Advanced
Maxx Remote advanced features: multi-way speaker channels, surround / crossmix layouts, and reusable speaker presets.
Goal / when to use
Use these Maxx Remote topics after the basic stereo / mono workflow is solid.
1 - Multi-way channels
Represent one loudspeaker cabinet as a single channel with 2 / 3 / 4 amp ways.
Goal / when to use
Use a multi-way channel when one physical speaker cabinet needs several amplifier outputs (for example low / mid / high). You still control the cabinet as one channel, while each way holds driver-specific DSP.
Prerequisites
Create multi-way channels
- Open CHANNELS → MAP | CREATE → + CHANNEL.
- Enable MULTI-WAY MODE.
- Set NR OF WAYS to 2, 3, or 4.
- Name the parent channels and click CREATE CHANNELS.
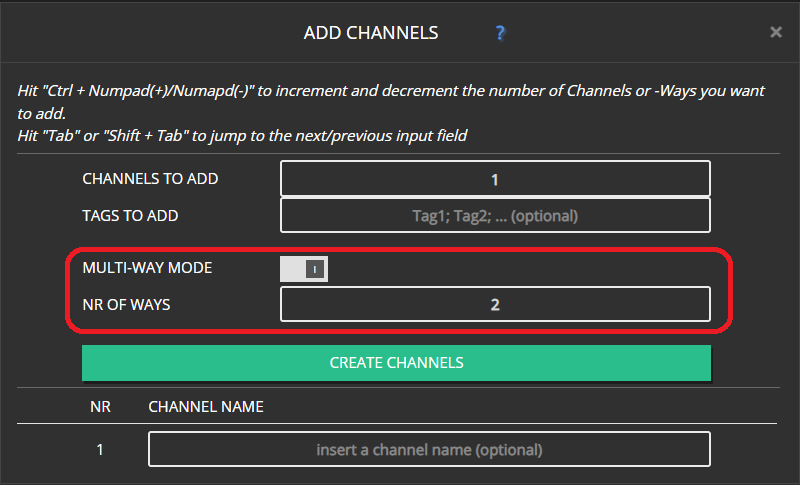
Expected result
Each new channel is a parent cabinet with fixed child ways (not separately deletable).
Convert an existing channel
- Open the channel edit dialog → MAIN.
- Enable multi-way (or change way count) and confirm the popup.
- You can pre-set the way count before enabling.
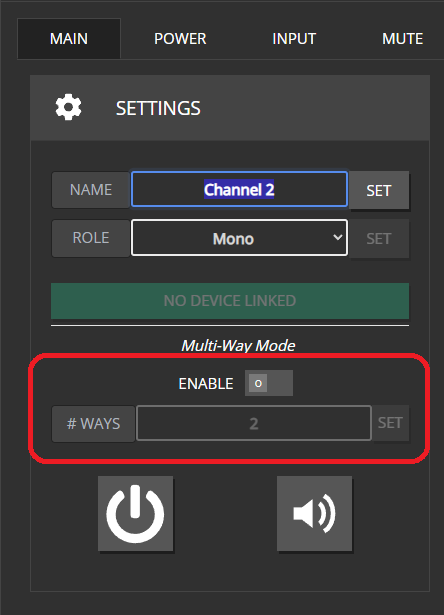
You cannot change multi-way configuration while the channel is linked to a device. Unlink first.
Note
Ways are always tied to their parent. They disappear only when you delete the parent, disable multi-way, or reduce the way count.
Naming
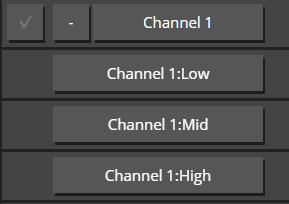
Ways are named from the parent plus a role:
| Ways | Roles |
|---|
| 2 | Low, High |
| 3 | Low, Mid, High |
| 4 | Sub, Low, Mid, High |
Link multi-way channels
Linking is like normal channels, with a few extras:
Open DEVICES → LINK CHs.
Multi-way parents show their way count.

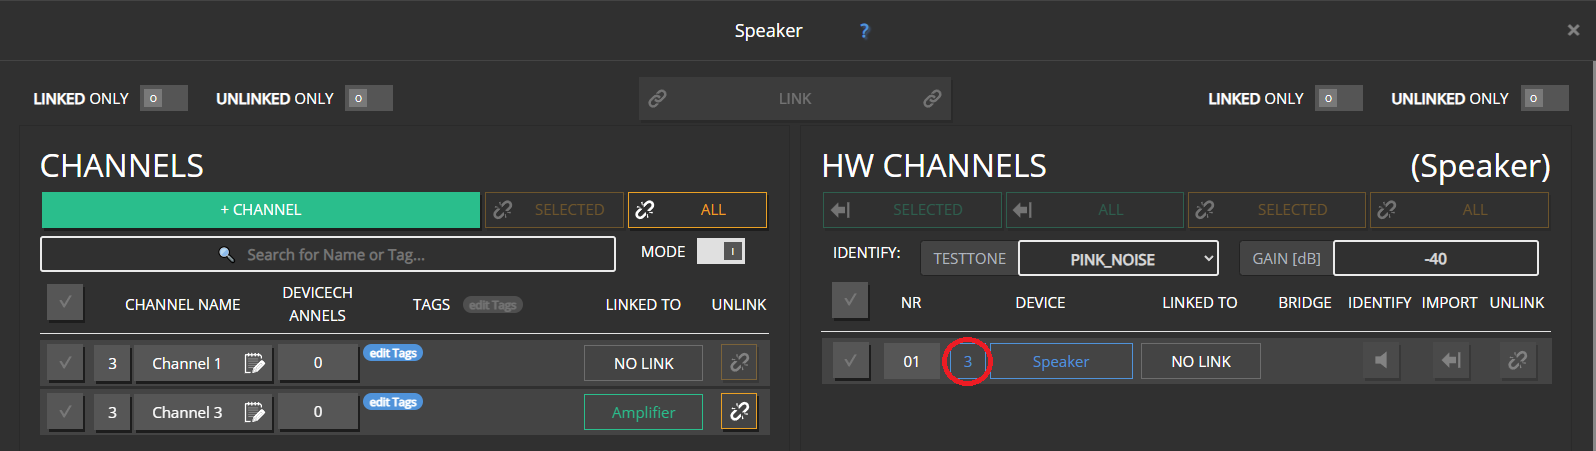
Use the PROJECT CHANNELWAYS tab to link individual ways (different amps or non-default order).
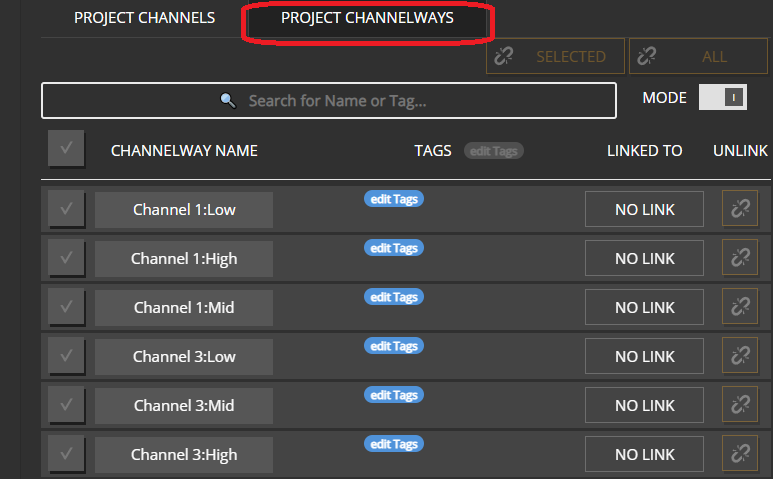
On the PROJECT CHANNELS tab, select the matching number of device channels before LINK unlocks (3-way → 3 HW channels).
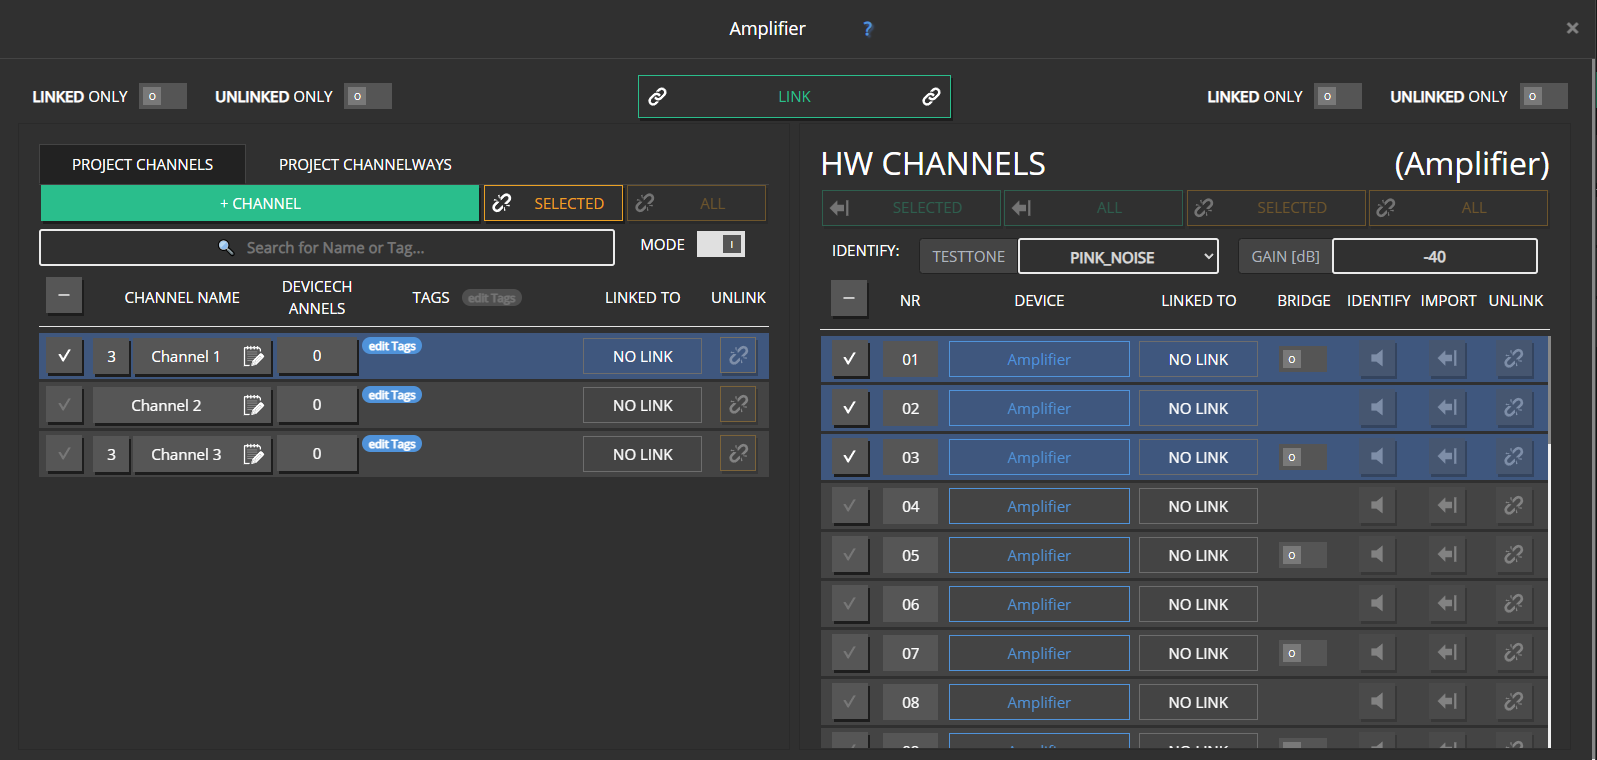
Drag and drop rules
Dragging a multi-way parent highlights the matching number of HW channels.
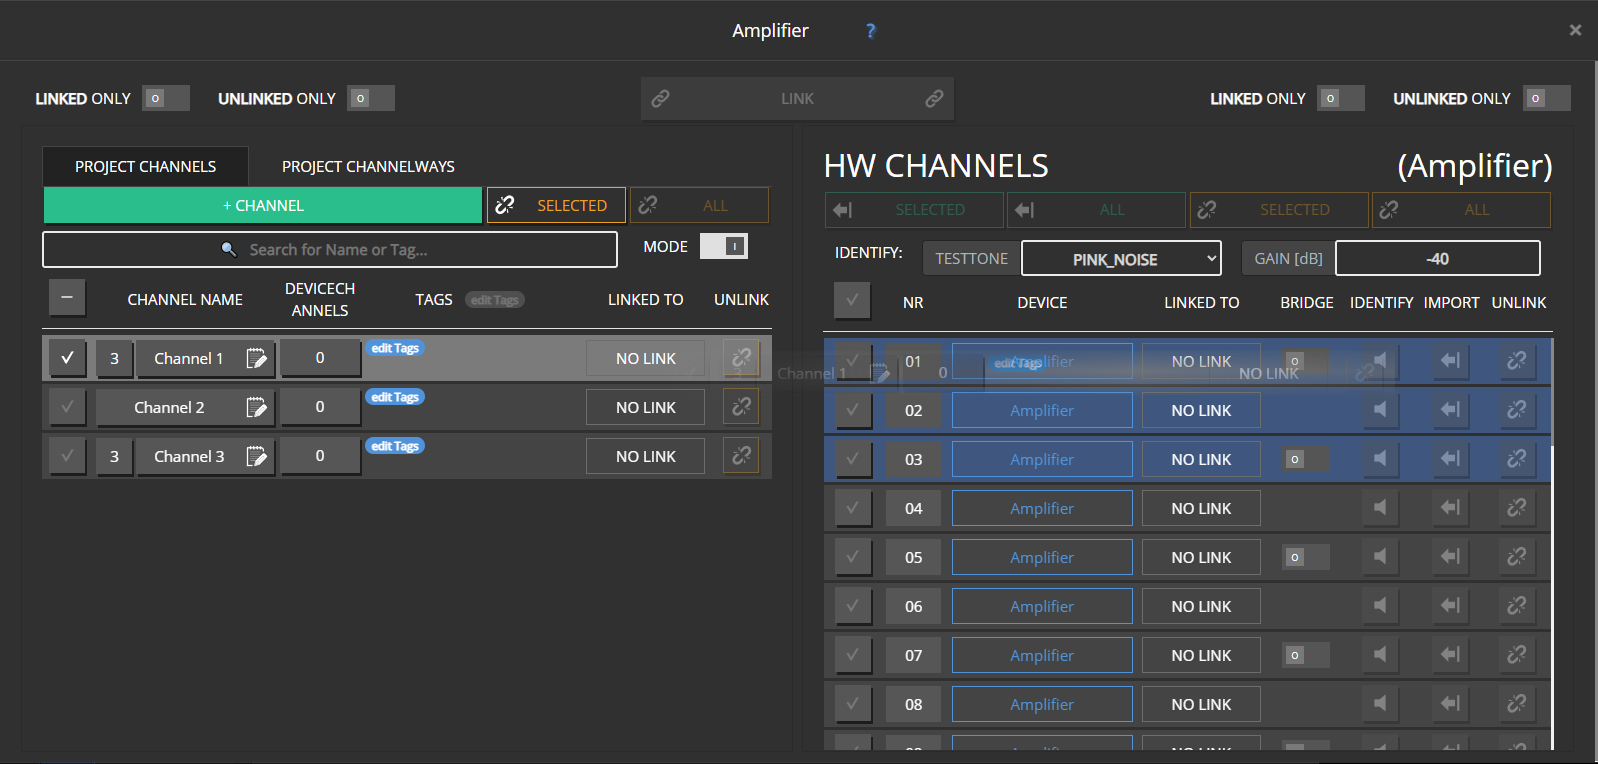
Dragging HW channels onto a parent requires the same count.
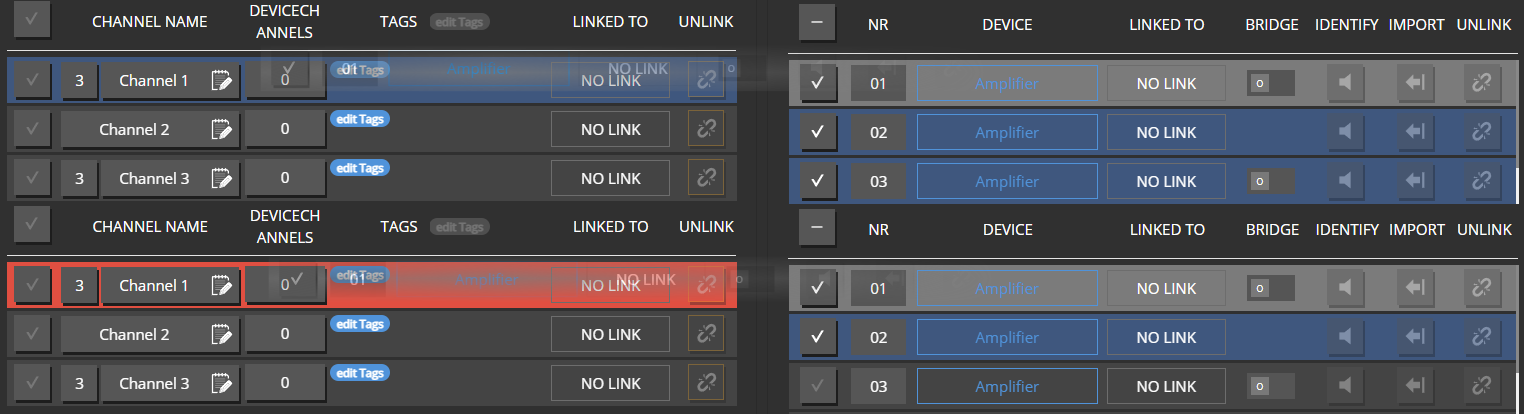
Extra HW channels continue to the next project channel in line.
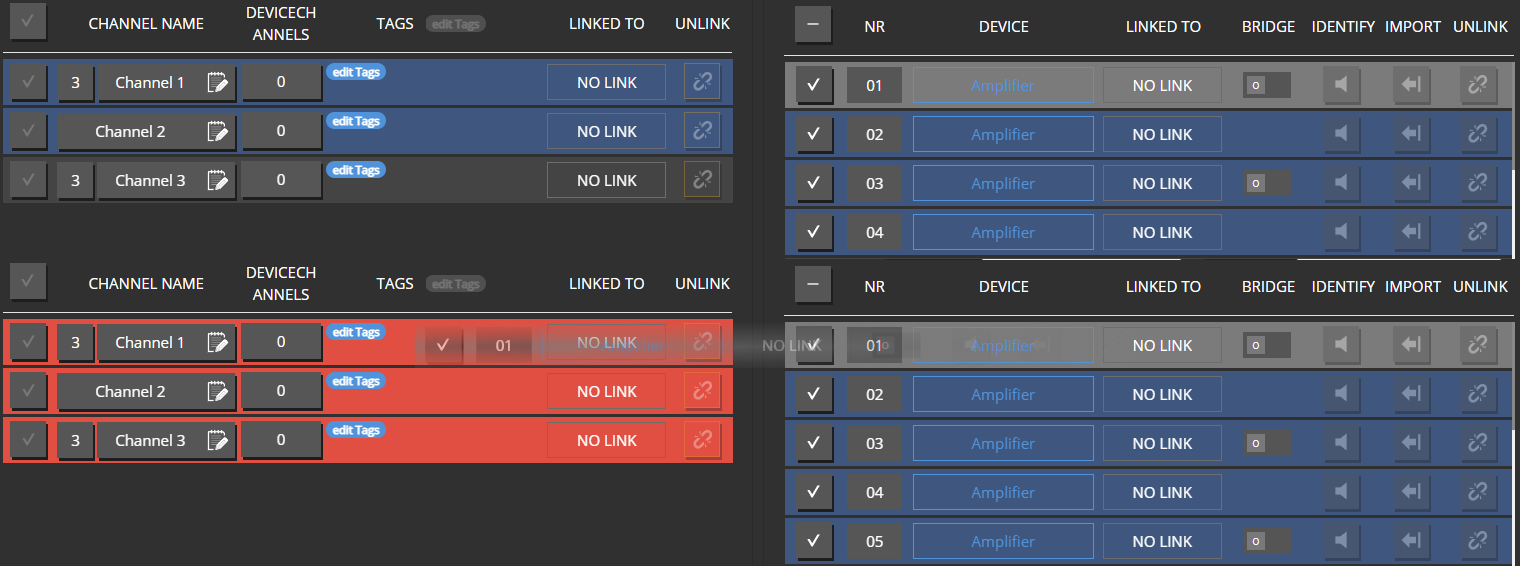
Whole-cabinet links assign HW channels low → high in list order.

Changing way count on an already linked channel is blocked on purpose — it would leave orphan ways or outputs. Unlink, reconfigure, then link again. Use the CHANNELWAYS tab when ways must land on different devices.
Speaker-style devices
Some amplifiers present as a single “speaker” device with a fixed internal way layout. For those:
- Link a matching multi-way parent as a whole — not individual ways.
- The linker filters to parents with the correct way count (shown next to the device name).
How settings combine
Parent settings and way settings combine much like group + channel. For limited DSP resources (EQ, FIR, limiters, speaker detection), a way’s own settings take precedence when the hardware cannot hold everything. Parent values may already include group contributions.
UI differences
CHANNELS overview
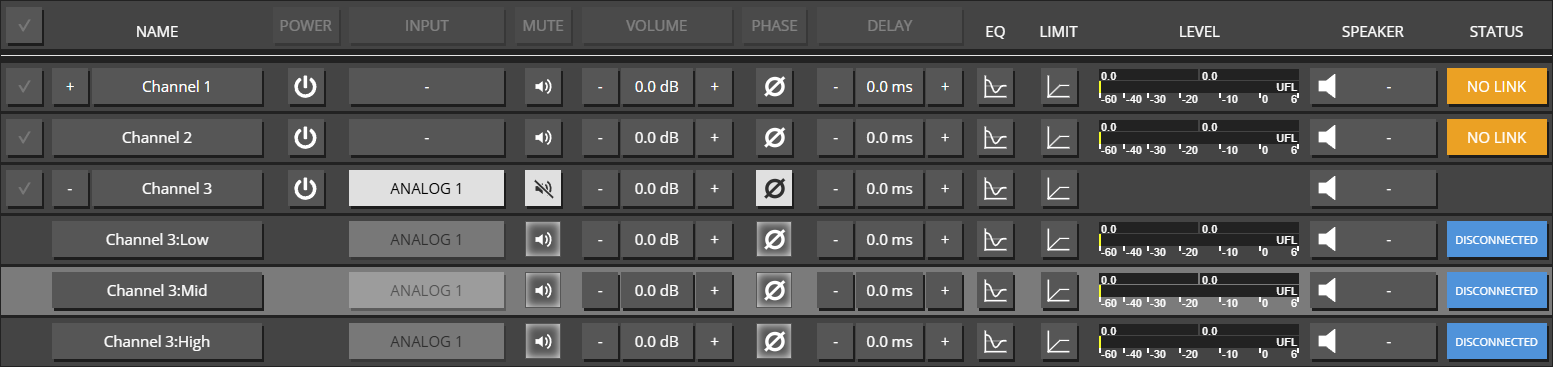
- Ways are not multi-selected for bulk edits — edit the parent for “whole cabinet” changes.
- Ways have no separate power control; INPUT on ways is read-only (inherited).
- Parent level meter shows the combined level of its ways; STATUS combines way status.
Edit dialogs
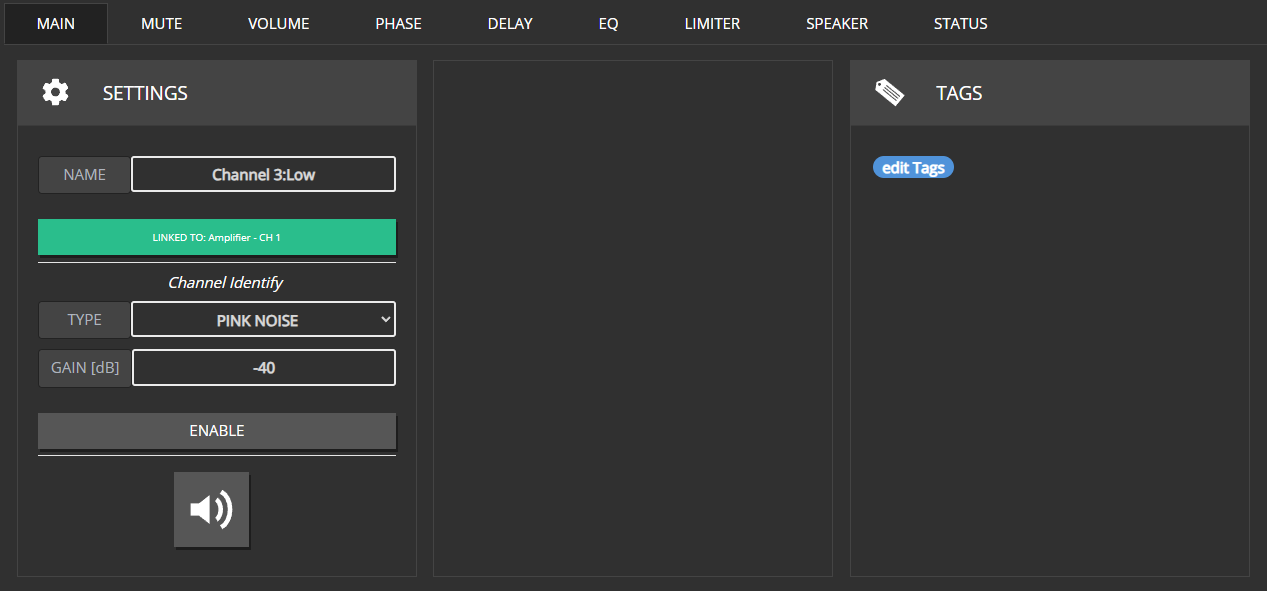
- Way editor: no Power / Input tabs; name read-only; no channel role / multi-way section.
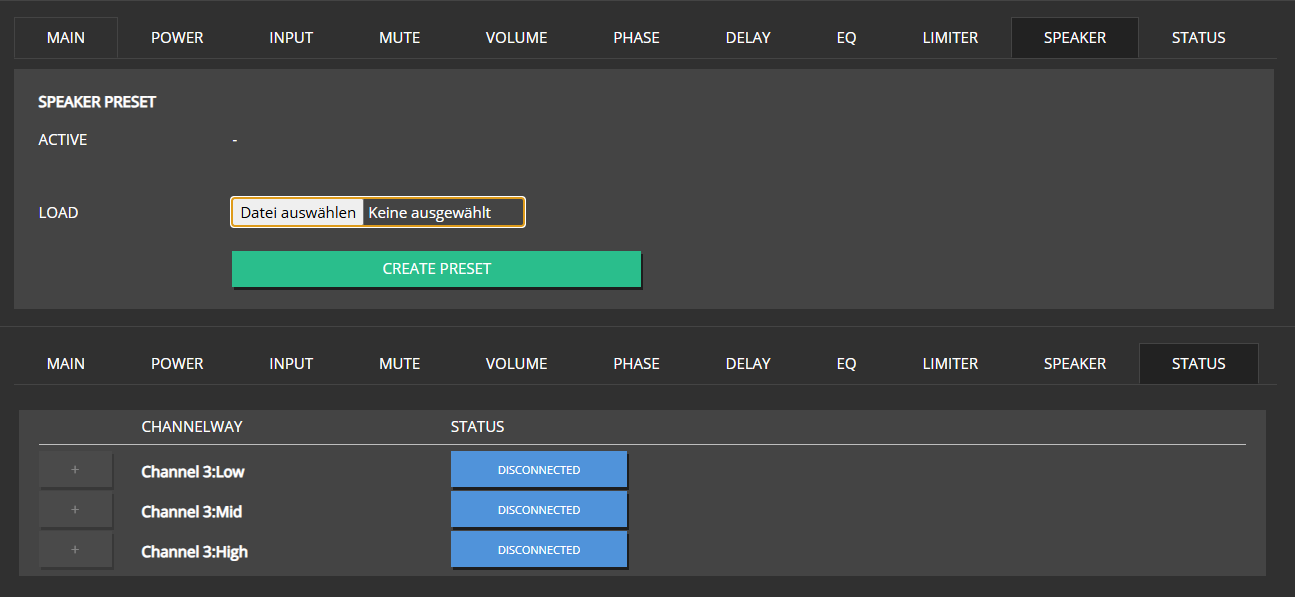
- Parent SPEAKER tab: no one-shot speaker detection (set per way).
- Parent STATUS lists way status (similar to groups listing members).
Common mistakes
Common mistakes
- Trying to rename or delete a single way — only the parent is editable that way.
- Linking three HW channels out of order without using the CHANNELWAYS tab.
- Applying a 2-way speaker preset to a 3-way parent (Speaker presets).
2 - Surround input sources
5.1 / 7.1 roles, group output setups, and crossmix strategies in Maxx Remote.
Goal / when to use
Route surround program (5.1 / 7.1 and related) into rooms when the speaker layout and the source layout are not always identical. For basic stereo INPUTS, start with Inputs and routing or Quick-Start.
Prerequisites
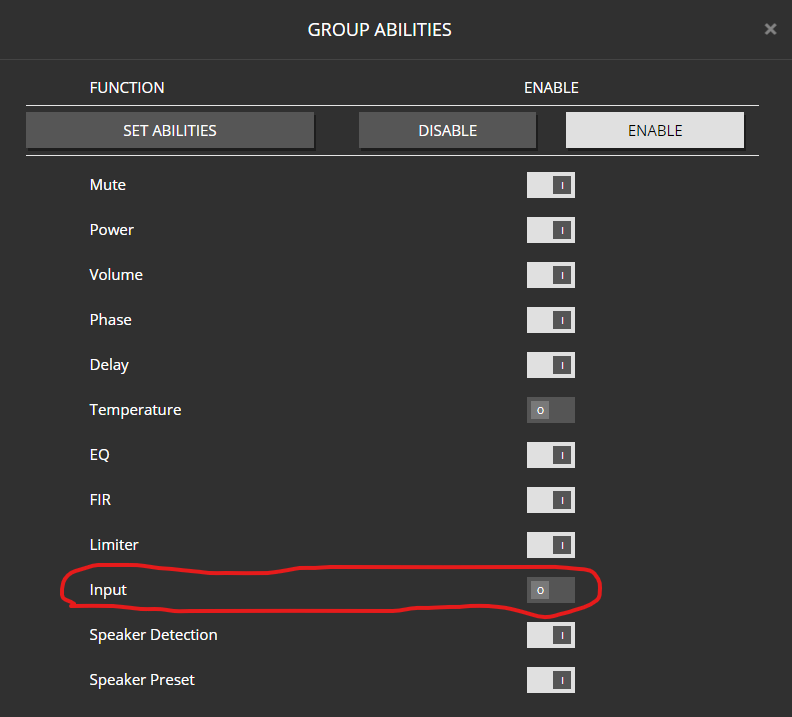
- Groups with Input ability enabled
- Channels created and given surround ROLEs
- Dante TX labels known for every surround leg
Surround channel names in Maxx Remote
Naming varies across the industry. Maxx Remote uses:
5.1

- Center (C)
- Left (L)
- Right (R)
- Left Surround (Ls)
- Right Surround (Rs)
- Low Frequency Effect (LFE)
7.1

- Center (C)
- Left (L)
- Right (R)
- Left Surround (Ls)
- Right Surround (Rs)
- Back Surround Left (Bsl)
- Back Surround Right (Bsr)
- Low Frequency Effect (LFE)
Note
LFE speaker position is not fixed in every room — place it as your design requires.
Same workflow as stereo INPUTS, with more RECEIVE LABEL entries — one per surround leg. See Quick-Start · inputs.
Channel roles
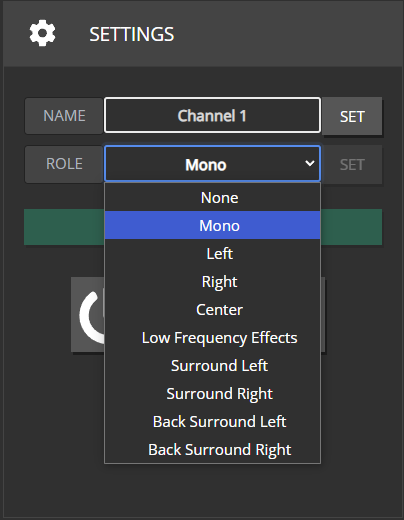
Assign each speaker channel a role. NONE receives no INPUT SOURCE streams. MONO usually receives a combination of legs (see crossmix).
Group output / channel setup
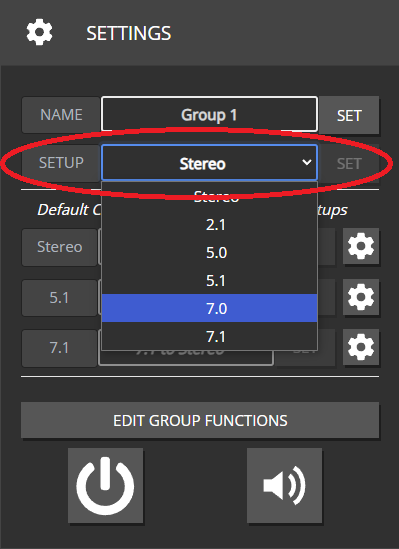
On GROUPS, set output / channel setup to match the room (Stereo, 2.1, 5.0, 5.1, 7.0, 7.1, …). Every role in that setup should exist on at least one mapped channel.
Missing or extra roles do not always hard-error — you may simply get silent speakers or unused streams.
Roles included in each output setup
Stereo: L, R
2.1: L, R, LFE
5.0: C, L, R, Ls, Rs
5.1: C, L, R, Ls, Rs, LFE
7.0: C, L, R, Ls, Rs, Bsl, Bsr
7.1: C, L, R, Ls, Rs, Bsl, Bsr, LFE
Disabling the group Input ability hides output-setup and crossmix controls.
Crossmix (upmix / downmix)
What it is
When the INPUT SOURCE layout and the group speaker layout differ, Maxx Remote needs a matrix that maps input legs to output roles. Downmix and upmix are both handled as CROSSMIX strategies.
Crossmix page
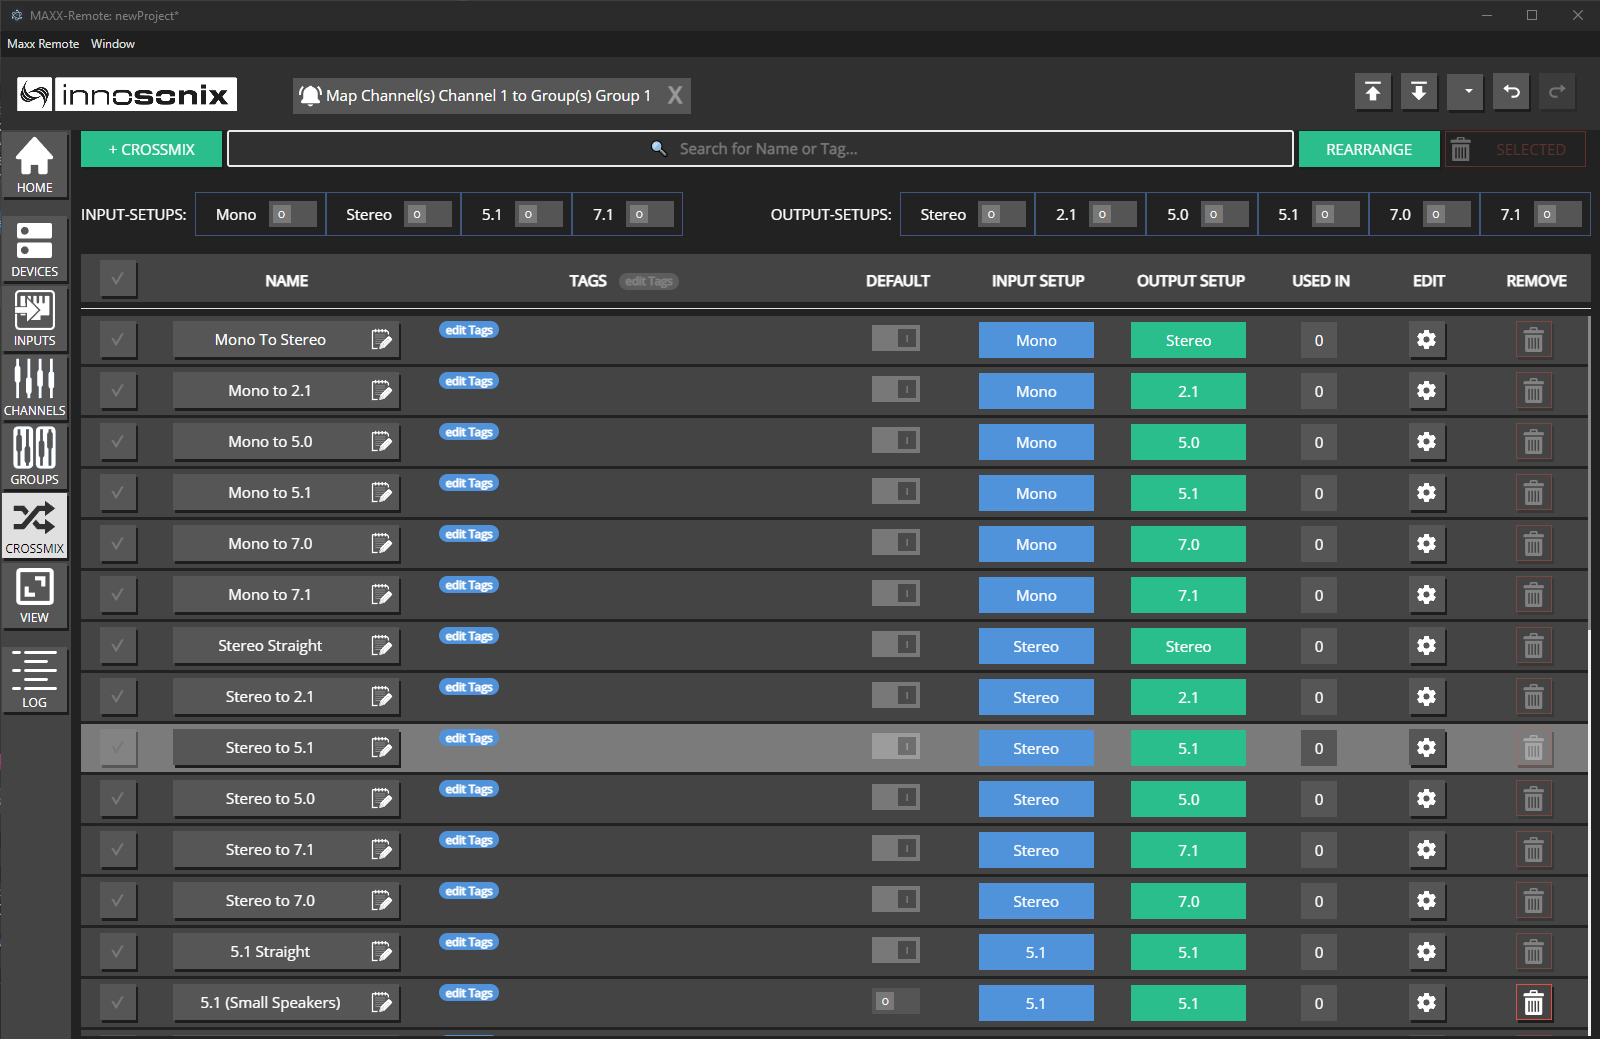
- Open CROSSMIX.
- Review built-in strategies for each in/out pair; edit or add your own (+ CROSSMIX).
- Filter by input / output setup when the list is long.

Note
Pre-defined strategies are editable (and deletable) — but a combination must always keep one global default.
Assignment priority (highest wins)
- INPUT SOURCE + GROUP specific strategy
- GROUP strategy for an input setup
- Global default for that in/out pair
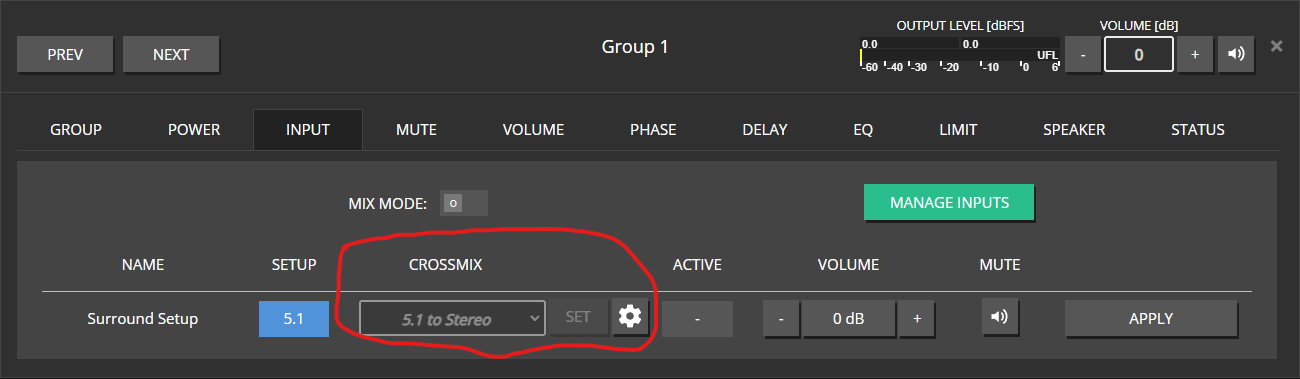
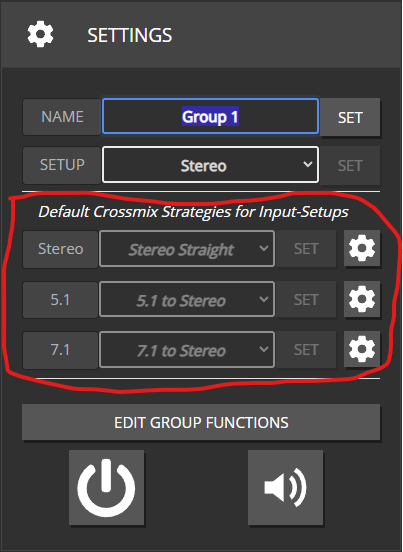

Maxx Remote always picks a strategy (even for exact matches) by checking from highest priority to lowest. Gear icons open the editor for the selected / effective strategy.
Add / edit a crossmix
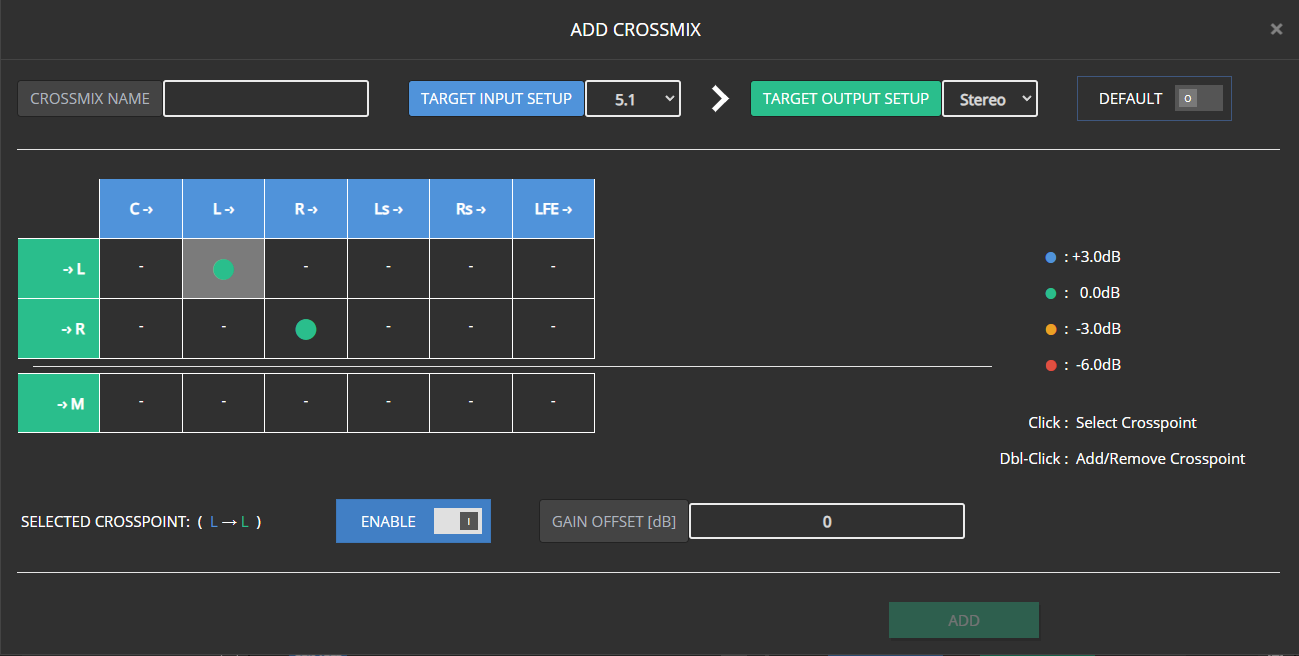
Rows = output roles, columns = input legs.
Enable crosspoints (double-click, or select + Enable).
Set Gain Offset on active points (common 0 / ±3 / −6 values are color-coded).
Name the strategy to unlock Add; use Save or Save As New when editing.

Mark Default only when this should become the global fallback for that in/out pair.
You cannot change in/out setup on the current global default (would remove the fallback). Non-defaults can change freely.


Changing setup on a strategy that was assigned to a group/input clears that assignment; Maxx Remote falls back to the next strategy in the chain.
Note
Crossmix is why each input-capable group needs an output setup. Without it, Maxx Remote cannot decide whether a Left channel should get only L or a surround-to-stereo downmix.
Expected result
Surround legs land on the intended speakers; intentional up/downmix uses the strategy you selected; Dante shows the resulting subscriptions.
Common mistakes
Common mistakes
- 5.1 source into a stereo group with no reviewed downmix.
- Forgetting LFE / Center roles in the room.
- Trying to delete the only global default crossmix for a pair.
- Disabling group Input ability and wondering where setup controls went.
3 - Speaker presets
Create, protect, and apply speaker presets for single- and multi-way channels.
Goal / when to use
Package a finished speaker tuning so you can reuse it on other channels or jobs. From Maxx Remote 1.13.0, presets are created and edited in Maxx Remote (not only on the amplifier).
For multi-way cabinets, read Multi-way channels first.
Prerequisites
- Channel (or multi-way parent) tuned the way you want
- Matching way count on any target channel that will load the preset
What a preset stores
Typical fields included:
- Volume
- Phase invert
- Delay
- EQ
- FIR
- Limiters
Create a preset
- Finish tuning on a regular or multi-way channel.
- Open the channel edit dialog → SPEAKER tab (use the parent for multi-way).
- Click CREATE PRESET.
- Enter metadata. Optionally set a password so only authorized users can edit later.
- Confirm creation / export as needed (
.spkr files).
Note
Presets are encrypted/encoded. Settings are not readable as plain text in exported files or project storage.
Expected result
You have a reusable speaker preset file / project preset you can apply elsewhere.
Edit a preset
- Apply the preset to a channel (or open a channel that already has it).
- SPEAKER tab → EDIT (enter password if prompted).
- The UI focuses on the preset editor channel(s).
- Change DSP, then SAVE or SAVE AS NEW / abort as offered.
Each edit increments an internal revision so two files with the same name/id can be compared for which is newer when exporting.
Apply a preset
- Open the target channel or group → SPEAKER.
- Use Select file (or the preset picker) and choose a
.spkr file. - Confirm the way configuration matches (2-way preset → 2-way channel only).
Groups
- Mapped channels inherit a group’s speaker preset unless the channel already has its own.
- If several groups provide presets, the channel uses the preset from the group that was mapped first — avoid stacking conflicting group presets.
- Way-count mismatches on some members are skipped for those members.
Expected result
Target channels show the preset on the SPEAKER tab; amp output follows after link/sync.
Legacy .speaker presets
Presets created on MAXX devices (.speaker) still load, but:
- They are not editable in Maxx Remote
- New
.spkr presets take precedence; applying a new preset removes the legacy one - A channel prefers a new preset (even from a group) over a legacy preset on the channel itself
Common mistakes
Common mistakes
- Loading a 3-way preset onto a single-way channel.
- Password-protecting a preset and losing the password — editing stays locked.
- Assigning different speaker presets on overlapping groups for the same channels.