Maxx Remote
Maxx Remote is Innosonix project-based control for multiple amplifiers: design channels and groups, tune offline, then link to real outputs including micro MAXX.
Maxx Remote is the project-based control software for Innosonix amplifiers. You design the system as channels (speakers) and groups (rooms or zones), then link those to real amplifier outputs when the hardware is available. micro MAXX amplifiers have full Maxx Remote support alongside other MAXX models.
What / when / how: use Maxx Remote when one site has many amplifiers or you need room-level groups, offline projects, or undo/redo while tuning. Install the Desktop app or Docker server, create a project, add channels and groups, link devices, then operate from GROUPS / CHANNELS / VIEW.
Use Maxx Remote when you need:
- One place to tune and operate many amplifiers
- Groups for room-level volume, mute, EQ, and routing
- Offline planning before the amps are on site
- Undo / redo while dialing in a system
- Operator-friendly VIEW pages for day-to-day control
Desktop vs Server
| Form | Best for | How you open it |
|---|
| Desktop application | Design, commissioning, laptop use on site | Portable app (Windows / macOS / Linux) from the downloads page |
| Server (Docker) | Always-on control in a rack or server room | Docker image; open http://<host>:8000 in a browser |
Both forms run the same Maxx Remote server and web UI. The Desktop app includes the server; Docker exposes the same UI on port 8000.
Maxx Remote vs Maxx Control
| Need | Use |
|---|
| One amplifier, quick local tweaks, no install | Maxx Control (built into each device) |
| Multiple amplifiers, rooms, groups, offline projects | Maxx Remote |
| Device network / IP / firmware setup | IDFM first |
Important
Once a device is linked and controlled from Maxx Remote, treat Maxx Remote as the source of truth. Changing the same channels in Maxx Control can create an Out of Sync state.
See the full comparison table on the Software overview.
Recommended reading path
- Concept — channels, groups, devices, and how values add up
- Installation — Desktop or Docker
- Prerequisites — network, discovery, Dante, ports
- Quick-Start — L / R / Sub demo with music
- Projects — create, save, export, persist on Docker
- Build a system — channels, linking, inputs, tuning
- Everyday control — operate rooms and VIEW pages
- Advanced — multi-way speakers, surround, speaker presets
- Troubleshoot — sync, discovery, Dante, device replace
- GUI reference and API when you need screen-level or integration detail
1 - Concept
How Maxx Remote thinks about channels, groups, devices, and output levels.
Goal / when to use
Read this once before you build a project. Maxx Remote sits between your speakers / rooms and the amplifier hardware, so you can tune and operate without constantly asking “which amp, which output?”
Mental model
Maxx Remote is an abstraction layer over amplifier outputs. It does not matter whether 1,000 speakers sit on thirty-two 32-channel amplifiers or on many smaller units — you work with project channels and groups.
As an operator or tuner, you usually care about this speaker or this room, not which physical output is used that day. Linking can change later; the channel settings stay in the project.
System overview

Desktop / Server and UI
Maxx Remote always consists of:
- A server that holds the project and talks to amplifiers
- A web UI (the screens you use in the browser or Desktop window)
Access the UI at http://localhost:8000 on the machine running the server (or http://<server-ip>:8000 for Docker / remote hosts).
Objects you will use
| Object | What it means in the room |
|---|
| Channel (project channel) | One speaker (or speaker strip) with full DSP: volume, EQ, delay, mute, and more |
| Group | A room or zone that can adjust the same kinds of parameters for many channels at once |
| Device | An amplifier in the project (for example 8 / 16 / 24 / 32 outputs, depending on model) |
| HW channel | A physical amplifier output, for example CH1 on AMP1 |
How they relate
A channel behaves like a channel strip: you can set it directly.
If that channel also belongs to one or more groups, group values are added (summed) with the channel’s own values. The result is what the amplifier should play.
Example for volume:
| Source | Volume |
|---|
| Channel | −2 dB |
| Group 1 | −1 dB |
| Group 2 | +5 dB |
| Output | +2 dB |
When a channel is linked to a HW channel, Maxx Remote sends that output result to the device.

Because settings live in the Maxx Remote project, you can replace an amplifier or re-link speakers to different outputs without rebuilding the whole tuning from scratch.
Out of Sync
After a channel is linked, Maxx Remote periodically compares project data with the device. Someone can still change the amp from Maxx Control or other tools — Maxx Remote then reports OUT OF SYNC for the mismatched parameters.
Important
Do not use Maxx Control for day-to-day control of devices that Maxx Remote already owns. Data direction is Maxx Remote → device.
You resolve sync by aligning values in Maxx Remote with the device, or by pushing project data to the device (SYNC). Details: Troubleshoot.
Expected result
You understand that:
- Channels and groups are how you design and operate the system
- Devices and HW channels are how sound reaches the speakers
- Output levels are the sum of channel + group contributions
Common mistakes
Common mistakes
- Tuning only on the device UI while Maxx Remote is connected — this causes Out of Sync.
- Expecting the CHANNELS list to show “group-only” values — CHANNELS shows the final output.
- Thinking a channel can live on only one group — a channel can belong to multiple groups.
2 - Installation
Install Maxx Remote as a portable Desktop app or run it as a Docker server.
Goal / when to use
Get Maxx Remote running so you can open the UI and create or load a project.
- Choose Desktop for commissioning laptops and day-to-day design work.
- Choose Docker for an always-on server that browsers can reach on the network.
Prerequisites
- Supported OS for Desktop, or a host that can run Docker
- Network access to your amplifiers (see Prerequisites)
- For automatic discovery (amplifiers and Dante TX sources): the host must receive the UDP broadcast / multicast traffic listed under Ports and discovery — on Docker that means host networking
Desktop application
- Download Maxx Remote from the Innosonix downloads page.
- Unpack or place the portable application where you want it — no installer is required.
- Start the application.
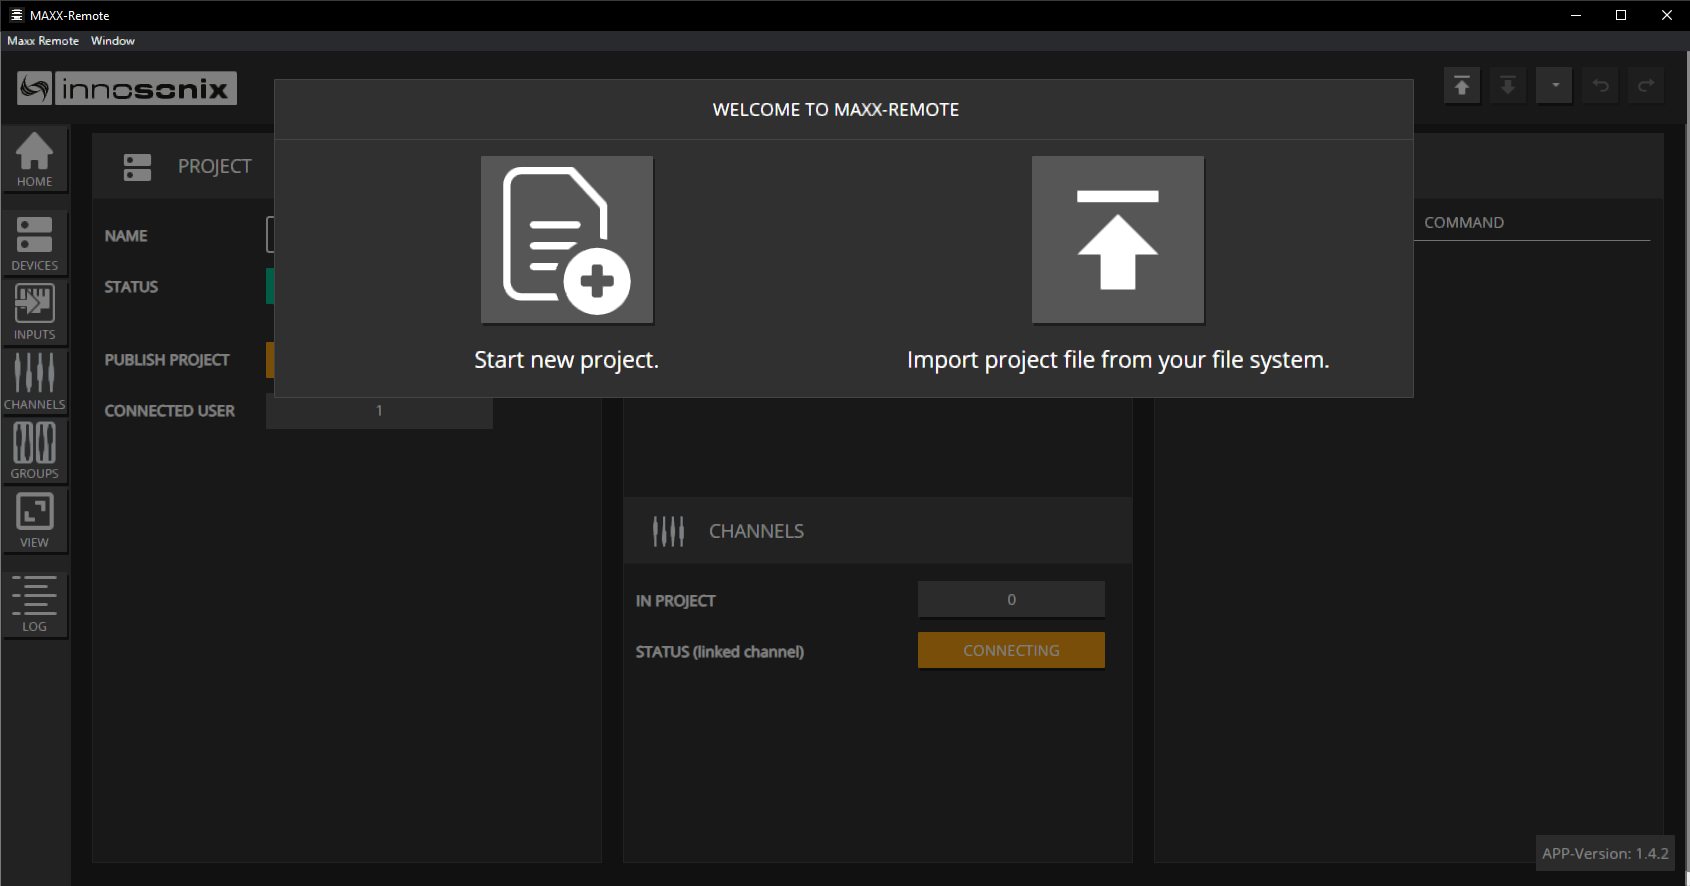
- On first launch, use Start a new project or import an existing project archive.
Expected result
The Maxx Remote window opens with the project splash / HOME UI. You can also reach the same UI in a browser at http://localhost:8000 while the Desktop app is running.
Server / Docker
Ports and discovery
Maxx Remote listens for more than the web UI. Automatic discovery uses UDP broadcast and multicast, which Docker’s default bridge network does not forward reliably when you only publish ports with -p.
| Traffic | Address / port | Purpose |
|---|
| TCP 8000 | host :8000 | Web UI and REST API |
| UDP 9453 | broadcast 255.255.255.255 | Innosonix amplifier discovery (INX / IDFM) |
| UDP 5353 | multicast 224.0.0.251 | mDNS — Dante device discovery (_netaudio-arc / _netaudio-cmc / _netaudio-dbc) |
| UDP 8702 | multicast 224.0.0.231 | Dante control-plane notifications (live TX updates) |
| UDP 8708 | multicast 224.0.0.233 | Dante heartbeats (device liveness) |
Maxx Remote also sends outbound unicast UDP to Dante devices (ARC channel queries, typically ports 4440 / 4444 / 4455, and CMC registration, typically 8800). Those are device-side ports — they are not something you “publish” on the container; the host firewall must allow the outbound path.
Why host networking?
Publishing individual UDP ports with -p maps unicast traffic into the container. Discovery needs broadcast (amplifiers) and multicast with IGMP joins (Dante / mDNS). On a Docker bridge those packets usually never reach the process — so ADD FROM NETWORK and Dante TX discovery stay empty even if you map every port above.
Recommended: host network (discovery works)
Use host networking whenever you want automatic amplifier scan or Dante TX discovery:
docker run --detach --name maxx-remote --network host innosonix/maxx-remote:latest
Once the container is running, open:
http://<docker-host-ip>:8000
Note
--network host is the approach used by Innosonix’s own deploy scripts. It is the simplest reliable way to put the process on the same L2 segment as amplifiers and Dante devices.
Alternative: published ports (UI only — no discovery)
If you only need the web UI and will add amplifiers by IP / hostname (and do not rely on Maxx Remote’s Dante discovery), bridge networking with a published HTTP port is fine:
docker run --detach \
  --name maxx-remote \
  -p 8000:8000 \
  innosonix/maxx-remote:latest
Compose equivalent:
services:
  maxx-remote:
    image: innosonix/maxx-remote:latest
    ports:
      - "8000:8000"
    # Discovery (INX + Dante) will not work reliably on the default bridge.
    # Prefer network_mode: host when you need ADD FROM NETWORK or Dante TX scan.
Do not expect a long -p 9453:9453/udp -p 5353:5353/udp … list to replace --network host for discovery. Map TCP 8000 for the UI; use host networking when discovery matters.
Persist project data (recommended)
Warning
If you start the container without a volume, the project lives only inside the container. Deleting or recreating the container deletes that data.
Option A — Export / import yourself
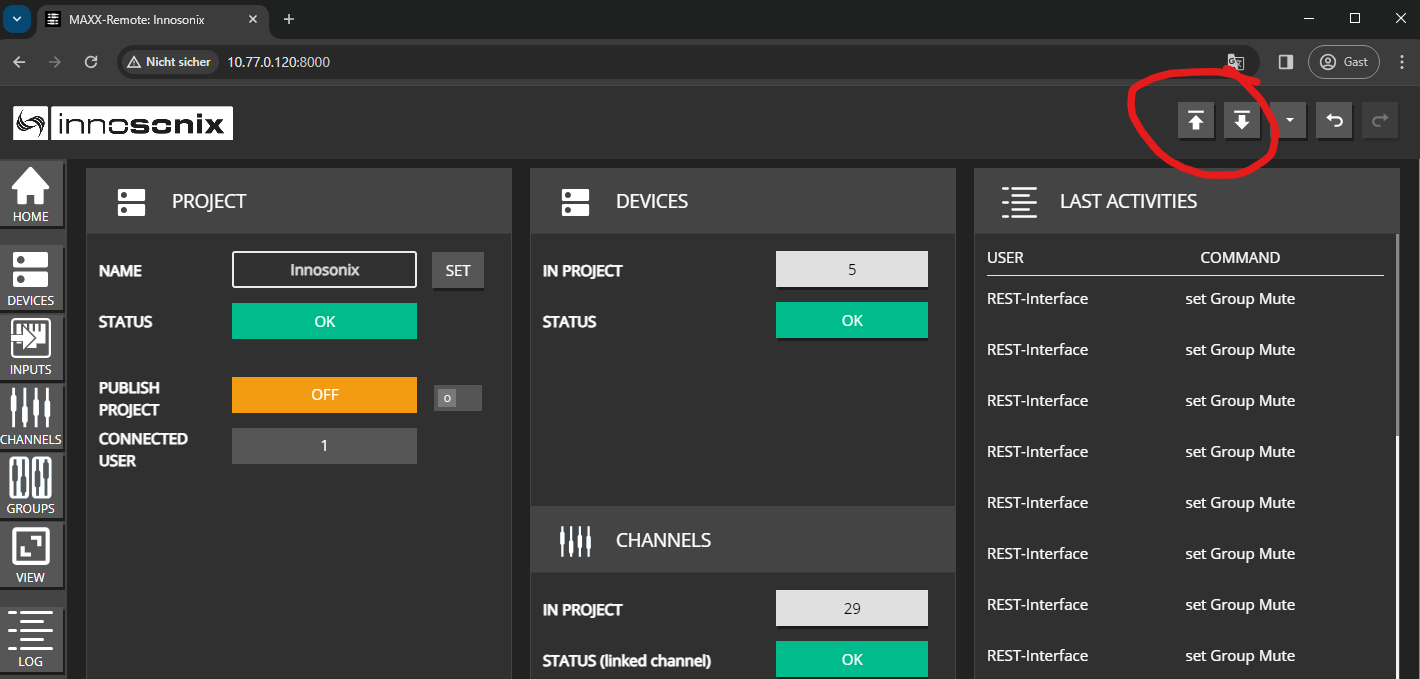
Use the UI Export / Import controls when you migrate to a new container.
Option B — Docker volume (preferred)
# create once
docker volume create maxx-remote-volume

docker run  --detach \
            --restart always \
            --name maxx-remote \
            --network host \
            --mount source=maxx-remote-volume,target=/root \
            innosonix/maxx-remote:latest
Expected result
Browsers on the network can open the Maxx Remote UI on port 8000, and projects survive container restarts when a volume is mounted. With --network host, ADD FROM NETWORK and Dante TX discovery can see devices on the same LAN segment.
Common mistakes
Common mistakes
- Running Docker without
--network host and wondering why ADD FROM NETWORK or Dante sources stay empty — discovery needs UDP broadcast 9453 plus Dante/mDNS multicast, not only published ports. - Assuming
-p 9453:9453/udp (or similar) is enough — bridge networking still breaks broadcast/multicast for discovery. - Recreating a container without a volume or export — project gone.
- Confusing port 8000 (UI / API) with discovery traffic (9453, 5353, 8702, 8708).
3 - Prerequisites
Network, discovery, Dante, and tools you need before commissioning with Maxx Remote.
Goal / when to use
Check this list before you expect amplifiers to appear automatically, Dante streams to route, or a Docker server to stay reachable.
1. Device network setup (IDFM)
Before Maxx Remote, put amplifiers on a working IP plan with IDFM (install):
- Discover devices.
- Set IP mode / address / hostname as required by the site.
- Update firmware if IDFM reports newer versions.
Tip
Always start network and firmware setup in IDFM. Maxx Remote assumes devices are already reachable.
2. Ports and reachability
| Traffic | Address / port | Purpose |
|---|
| TCP 8000 | host :8000 | Maxx Remote UI and REST API (http://host:8000, OpenAPI at /api-docs/) |
| UDP 9453 | broadcast 255.255.255.255 | Innosonix amplifier discovery (INX / IDFM) |
| UDP 5353 | multicast 224.0.0.251 | mDNS used for Dante device discovery |
| UDP 8702 | multicast 224.0.0.231 | Dante control-plane notifications |
| UDP 8708 | multicast 224.0.0.233 | Dante heartbeats |
Outbound (device-side ports Maxx Remote talks to, not listens on): Dante ARC queries typically 4440 / 4444 / 4455, CMC registration typically 8800.
Firewall / VLAN notes:
- The PC or Docker host must reach each amplifier’s management IP (HTTP/API used by Maxx Remote).
- Discovery broadcast/multicast usually do not cross routers. Across subnets, add amplifiers by hostname + IP instead of relying on scan.
- Docker: use
--network host for automatic INX and Dante discovery. Publishing only -p 8000:8000 is enough for the UI if you add devices manually — see Installation.
3. Dante (audio network)
If you use Dante input sources:
- Amplifiers and sources must share a working Dante network (often separate from or VLAN’d from control).
- Maxx Remote discovers Dante TX channels on the LAN (mDNS + multicast control plane above). You can still use Dante Controller (or equivalent) to confirm Transmit Channel@Hostname names when creating INPUTS.
- Maxx Remote can create dynamic Dante subscriptions (often shown with a
D: prefix in Dante Controller). - On Docker, Dante discovery needs the same host-network path as amplifier discovery — bridge
-p mappings are not enough.
Stereo / surround routing is covered in Inputs and routing and Surround input sources.
4. Control PC / server
- Desktop: portable Maxx Remote build for your OS
- Server: Docker host with enough disk for a volume (do not rely on ephemeral container storage)
- Browser: modern Chromium / Firefox / Edge for the web UI
5. Project planning (optional)
You can create channels, groups, EQ, and routing offline with no amplifiers present. Link hardware later on site. See Projects.
Expected result
- Amplifiers respond to ping / IDFM
- Maxx Remote UI opens on port 8000
- Amplifier and Dante discovery work on the same L2 segment (or you are ready to add amplifiers manually and pick TX names from Dante Controller)
Common mistakes
Common mistakes
- Skipping IDFM and fighting wrong IPs inside Maxx Remote.
- Expecting discovery across routed VLANs without static IPs.
- Putting control and Dante on incompatible networks, then blaming INPUTS.
- Opening an old static build on port 8000 while editing something else — always confirm which Maxx Remote instance you are talking to.
4 - Quick-Start
Guided demo: Left / Right / Sub on an MA32/D² with Dante music.
Goal / when to use
Get first music out of a simple system: three speakers (Left, Right, Sub) on an MA32/D², with group volume/EQ and a stereo Dante source (for example Dante Virtual Soundcard).
This is a guided walkthrough. For deeper topics afterward, use Build a system and Everyday control.
Prerequisites
- Maxx Remote installed and running (Installation)
- Amplifier on the network (Prerequisites, IDFM / install)
- Speakers on amp channels 1, 4, and 9 (or adapt the link steps)
- Dante TX available (hostname + transmit channel names)
1. Create a project
- Start Maxx Remote. On the splash screen, click Start a new project.
- Enter a project name and confirm.
Expected result
HOME opens for the new project.
2. Create channels and a group
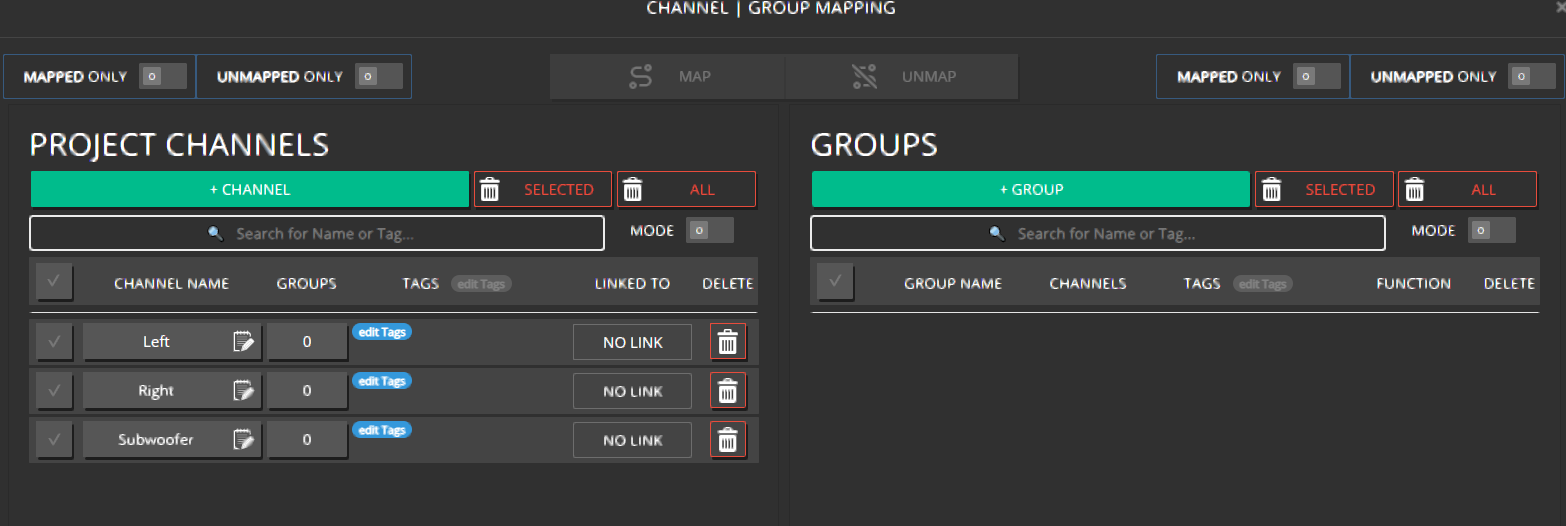
Open CHANNELS → MAP | CREATE.
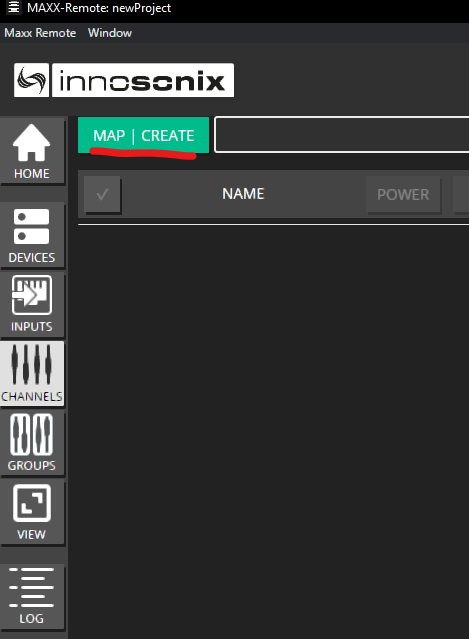
Click + CHANNEL, set CHANNELS TO ADD to 3, name them (for example Left, Right, Subwoofer), then CREATE CHANNELS.
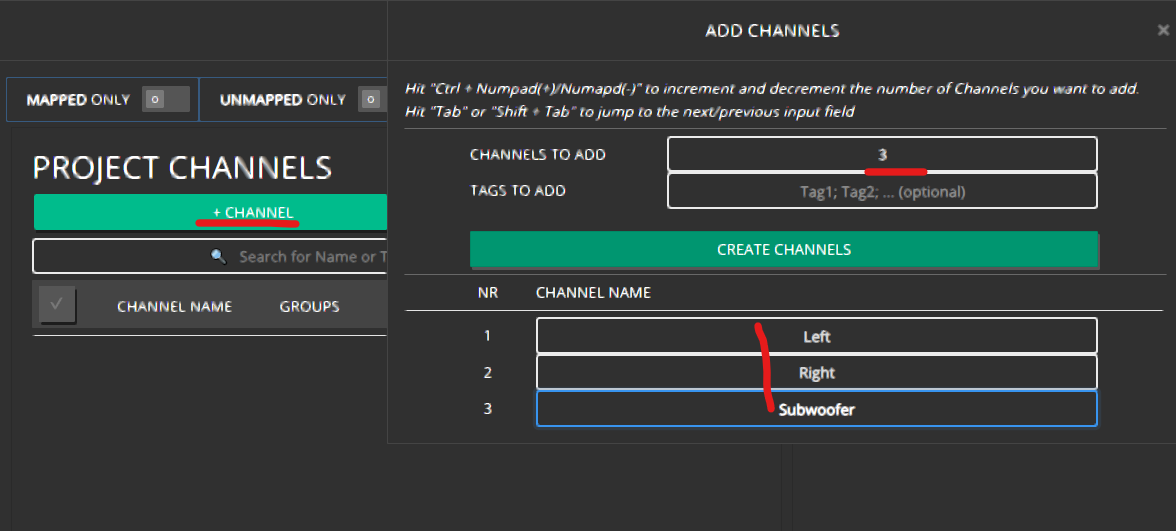
Confirm the three PROJECT CHANNELS exist. LINKED TO is empty until you connect hardware.
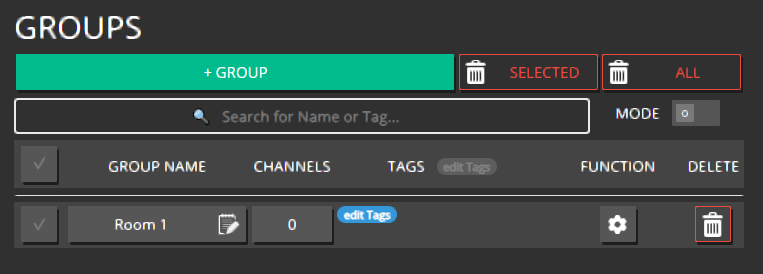
Click + GROUP, name it (for example ROOM 1), and create it.
Map all three channels into the group: drag and drop, or select them and click MAP.
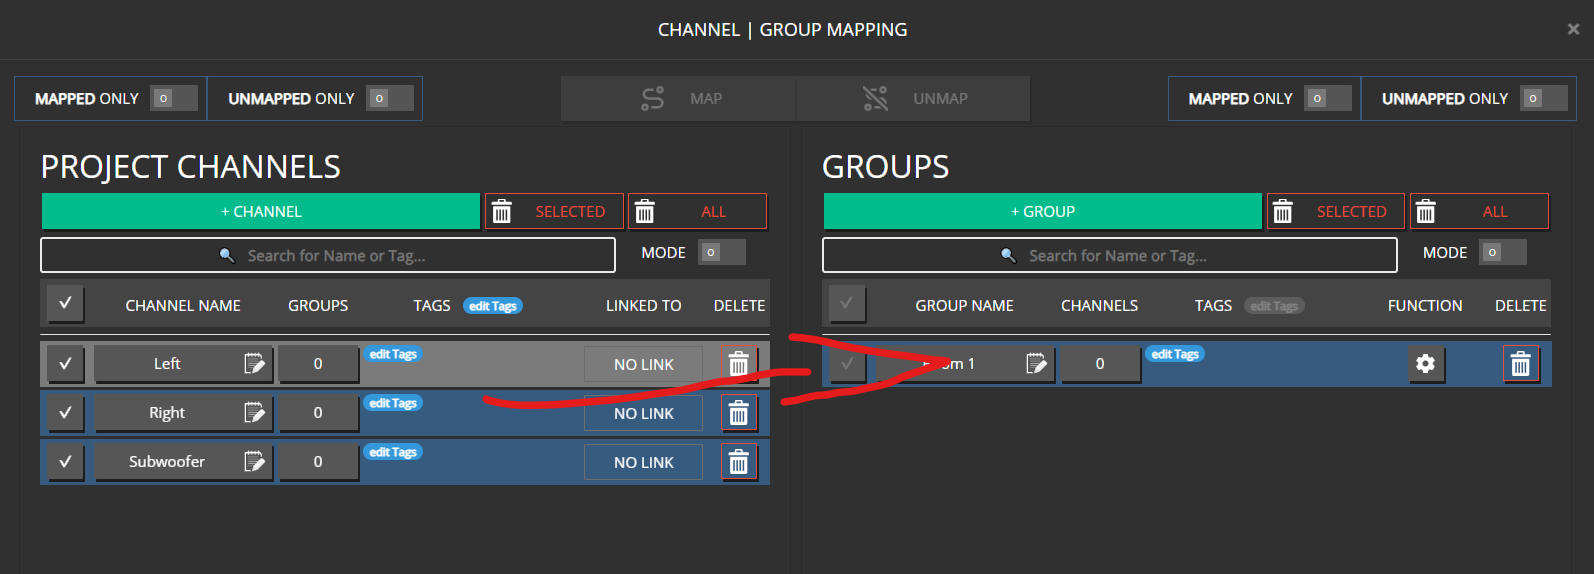
Hint
A channel can belong to multiple groups at the same time.
Expected result
Three unlinked channels mapped to ROOM 1.
3. Add the amplifier and link outputs
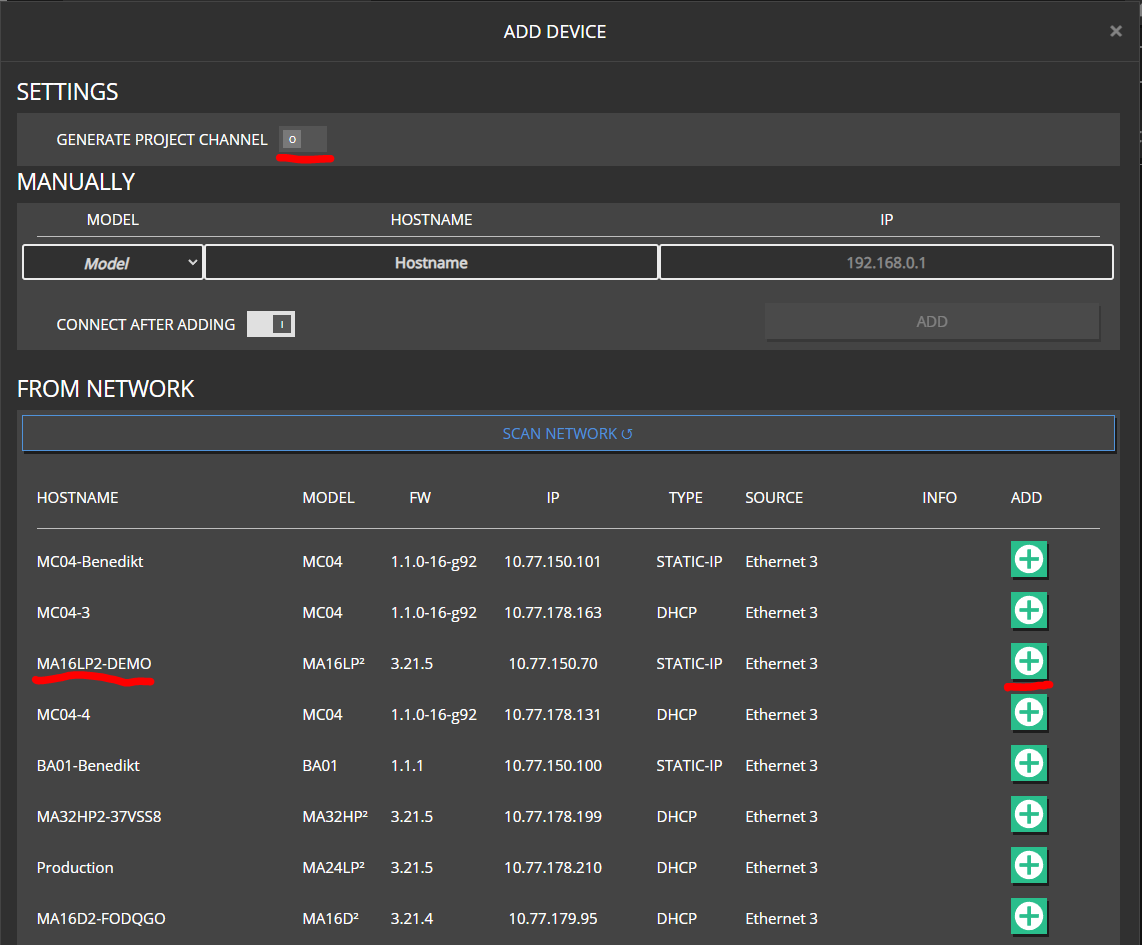
Open DEVICES → ADD DEVICE.
Add a device found on the network, or add manually (model + hostname).
Disable CREATE CHANNELS / GENERATE PROJECT CHANNELS if offered — you already created the three you need.
Note
A fixed IP is optional. Without it, hostname is resolved via discovery. For fixed installs, enter an IP to speed up reconnects.
Wait until Maxx Remote connects. Use CONNECT to disable network activity if needed.

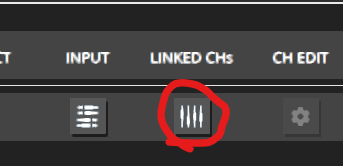
Open the LINK CHs (linked channels) control.
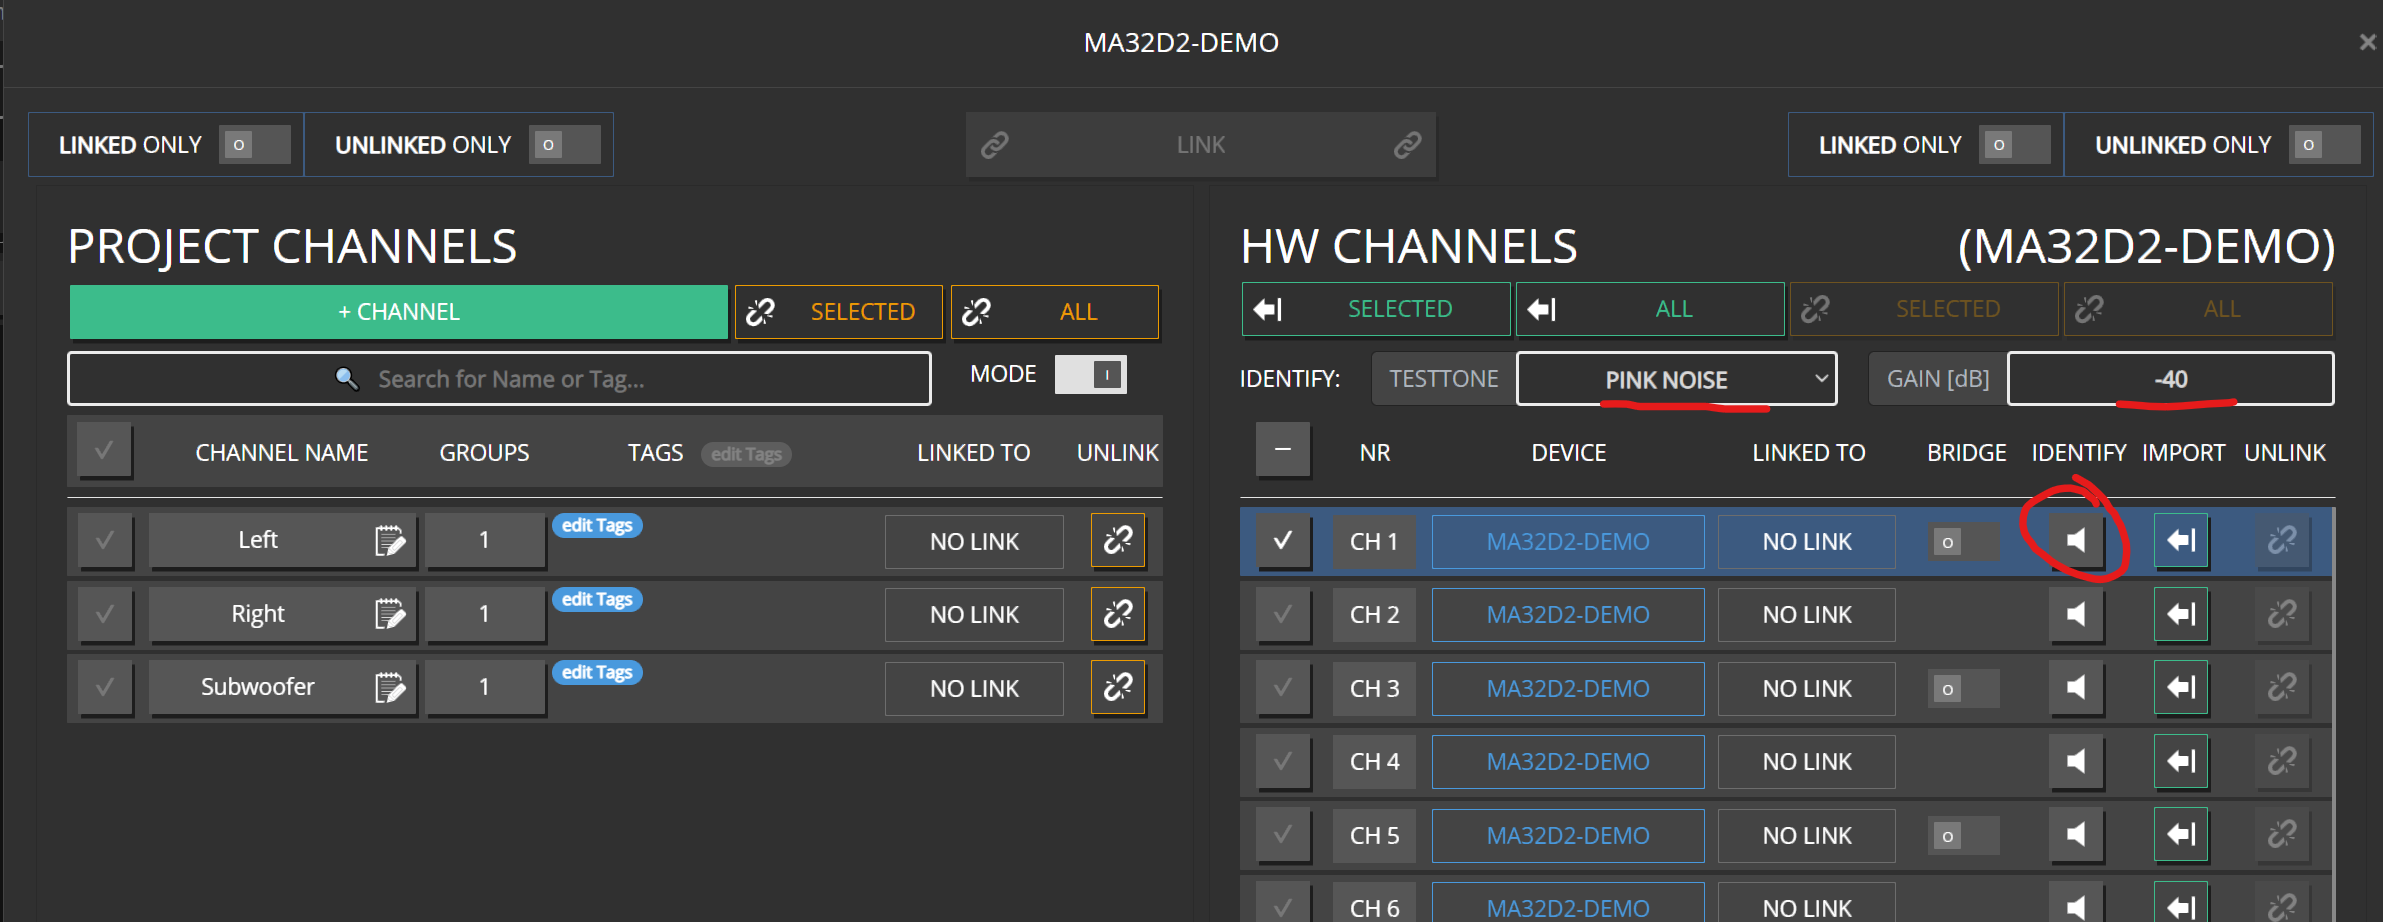
Use IDENTIFY to play a test tone (for example pink noise at −40 dB) and confirm the physical speaker.
Link each project channel to the correct HW channel (drag and drop or LINK).
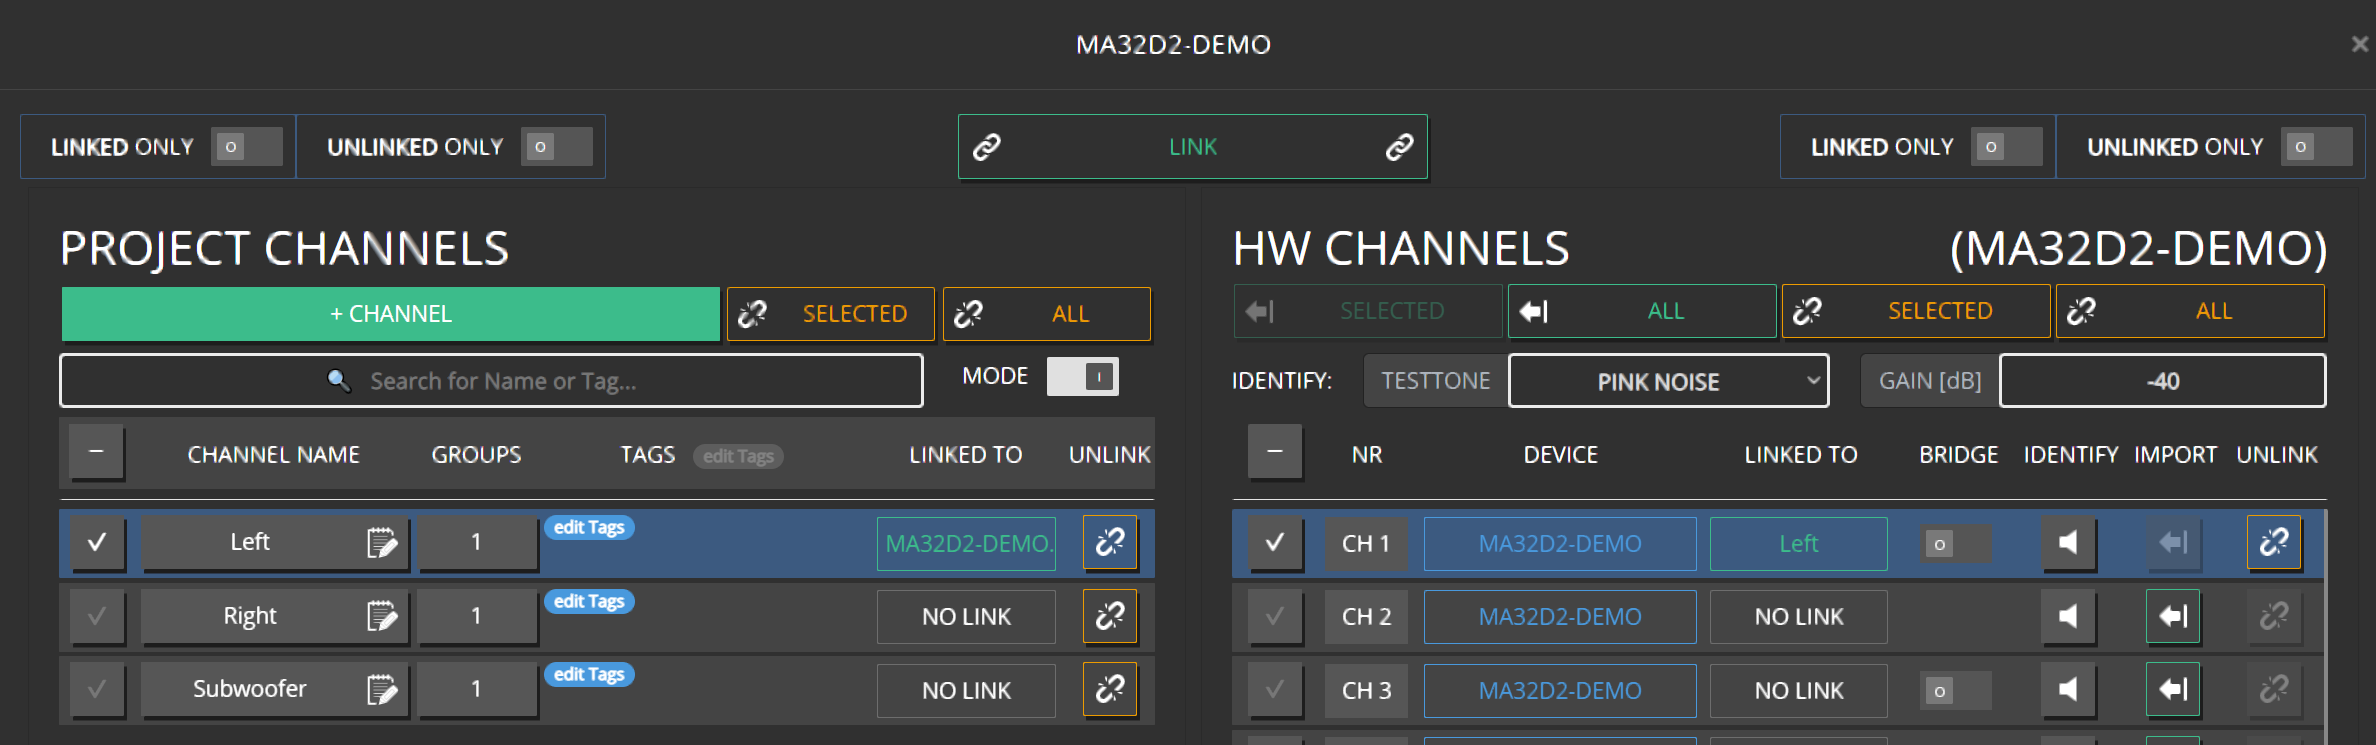
Finish Left, Right, and Sub.
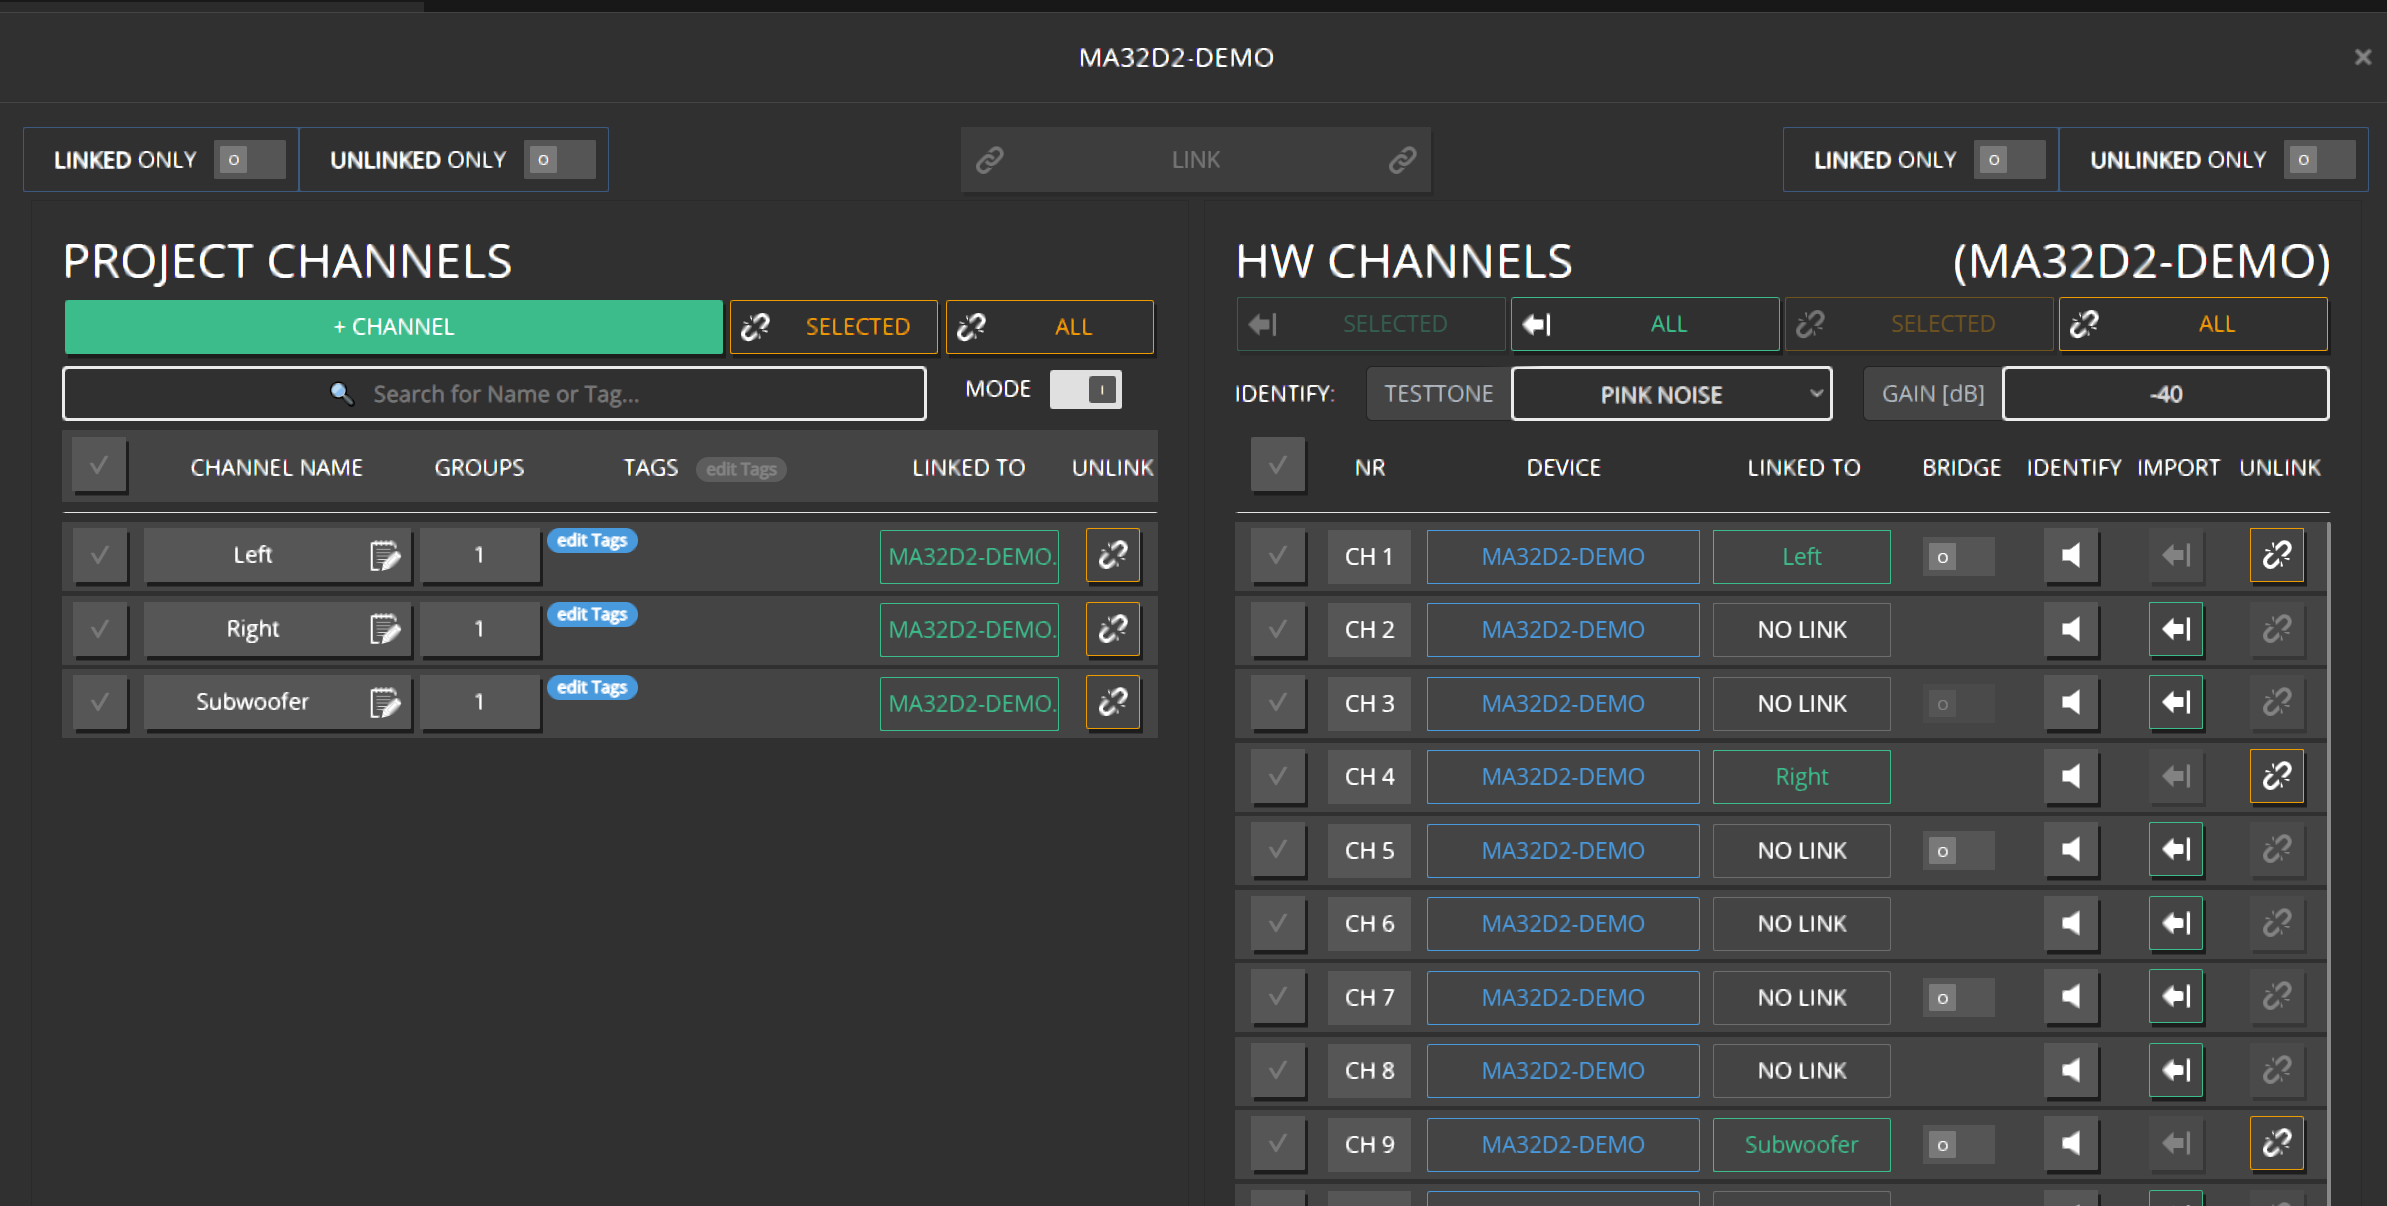
Reorder later by dragging HW channels between empty slots, or swap by dropping onto an assigned slot.
Expected result
All three project channels show a hardware link; identify confirms the correct speakers.
4. Set safe group volume
Open GROUPS and click the VOLUME field for ROOM 1.
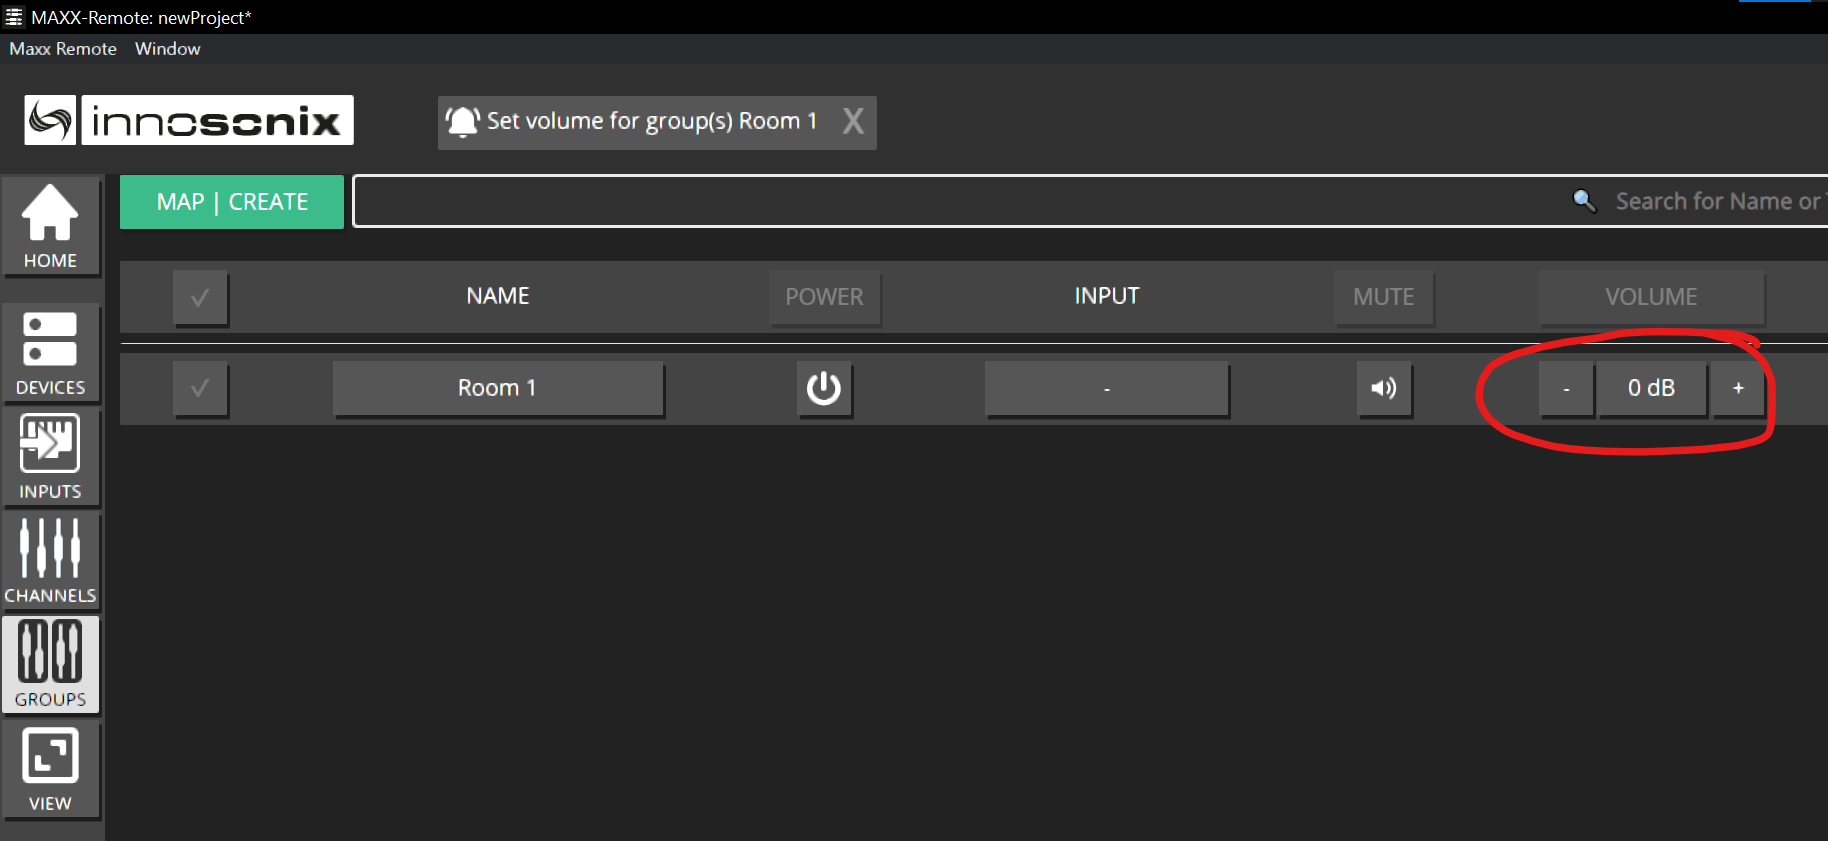
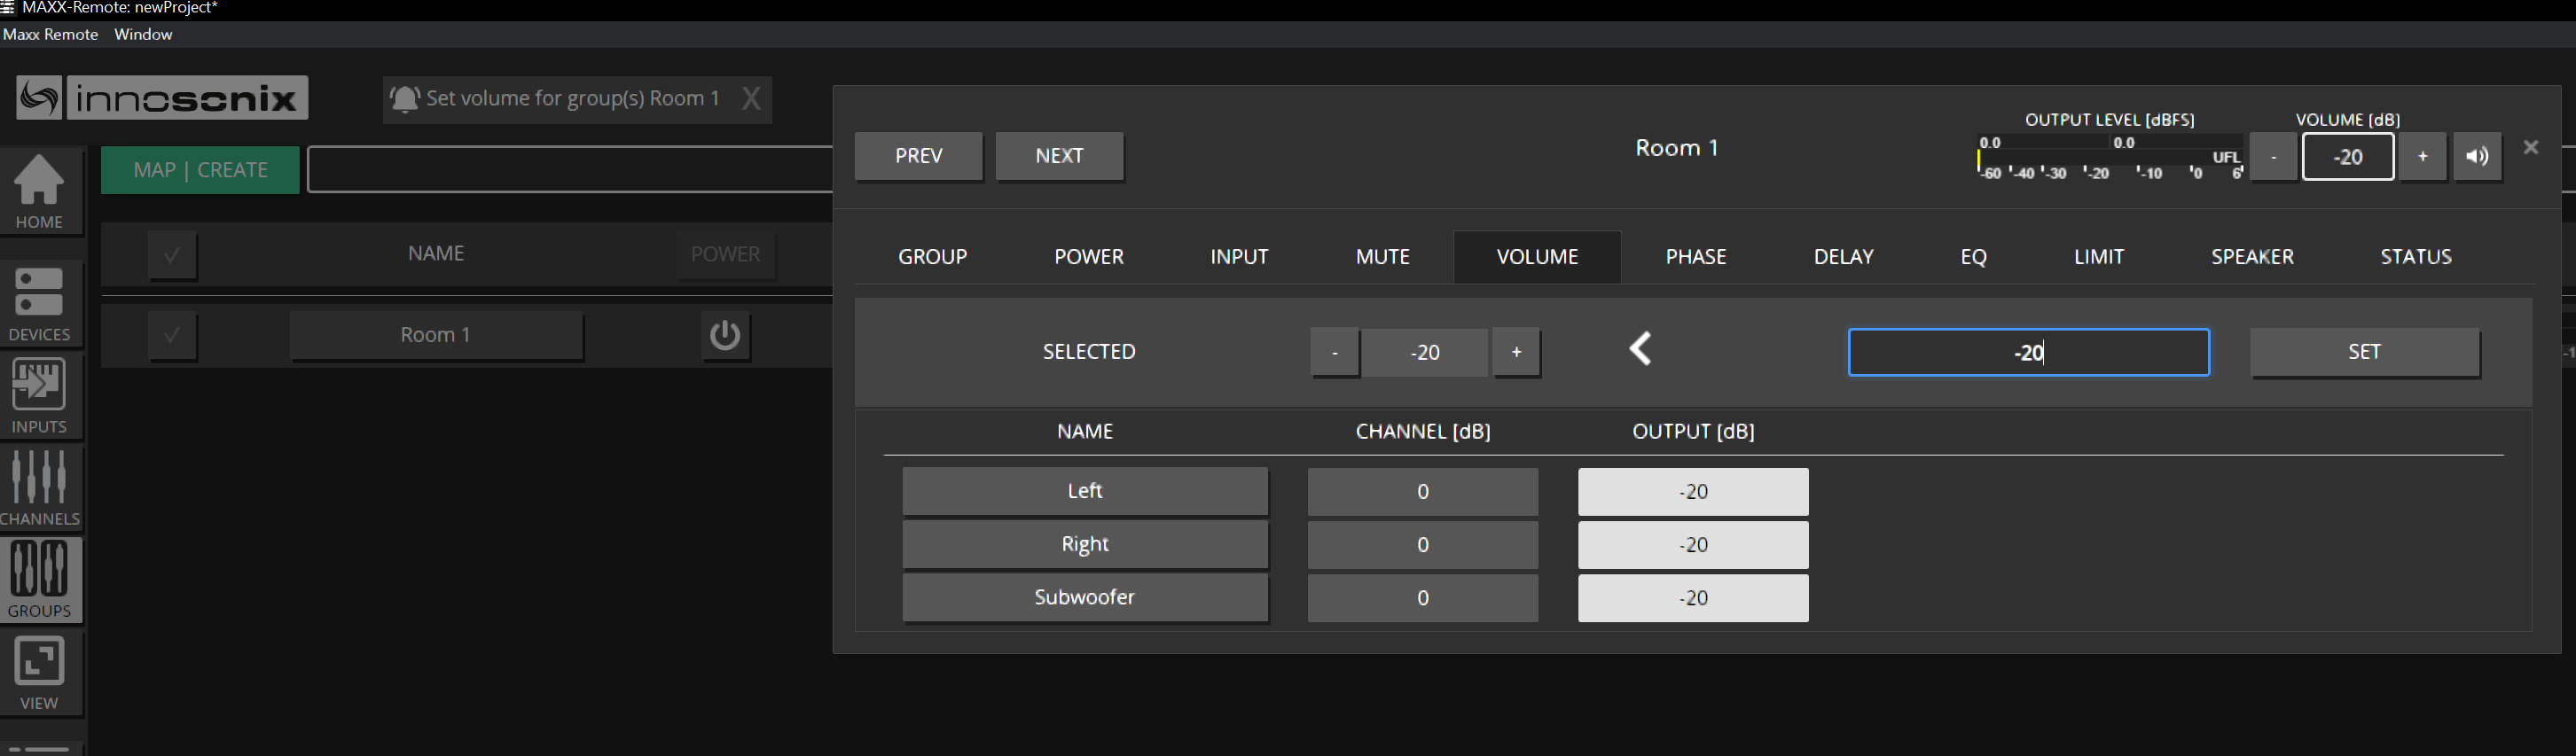
Enter -20 and press Enter or SET.
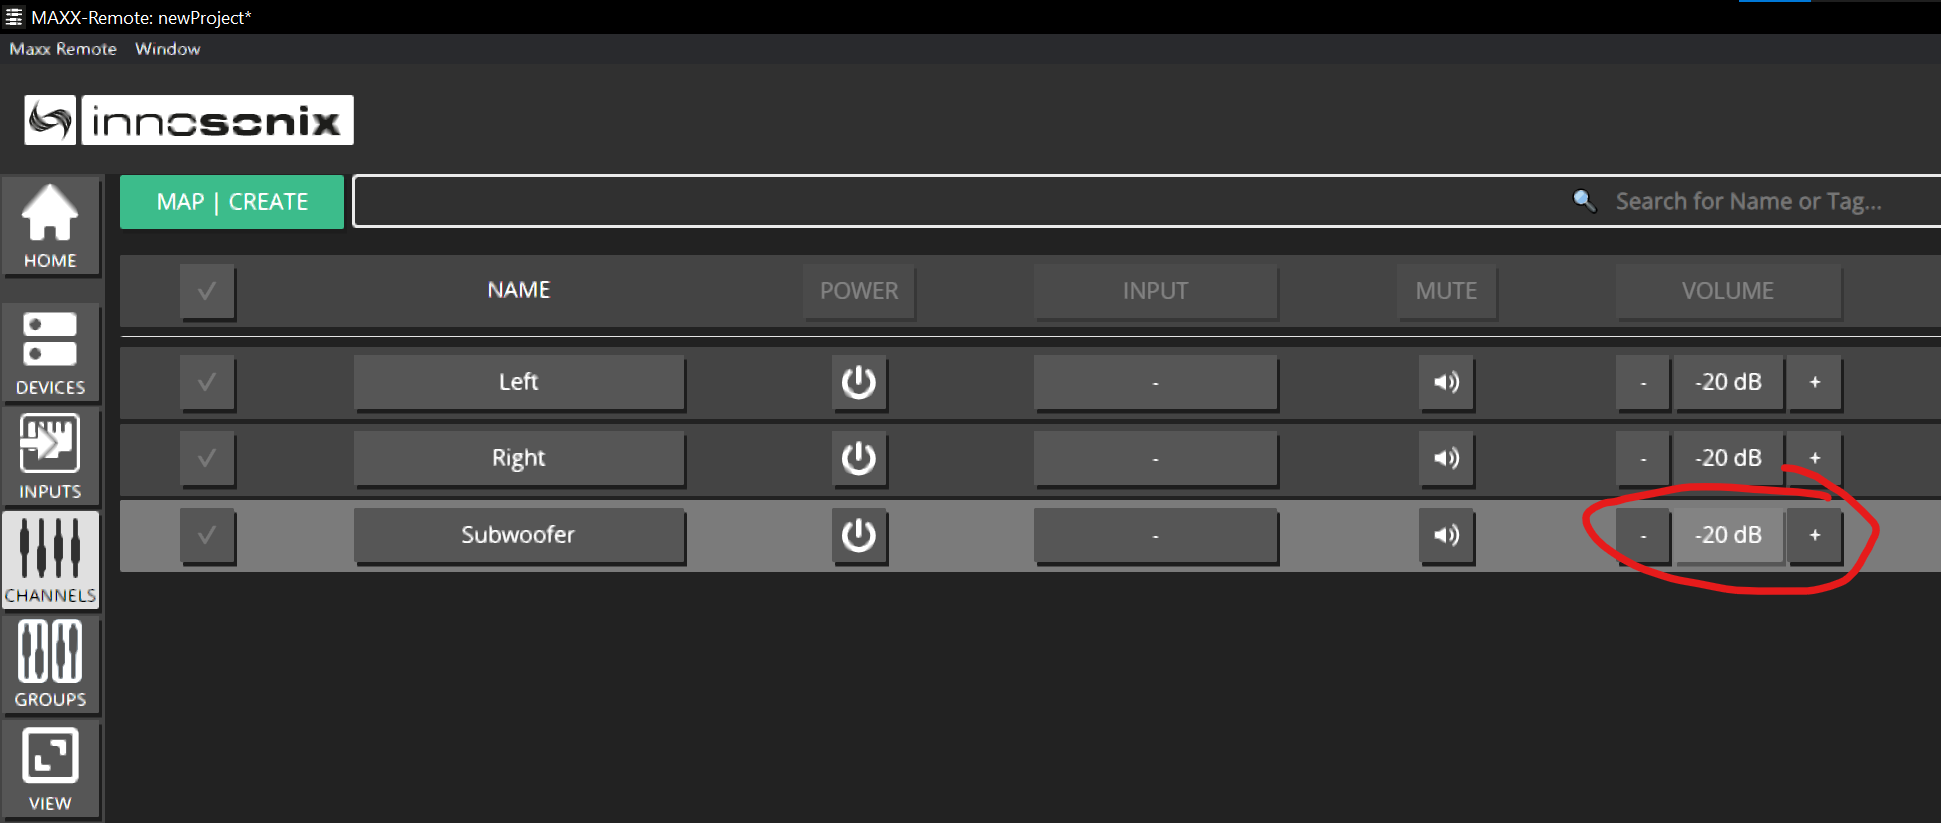
On CHANNELS, raise the Subwoofer channel by +6 dB for a bit of boost.
Note
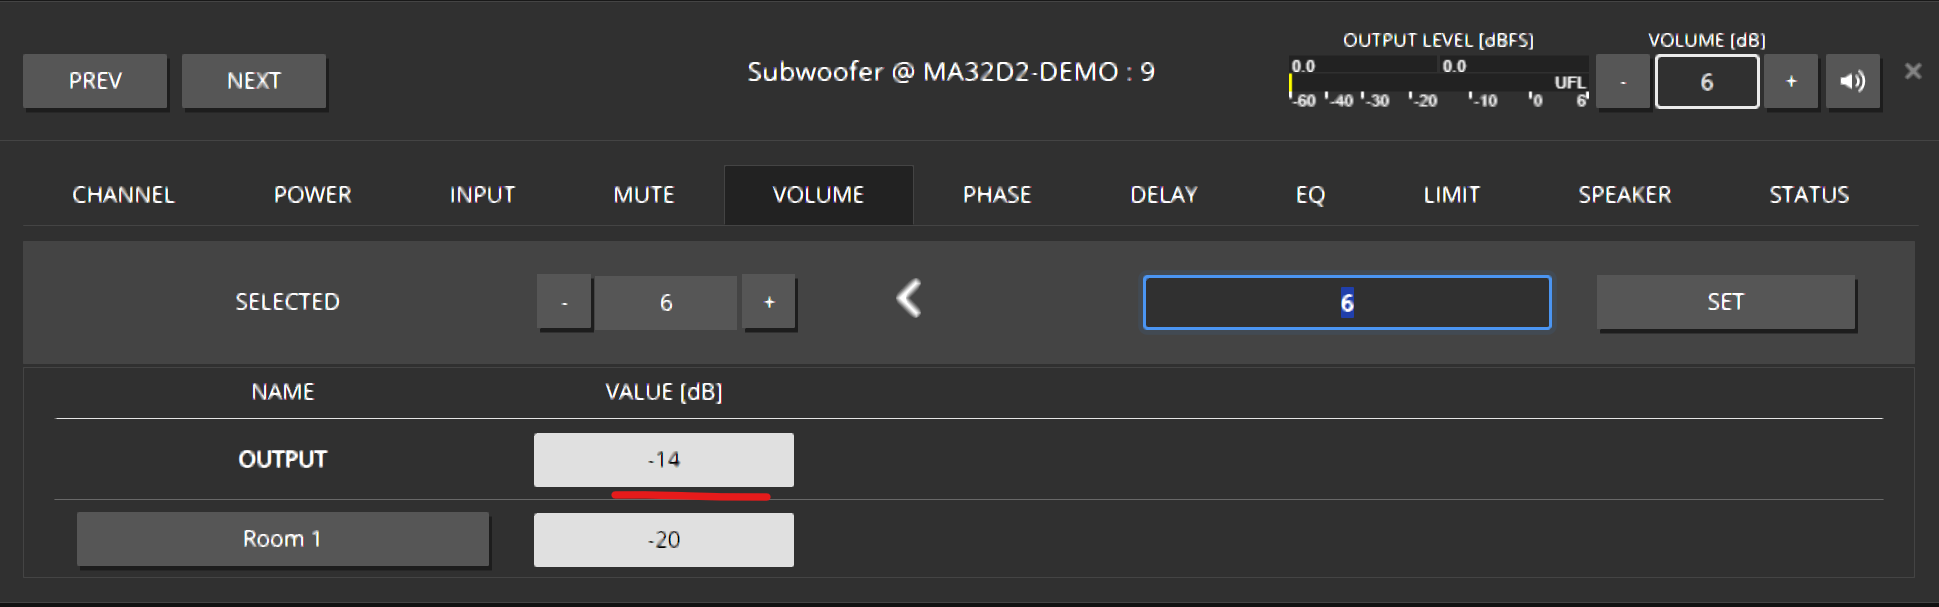
The CHANNELS overview shows final output. After the group −20 dB, channels already read −20 dB before you add a channel offset.
Example: group −20 dB + channel +6 dB → −14 dB output.
Expected result
Room is at a safe level; Sub sits 6 dB hotter than Left/Right at the channel layer.
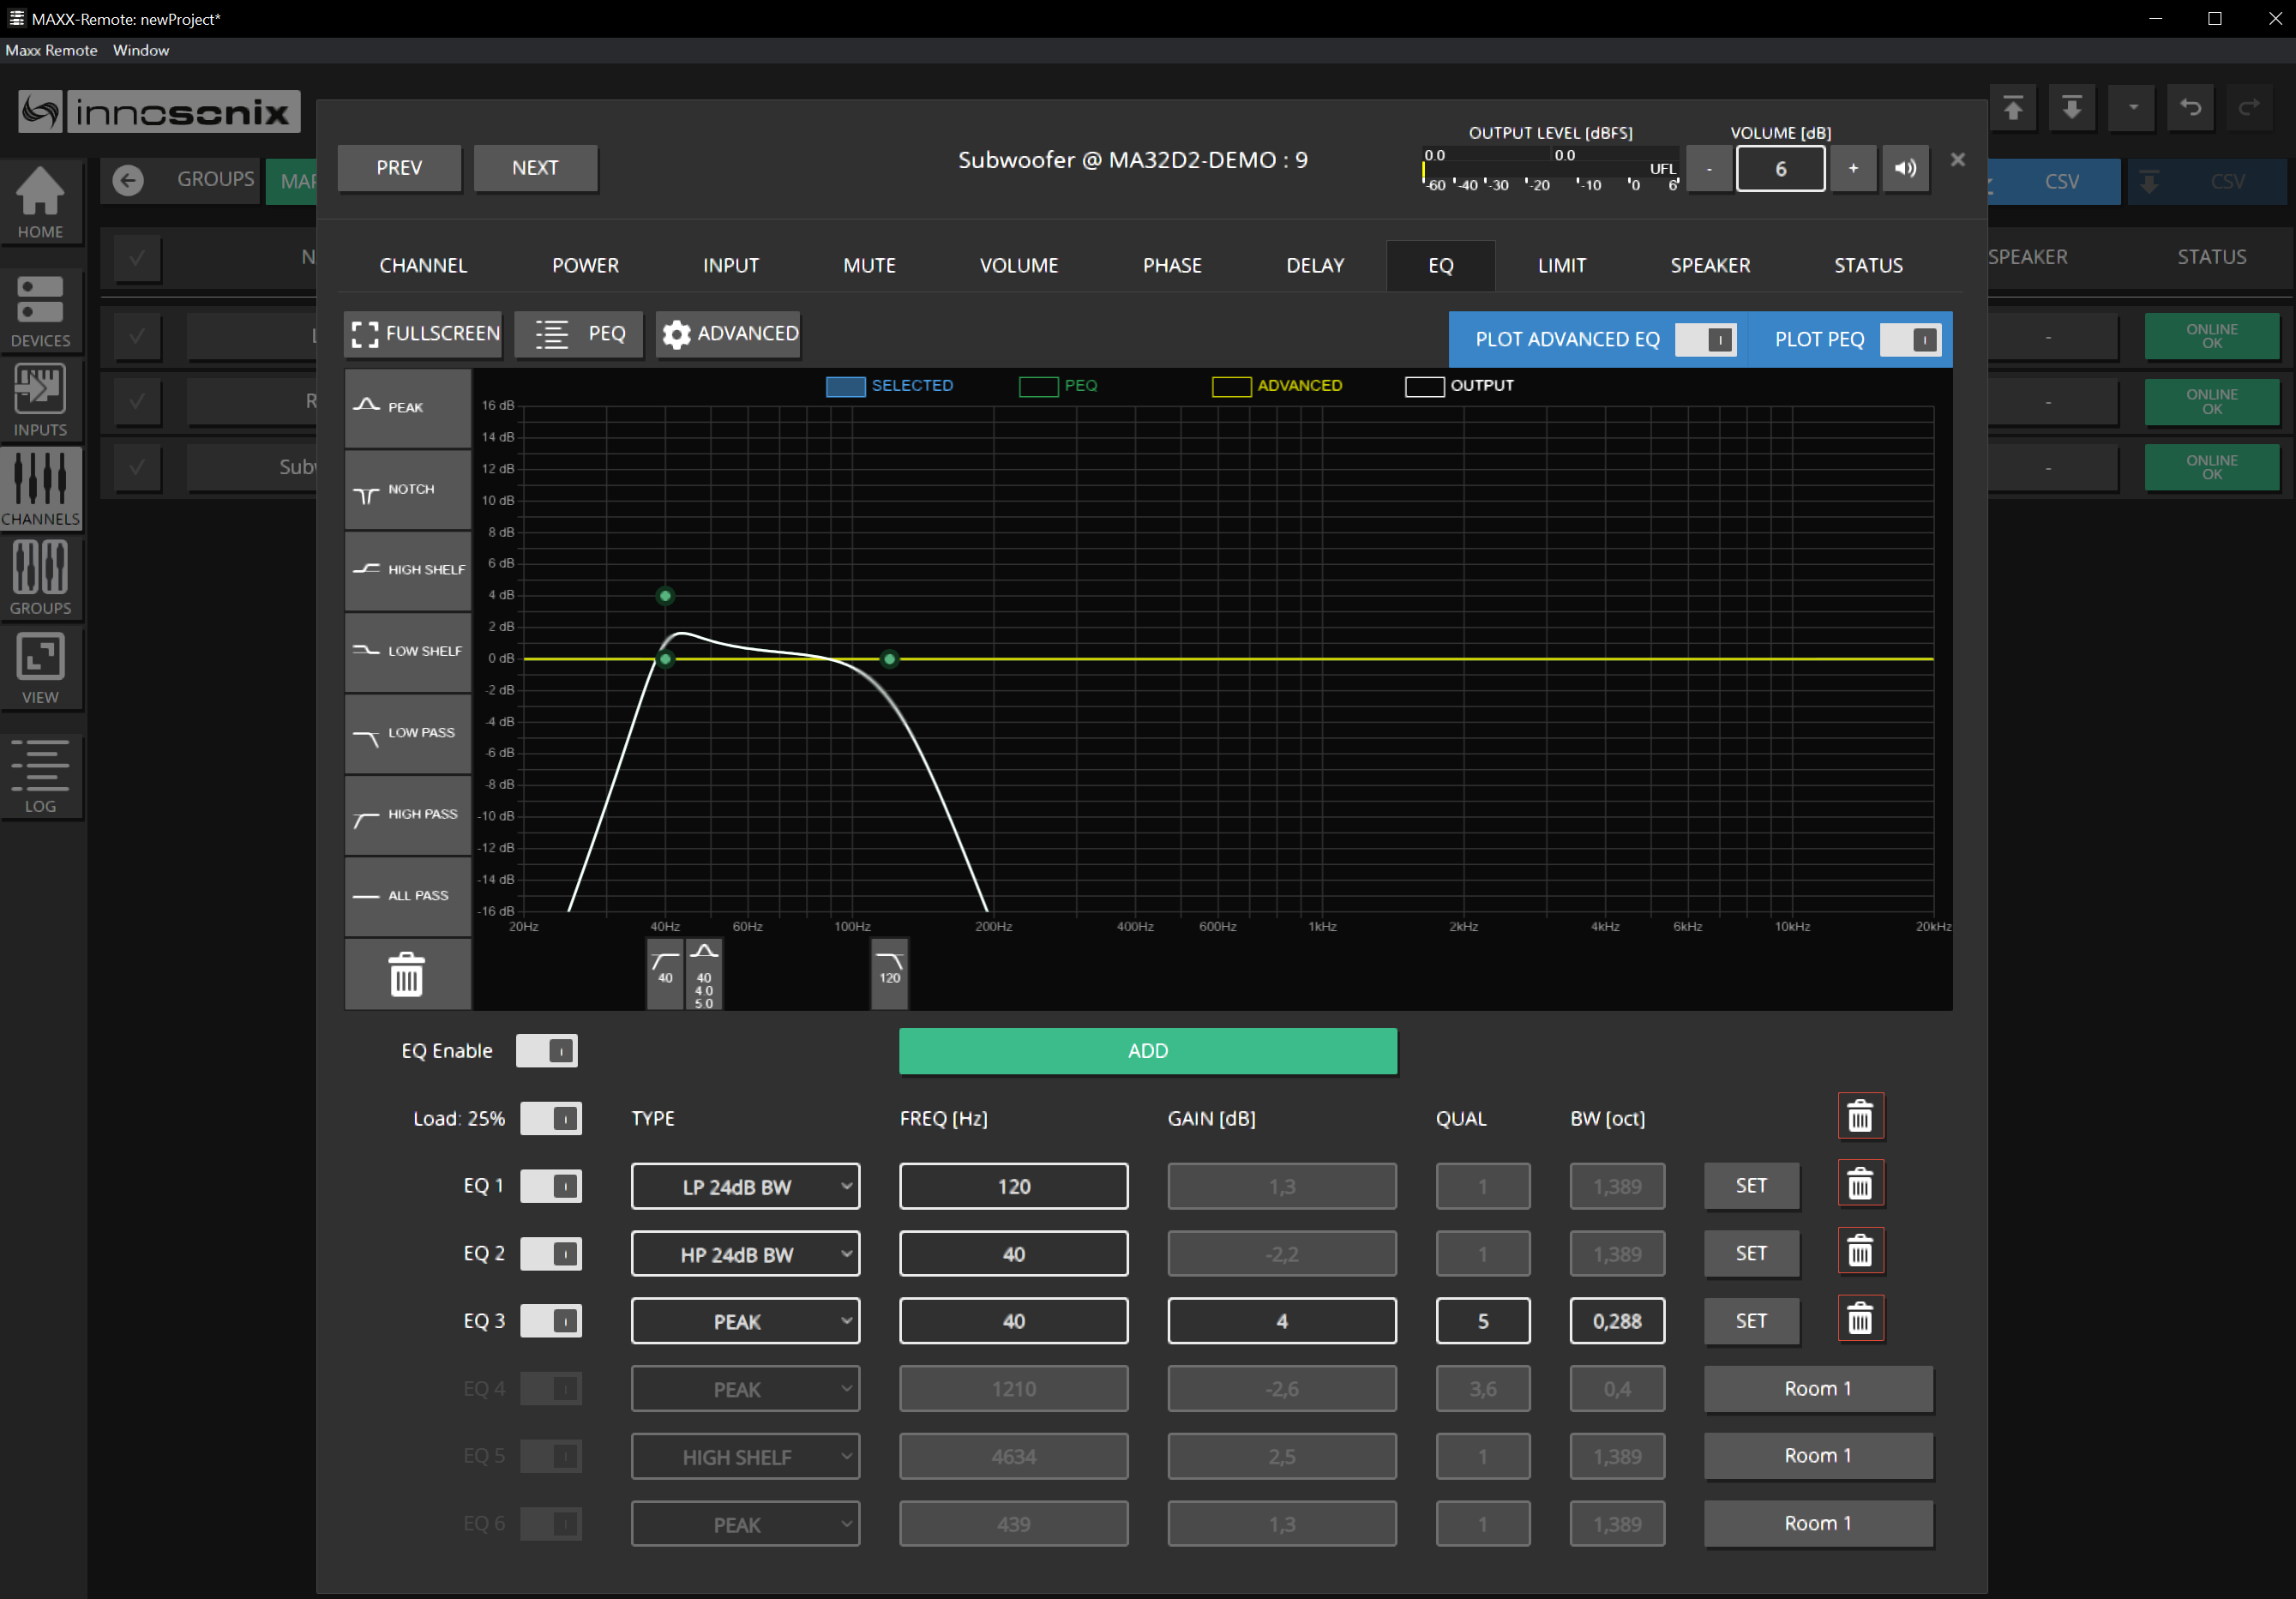
5. EQ the Subwoofer
Open CHANNELS → EQ for Subwoofer.
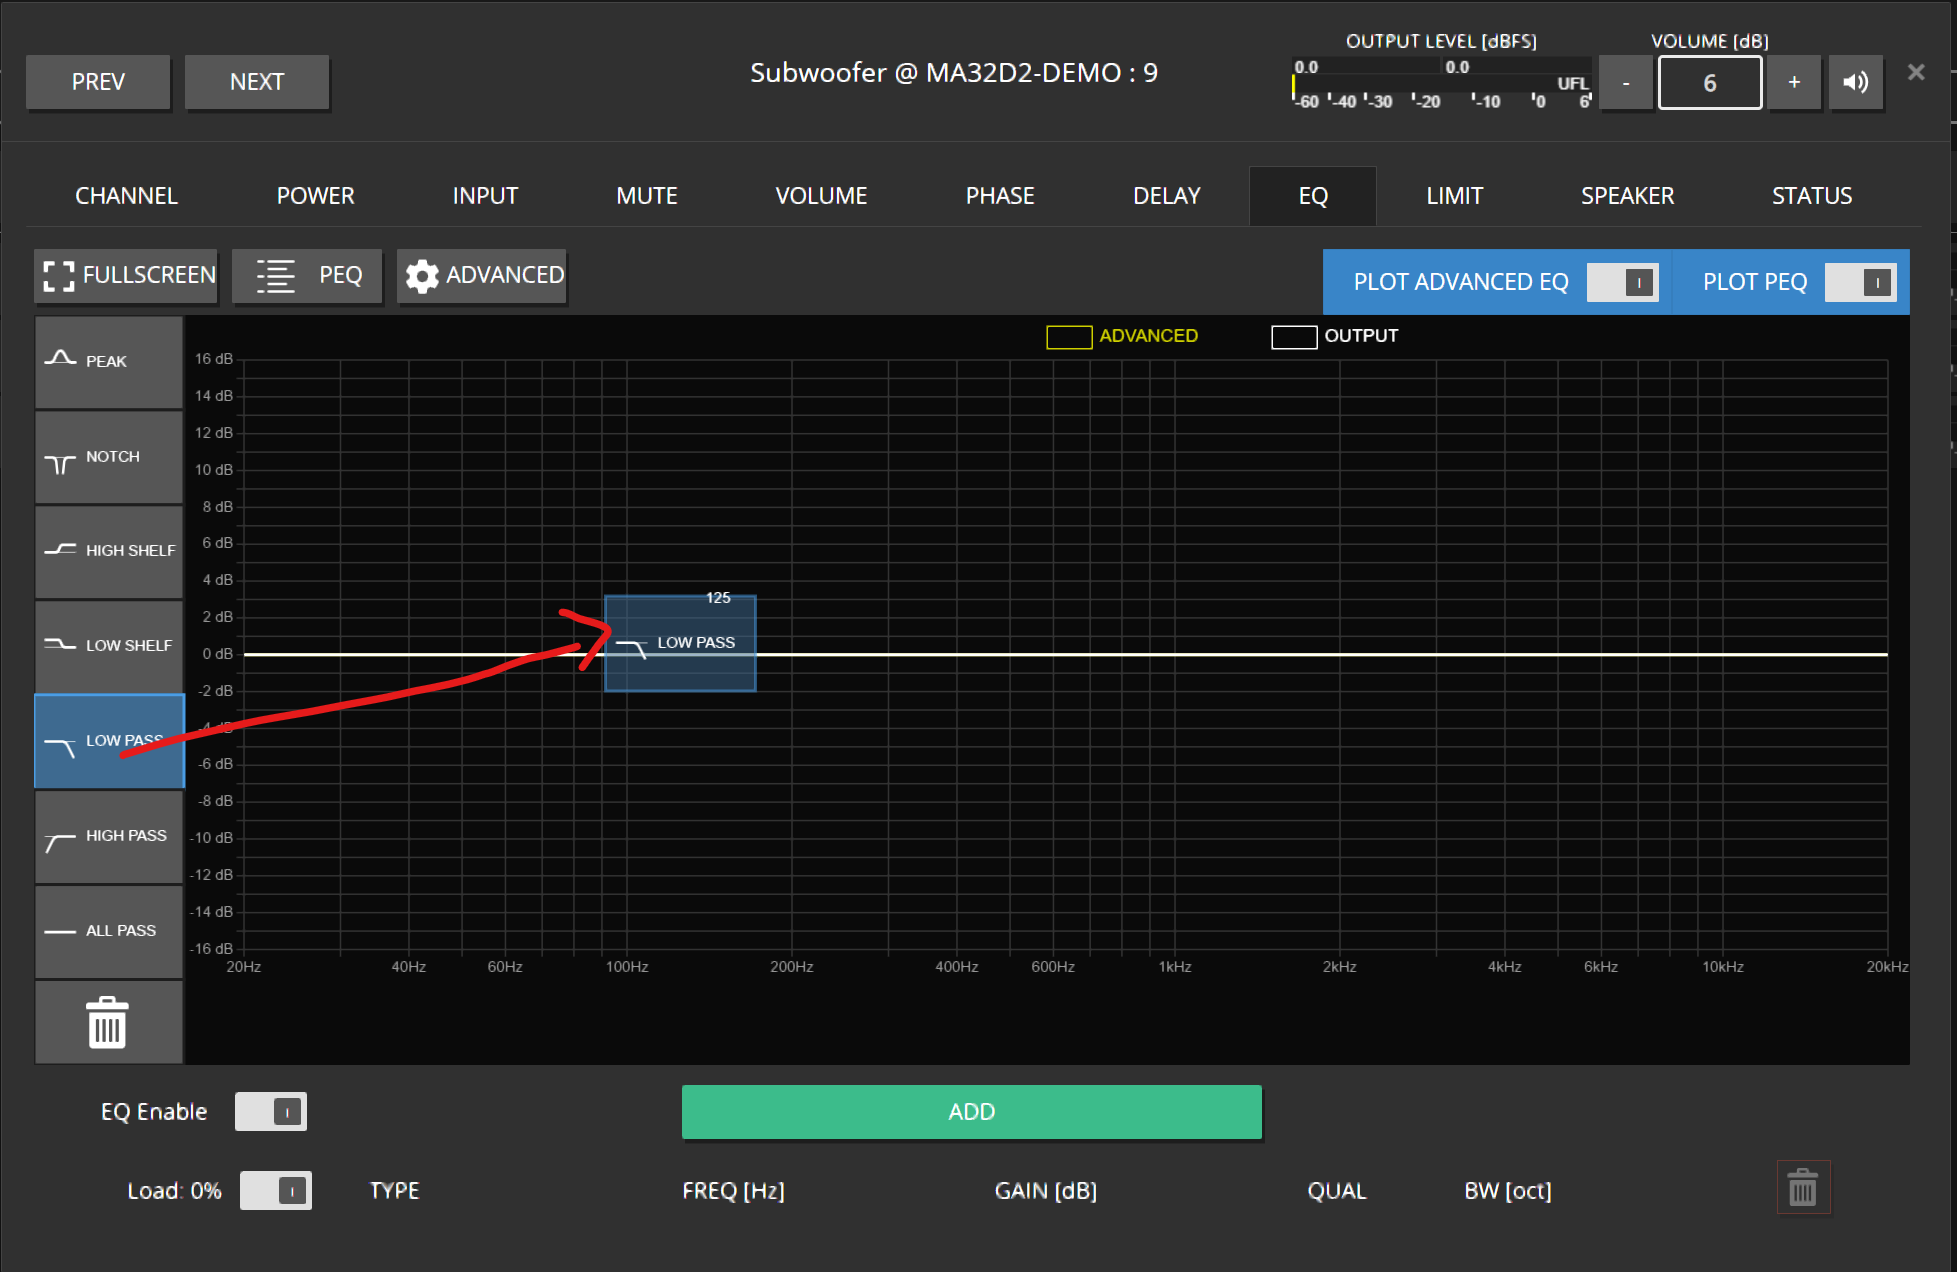
Drag a LOW PASS filter into the EQ view.
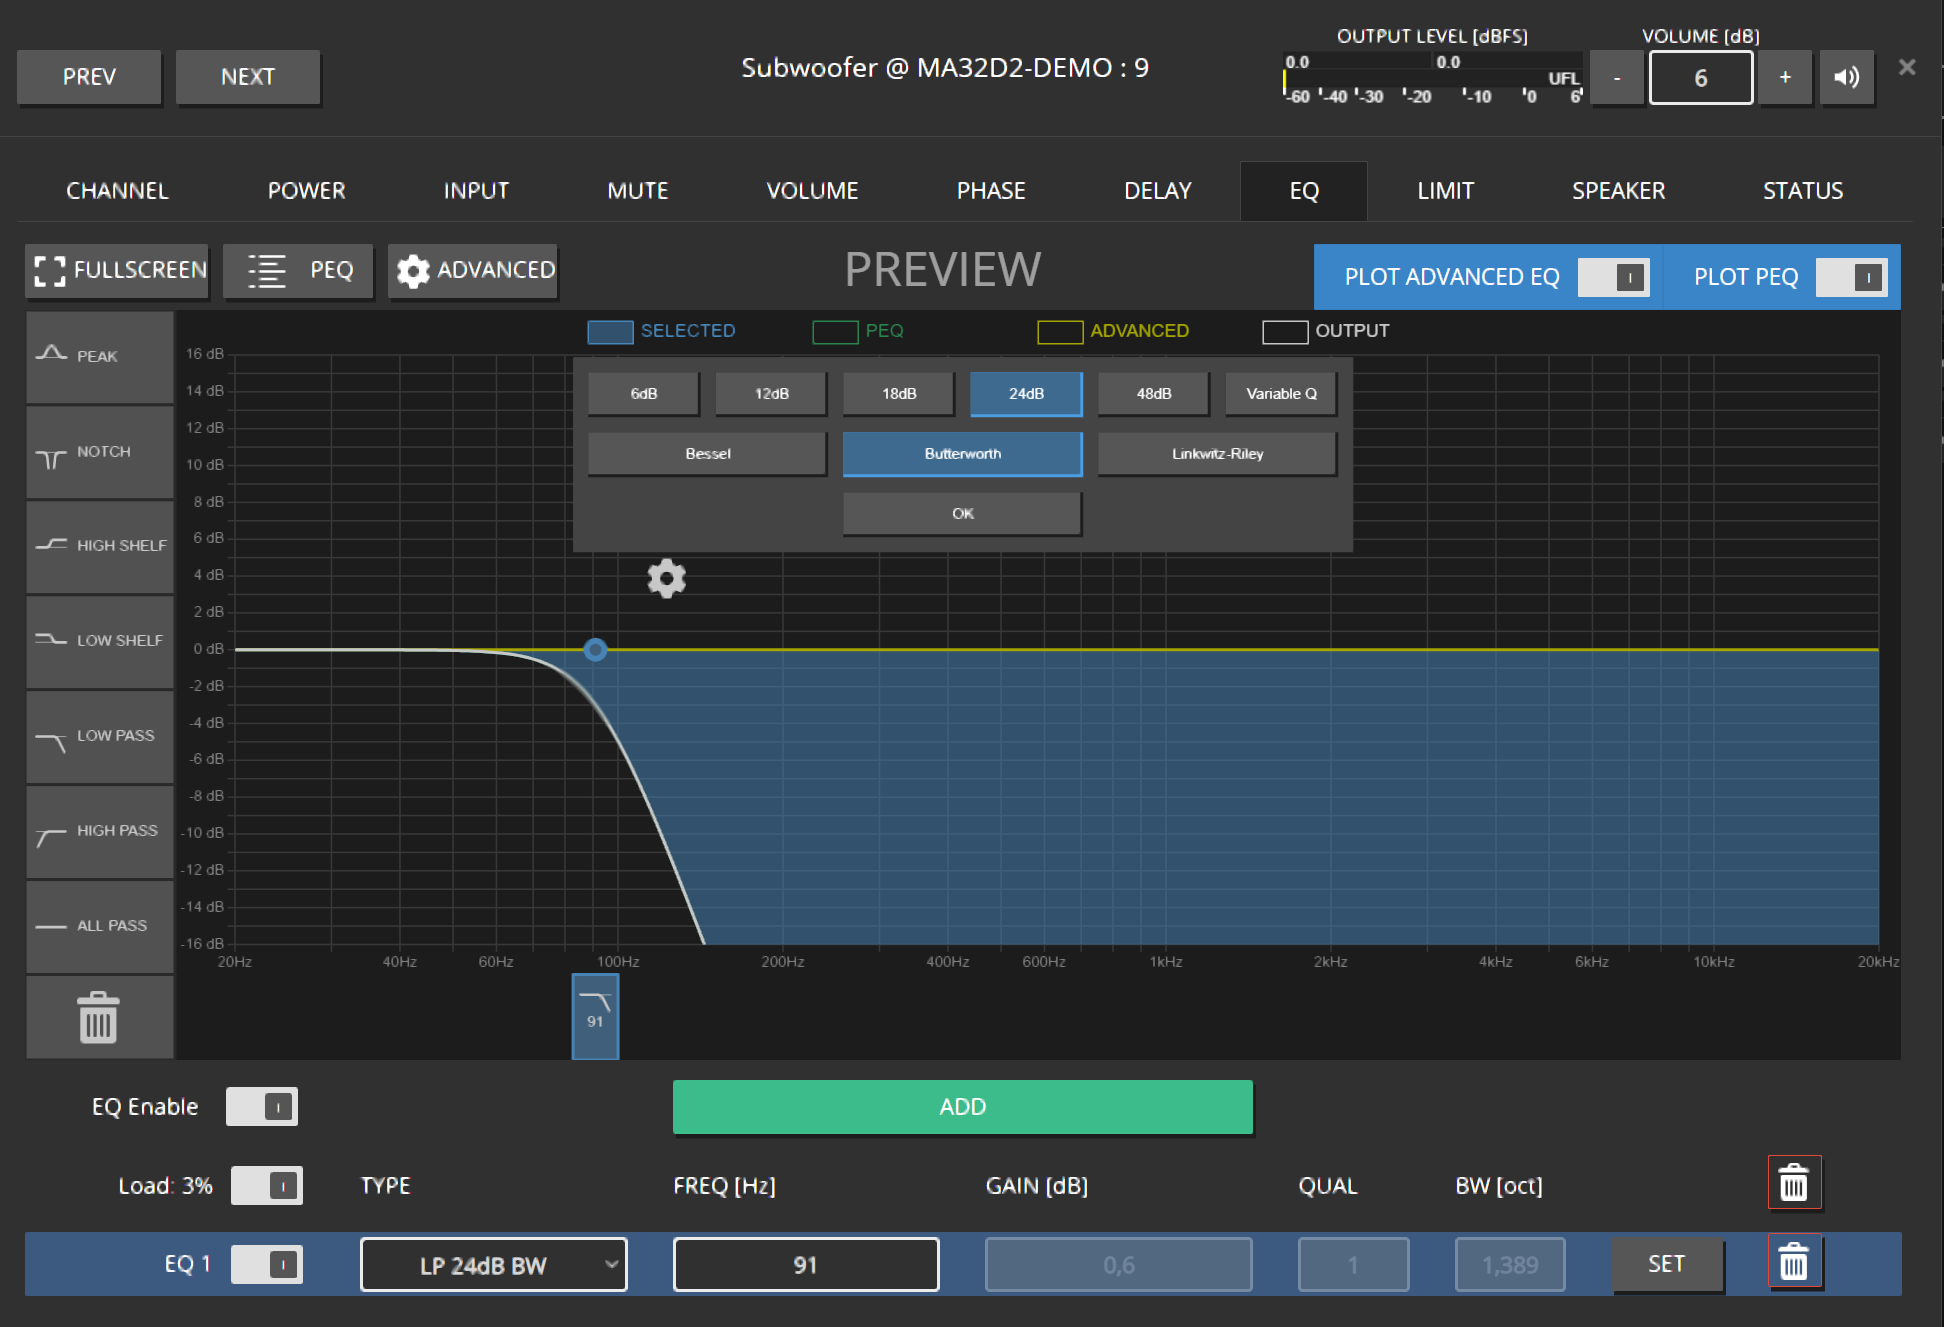
Select the filter (blue handle / row), open the gear editor, pick for example 24 dB Butterworth, confirm OK.
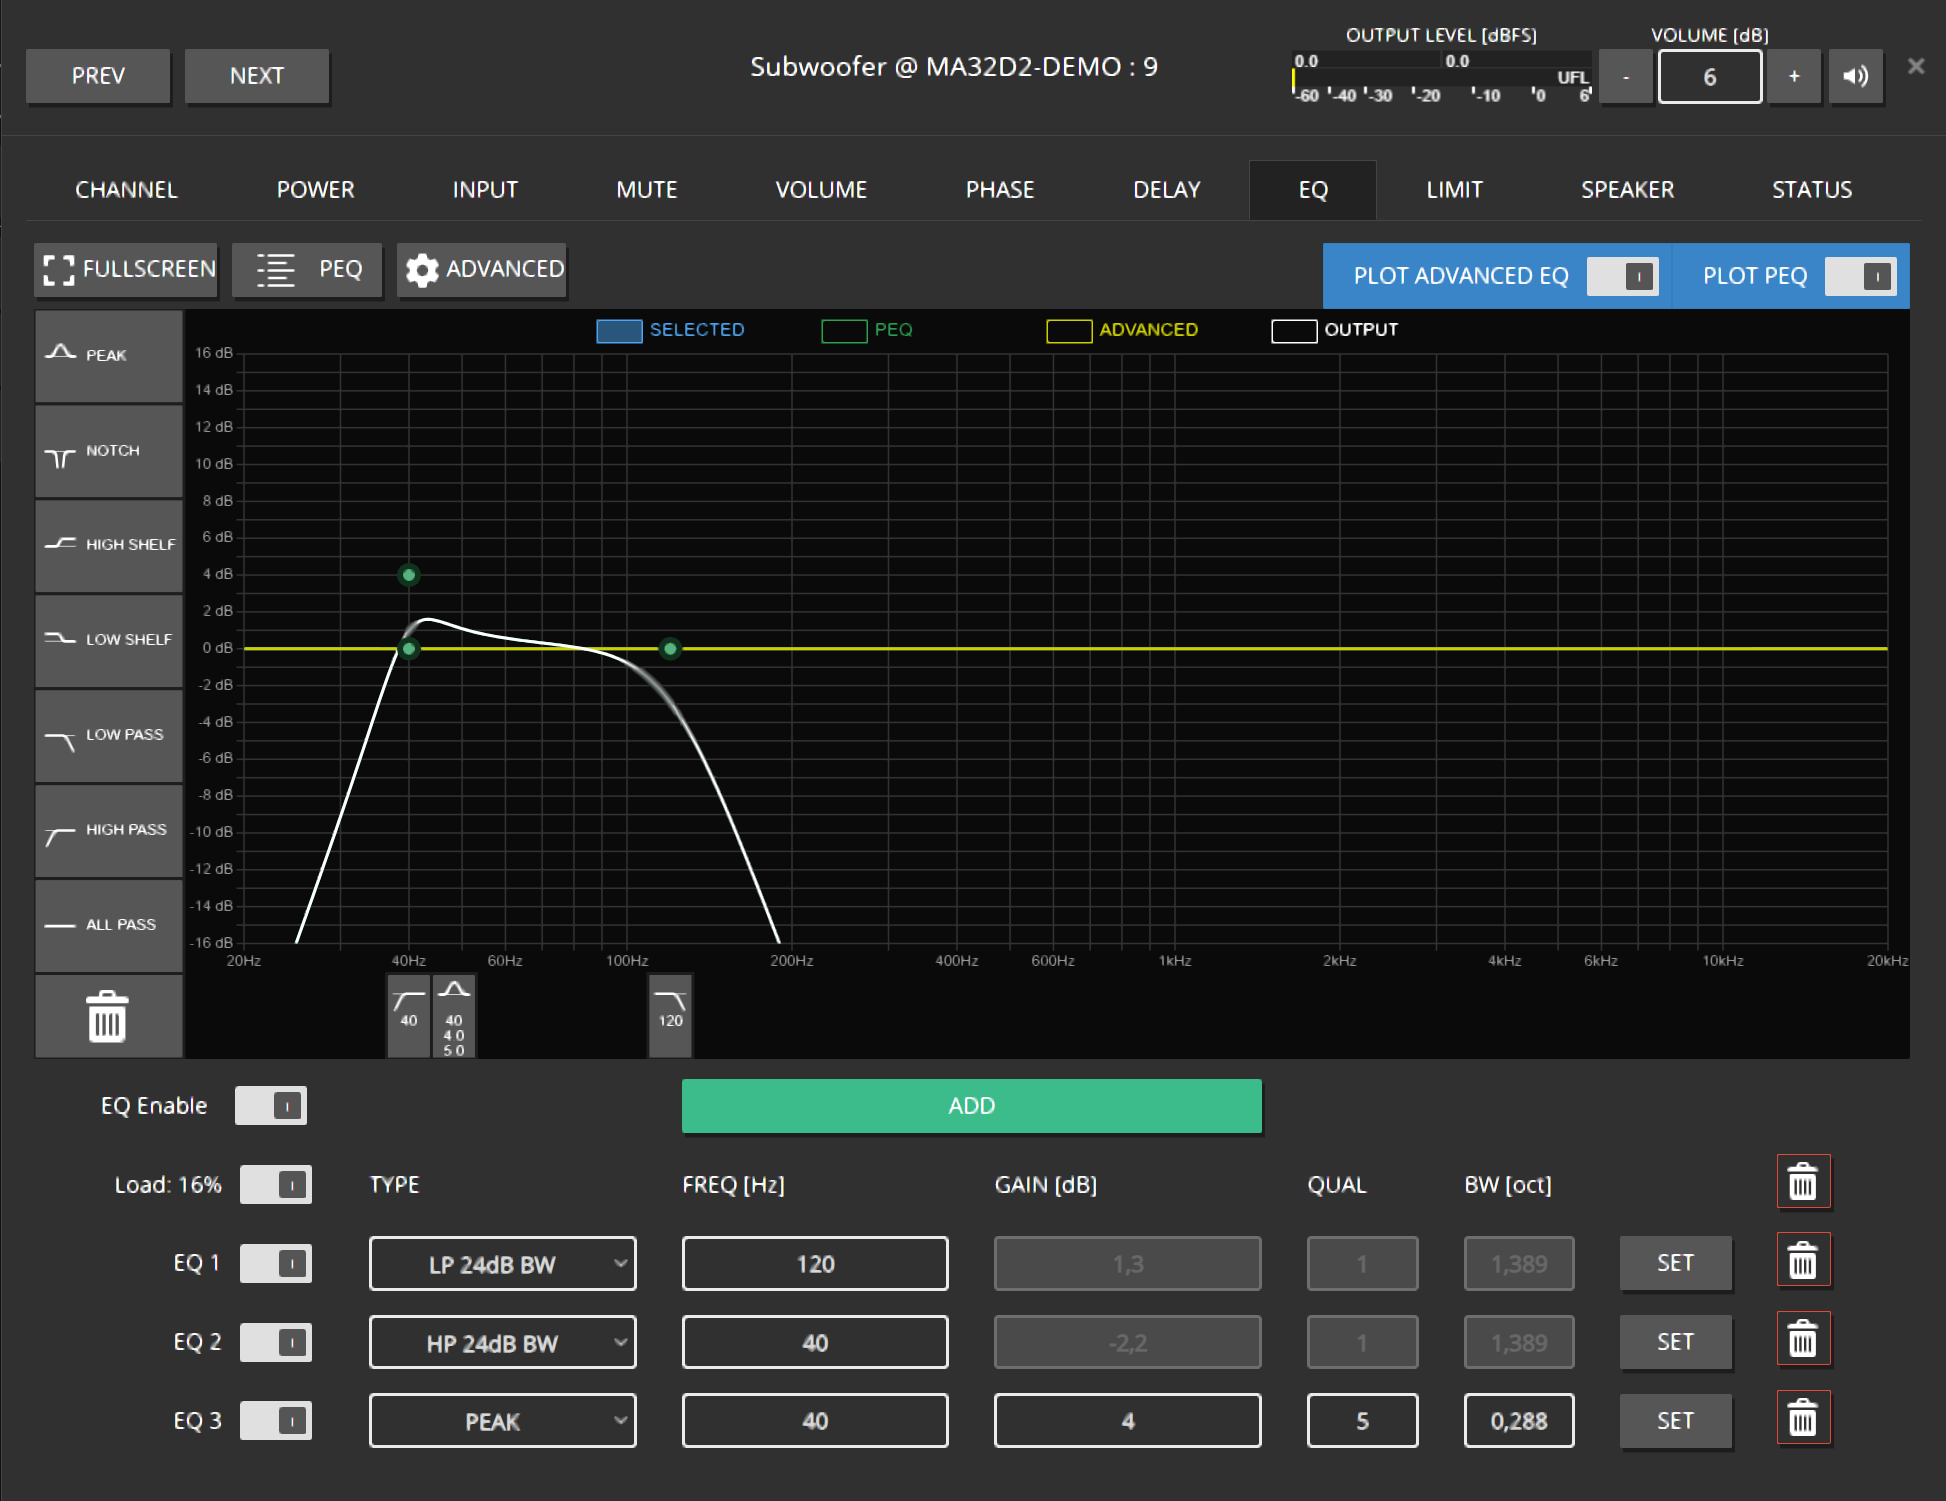
Set frequency by dragging or typing, then Enter / SET.
Add more filters if needed.
6. EQ the group (room)
Add overall EQ on GROUPS → ROOM 1.
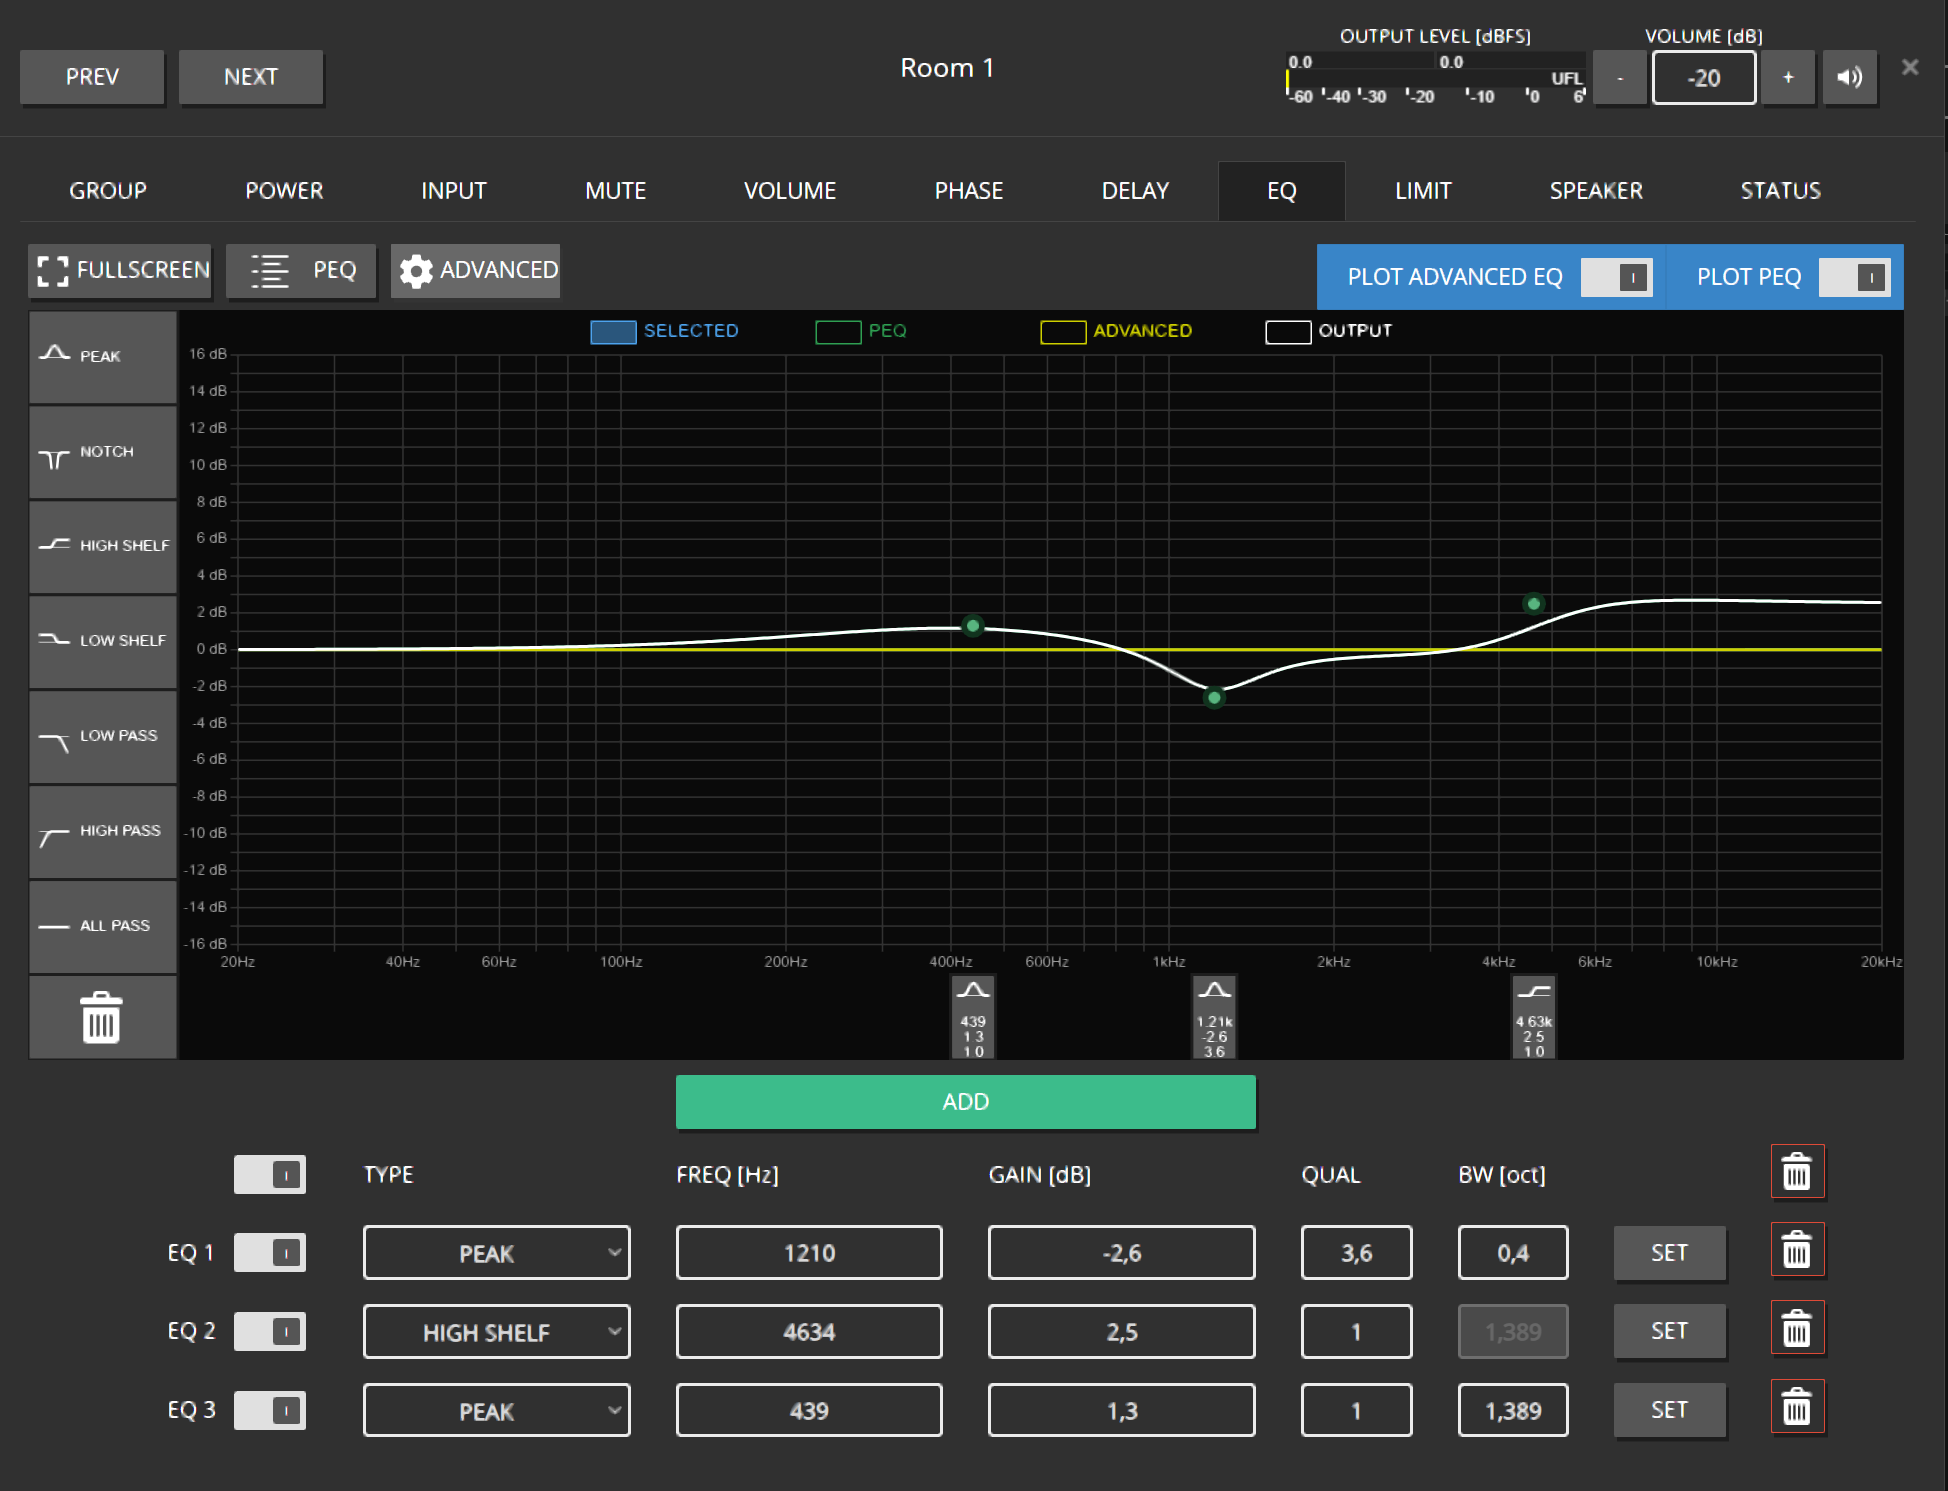
Jump back to the group’s channels (arrow control).

Re-open Subwoofer EQ — you should see channel EQ plus group EQ summed.
Expected result
Room EQ affects all members; Sub still shows its own low-pass on top.
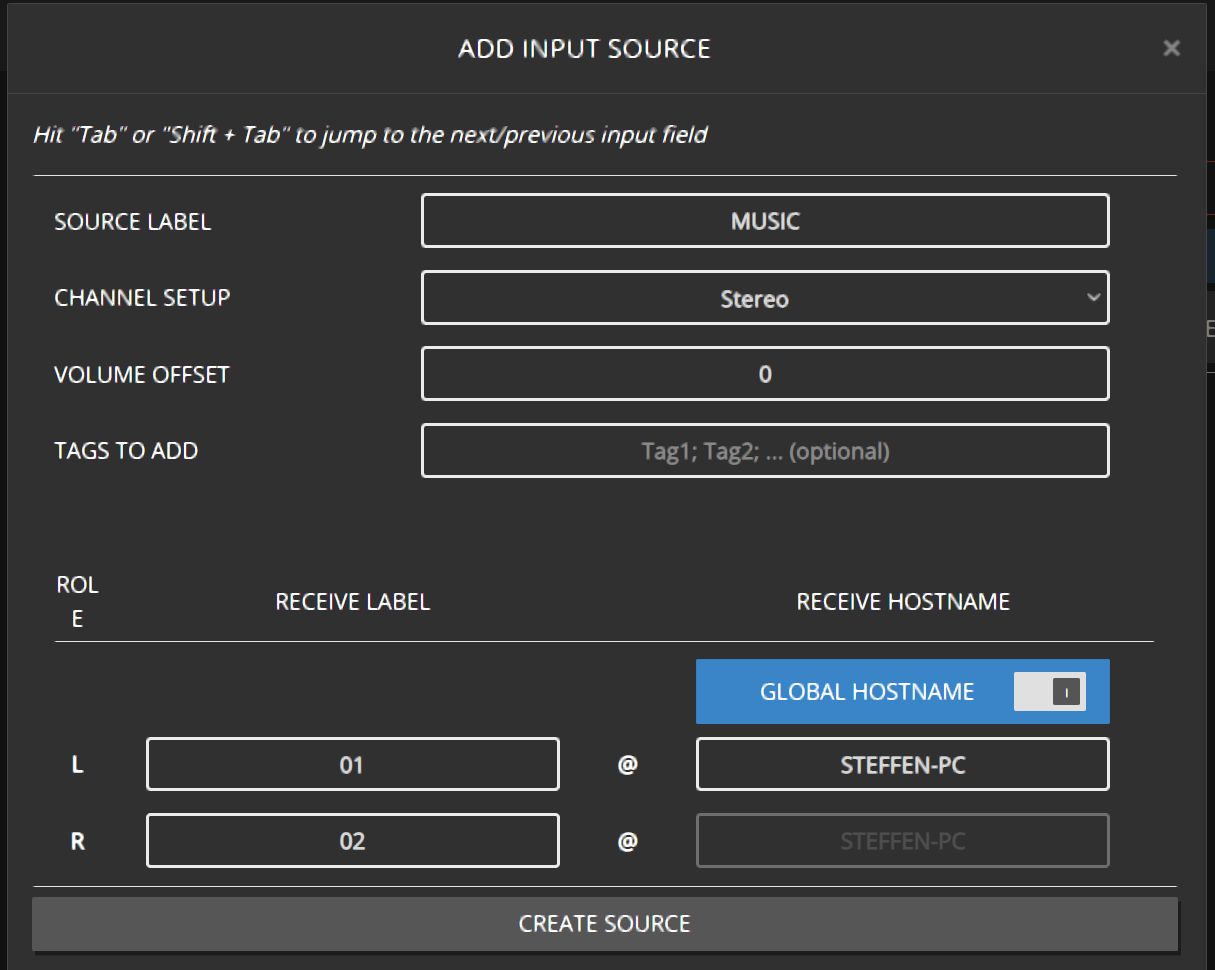
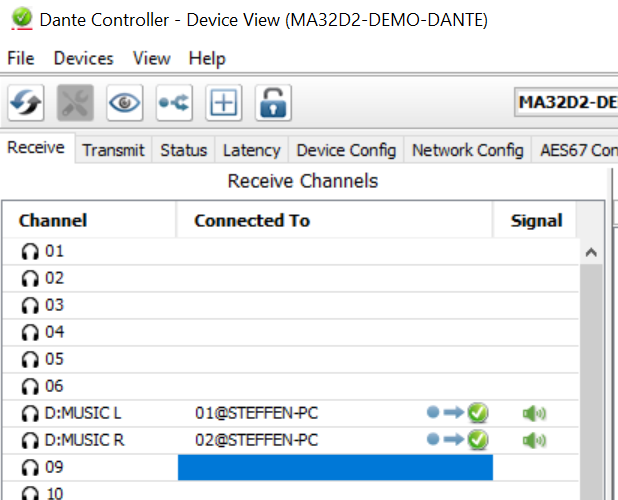
From Dante Controller, note Transmit Channel@Hostname (example: 01@STEFFEN-PC).

Open INPUTS → + INPUT SOURCE. Fill in:
- SOURCE LABEL — name in Maxx Remote
- RECEIVE HOSTNAME — Dante device hostname
- RECEIVE LABEL — transmit channel name
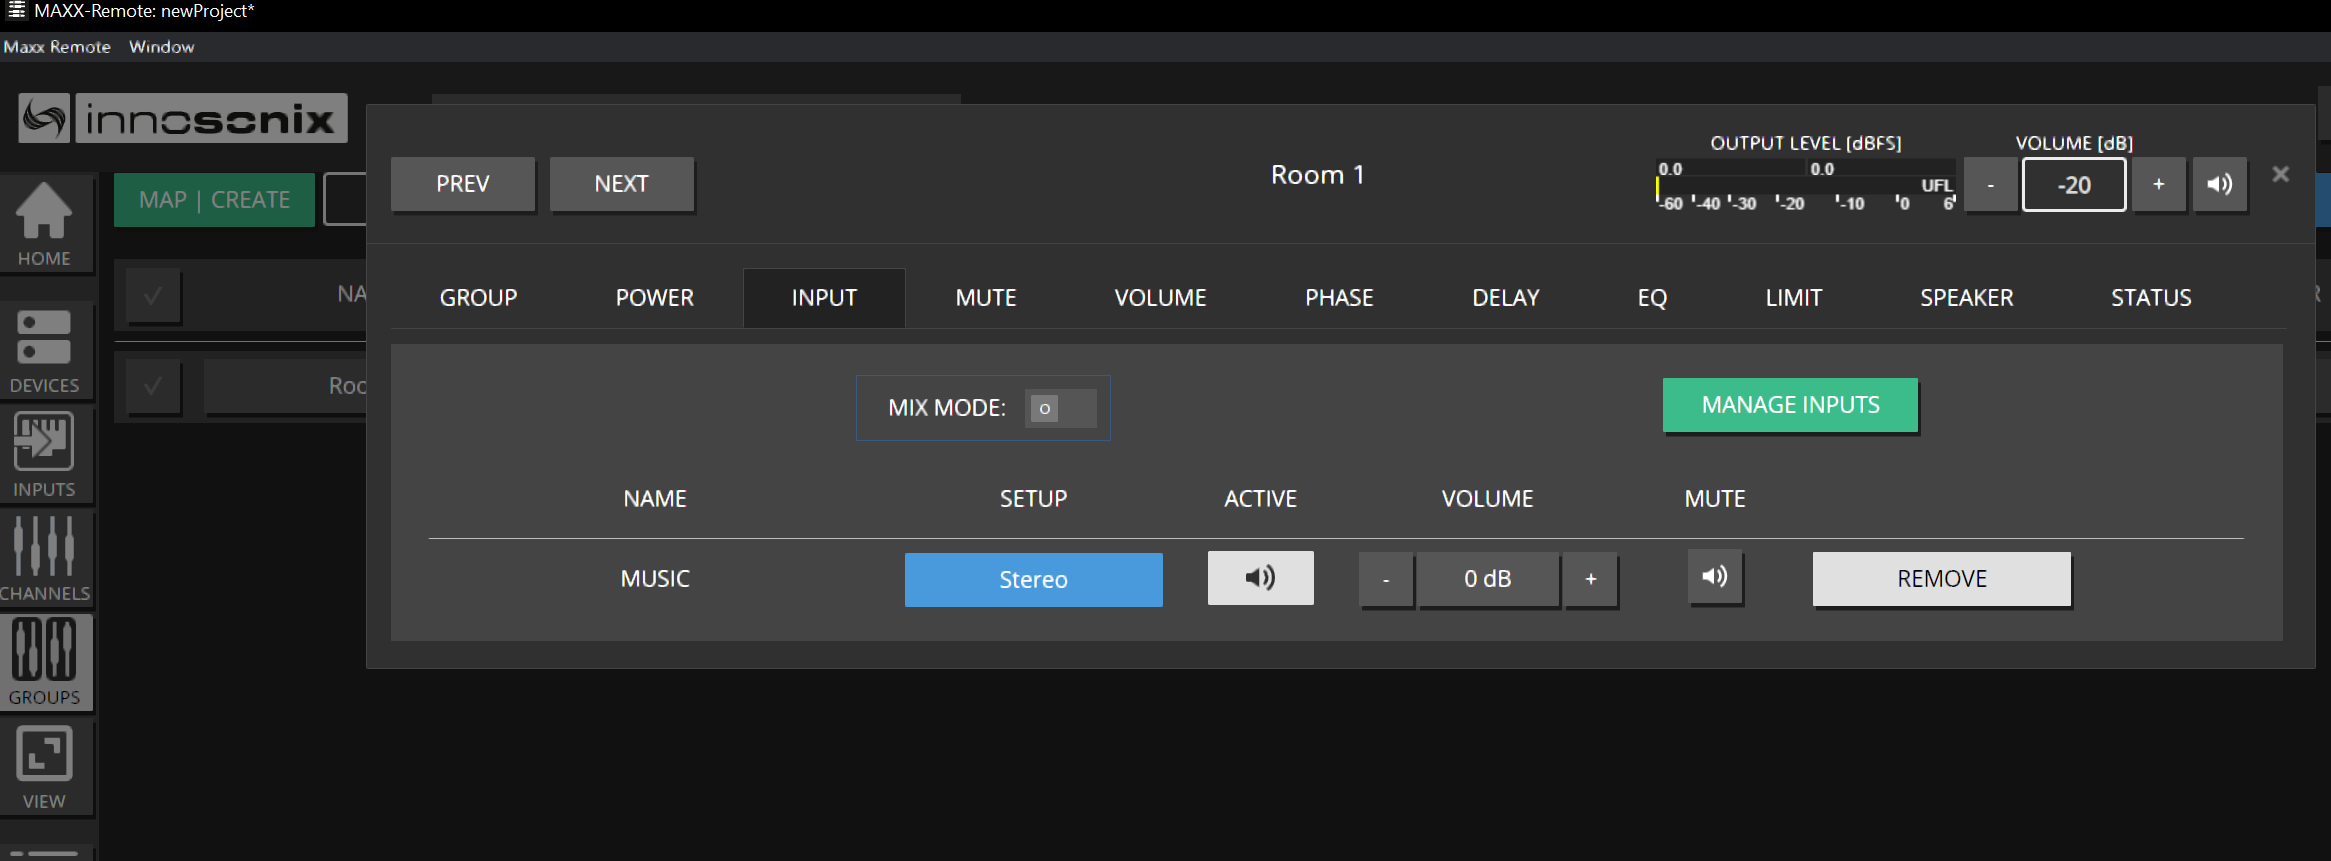
Open GROUPS → INPUT and assign the source to ROOM 1.
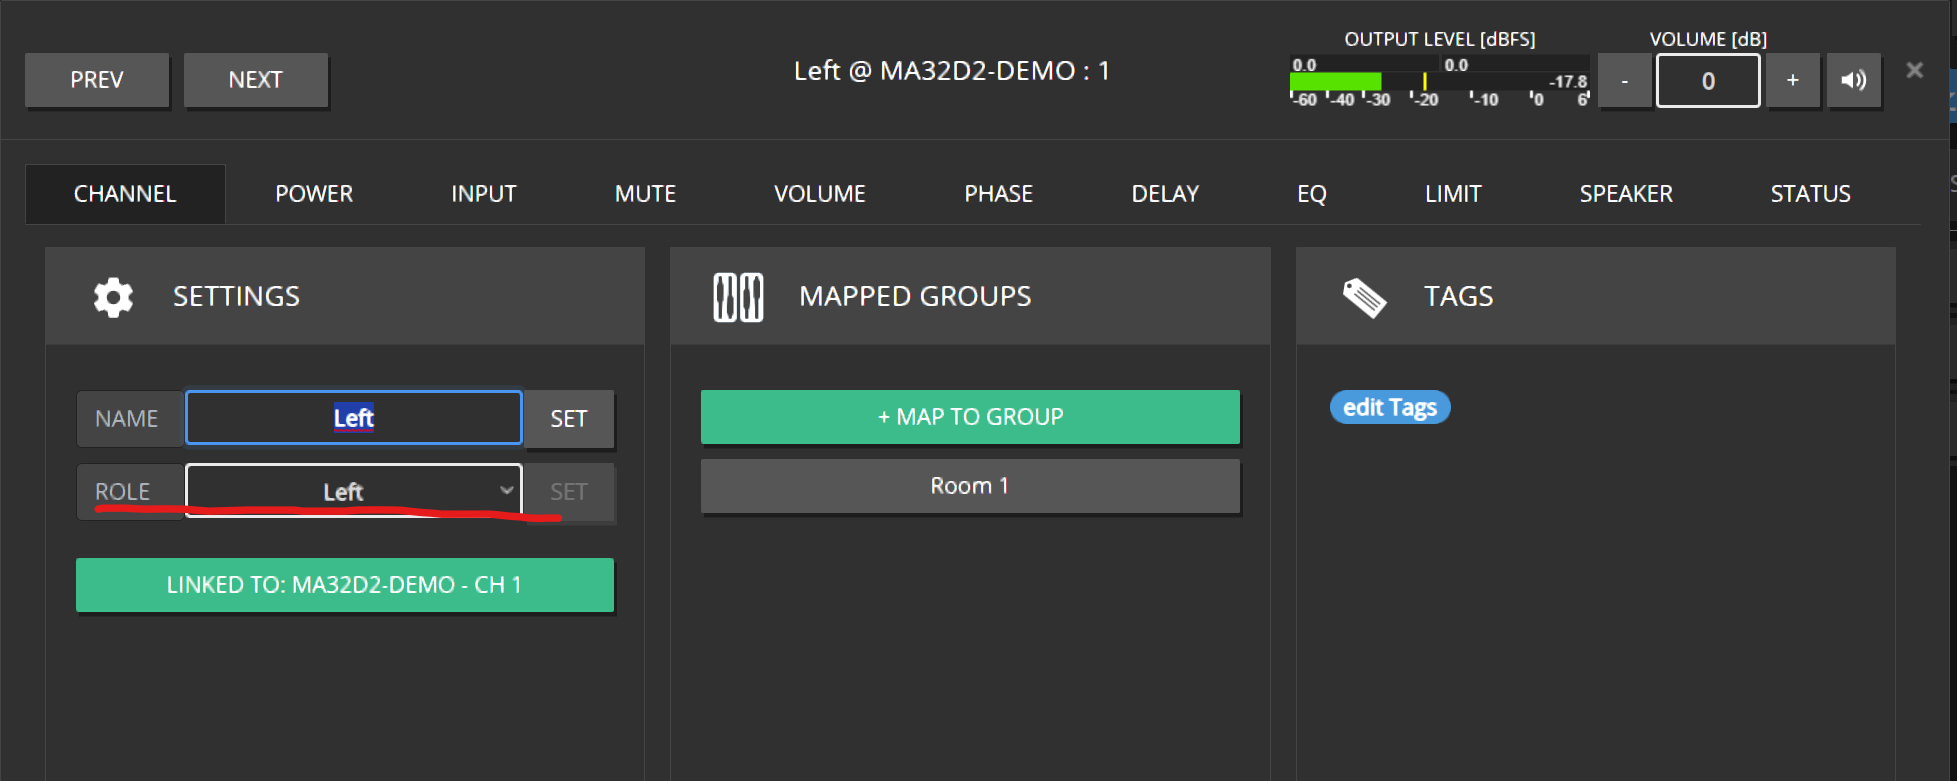
Channels inherit the source using their ROLE (Left / Right / Mono, …).
If Left is still MONO, it may downmix both legs — set ROLE → LEFT.
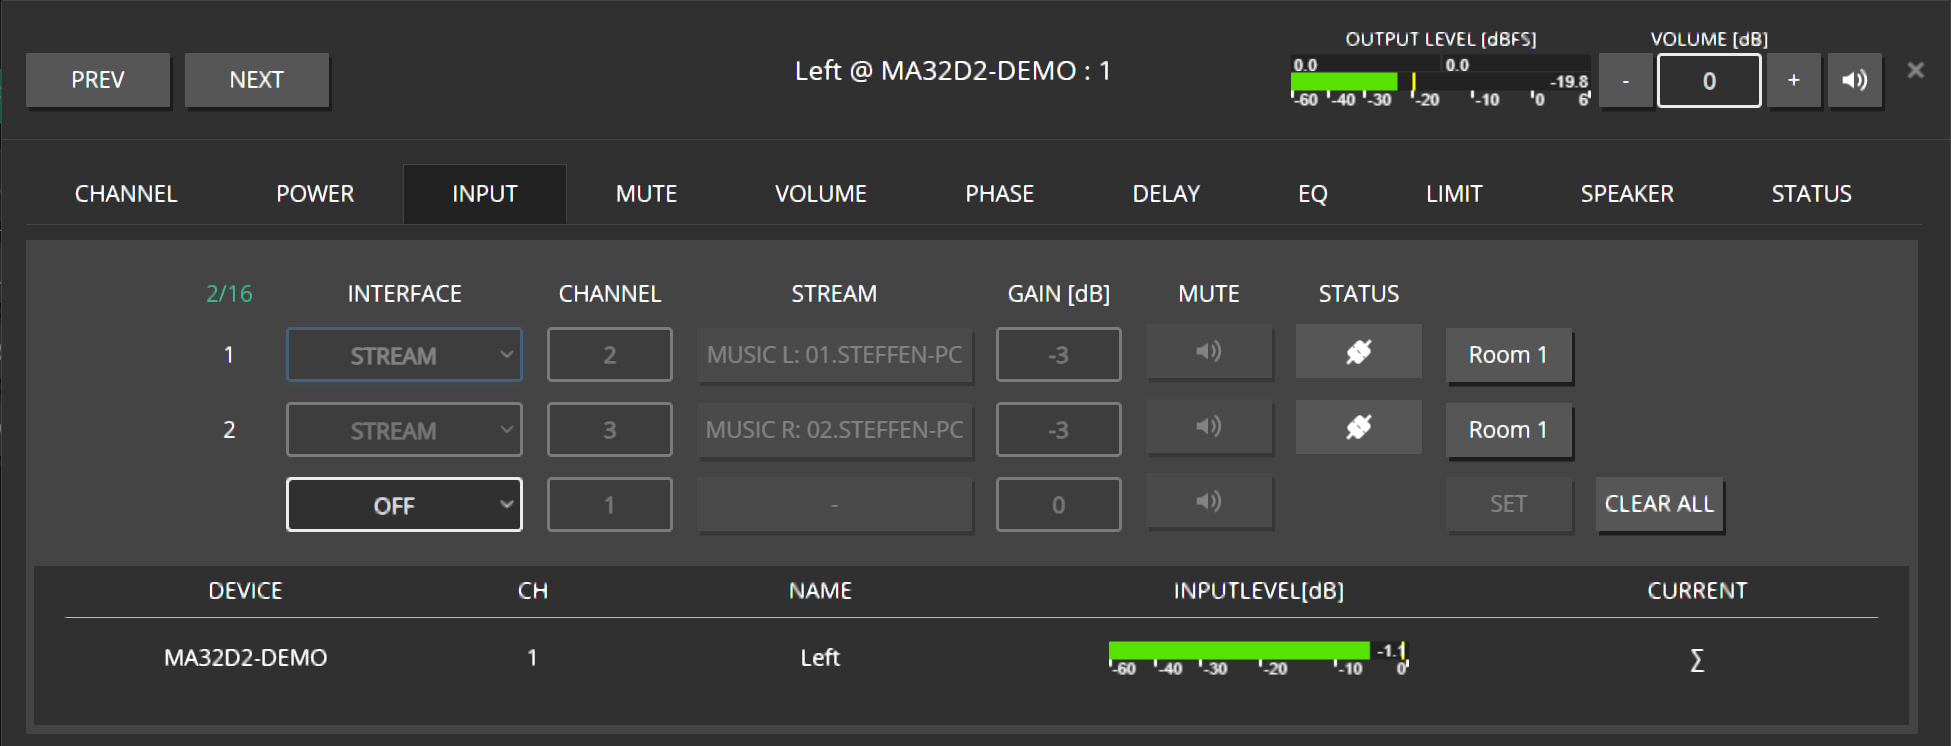
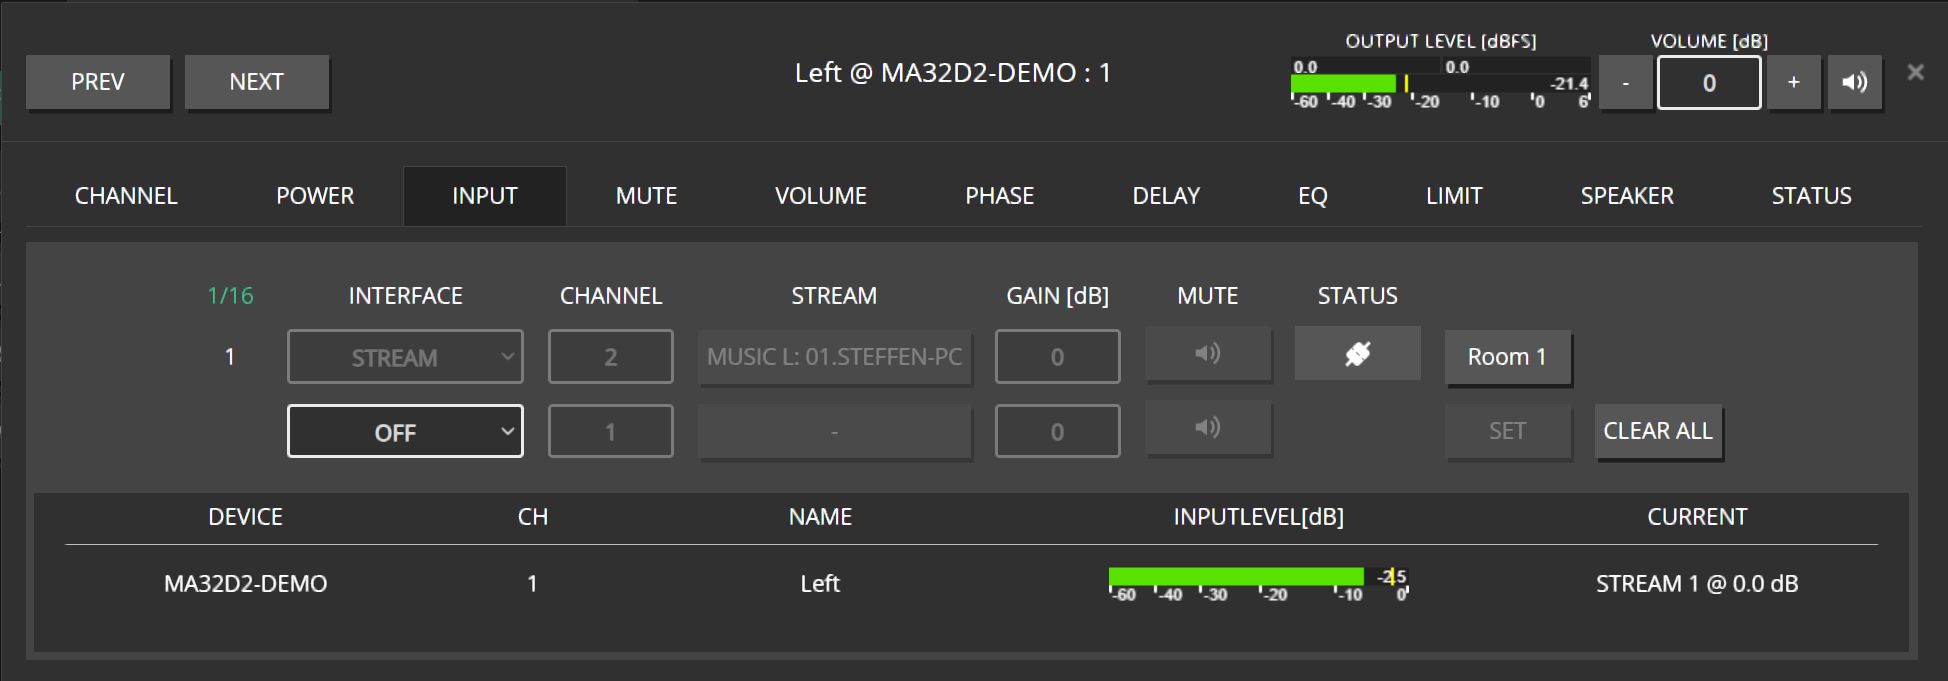
Confirm Dante Controller shows dynamic subscriptions (often prefixed with D:).
Set Right to role RIGHT. Leave Sub as MONO for a stereo downmix to the sub.
Expected result
Music plays Left / Right / Sub with correct legs; Dante shows the subscriptions Maxx Remote created.
Checklist — you are done when
Common mistakes
Common mistakes
- Leaving channel role on MONO for Left/Right — you get a downmix instead of discrete L/R.
- Enabling auto-create of all device channels when you only need three.
- Raising channel volume while forgetting the group is still very loud (or muted).
- Editing the amp in Maxx Control afterward — expect OUT OF SYNC.
5 - Projects
Create, open, save, export, and persist Maxx Remote projects — including offline planning and Docker volumes.
Goal / when to use
Manage the project file that holds your channels, groups, devices, inputs, views, and tuning. Use this when starting a job, moving between machines, or keeping a Docker server’s configuration safe.
Prerequisites
Create a new project
Desktop or browser splash
- Start Maxx Remote with no project loaded.
- Choose Start a new project.
- Enter a clear site name (for example
Museum-Floor2).

Use the application menu when available:
- New Project
- Load Project / Last Projects
- Save Project / Save Project As
- Close Project
Expected result
HOME shows the new project name; DEVICE / CHANNEL counts start empty.
Open / import an existing project
- On the splash screen, choose Import project archive to host, or
- Use the top-bar Import control to upload a project archive or partial JSON.
Expected result
HOME and list pages populate with the imported project.
Export / backup
- Use the top-bar Export control.
- Store the download with your site documentation.
Export before:
- Updating Maxx Remote
- Recreating a Docker container
- Handing the project to another engineer
Offline planning
You can design without amplifiers:
- Create channels and groups.
- Set volumes, EQ, delay, mute, speaker presets.
- Define INPUTS and roles (even if Dante is not online yet).
- On site, add devices and link.
Project settings stay in Maxx Remote until you link and sync to hardware.
Docker persistence
Warning
Without a mounted volume, deleting the container deletes the project. Prefer a Docker volume, and keep exports anyway.
Recommended pattern:
- Mount a volume (see Installation).
- Periodically Export from the UI as an off-host backup.
- When migrating hosts, import the archive into the new server.

HOME project card
On HOME you can:
- View / set the project NAME
- See overall STATUS for devices and linked channels
- Enable AUTO SYNC so Maxx Remote can push project data when differences are found
- Open REST-API Doc for integrators
Details: GUI · HOME.
Expected result
You can create, reopen, and back up a project, and you know how Docker storage differs from Desktop files.
Common mistakes
Common mistakes
- Working for days on Docker with no volume and no export.
- Overwriting a live project import without a backup export.
- Assuming Desktop “Save” and Server “Export” are the same workflow — Server projects live on the host; use Import/Export (and volumes) deliberately.
6 - Build a system
Commission a Maxx Remote system: create channels and groups, link amplifiers, route Dante inputs, and tune volume, EQ, and delay.
Goal / when to use
Use this chapter after Quick-Start when you commission a real site: model speakers and rooms, connect amplifiers, bring in program sources, then tune.
For multi-way cabinets, surround, and speaker presets, see Advanced.
6.1 - Channels and groups
Create project channels (speakers) and groups (rooms), and map them together.
Goal / when to use
Build the logical system: one channel per speaker (or multi-way cabinet), and groups for rooms, zones, or show control.
Prerequisites
- Open project (Projects)
- Optional: sketch which speakers belong to which rooms
Create channels
- Open CHANNELS → MAP | CREATE.
- Click + CHANNEL.
- Set how many channels to add and name them (for example
Lobby Left, Lobby Right). - Click CREATE CHANNELS.
For multi-way cabinets (one channel object with Low/Mid/High ways), enable MULTI-WAY MODE — see Multi-way channels.
Expected result
Channels appear in the CHANNELS list with empty LINKED TO until devices are linked.
Create groups
- In MAP | CREATE, click + GROUP.
- Name the group after the room or zone (for example
Foyer, Hall A). - Create the group.
Expected result
The group appears in GROUPS and in the mapping lists.
Map channels into groups
- Stay in CHANNEL | GROUP MAPPING (MAP | CREATE).
- Select one or more channels.
- Drag them onto a group, or click MAP.
- Use UNMAP when a speaker should leave a room.
- Filters MAPPED ONLY / UNMAPPED ONLY help large projects.
Hint
One channel may belong to several groups (for example room group + “All Subs” group). Remember that group values sum with the channel (Concept).
Expected result
Groups show their member channels; CHANNELS can show group membership.
Choose what a group can control
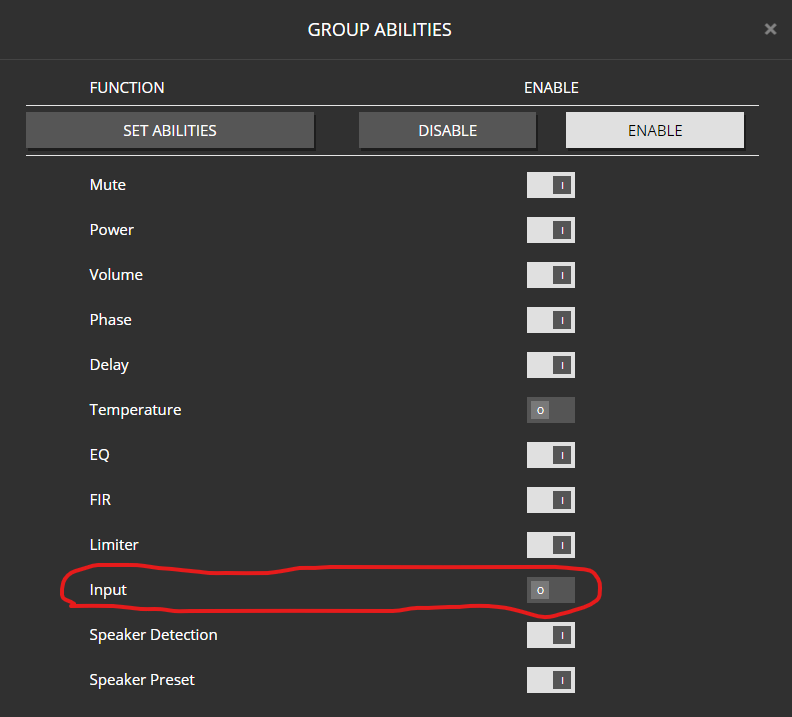
On a group’s edit dialog, GROUP ABILITIES decide which controls the group exposes (Mute, Volume, EQ, Input, Speaker Preset, and more). Turn off abilities you do not want operators to touch at group level.
Expected result
GROUPS overview and edit tabs match the abilities you enabled.
Set each channel’s ROLE (Left, Right, Mono, Center, LFE, surrounds, …) so group INPUT assignment routes the correct Dante legs. Details: Inputs and routing, Surround.
Common mistakes
Common mistakes
- Creating one channel per amp output “just because,” then drowning in unused strips — create channels for speakers you care about.
- Putting the same channel in two groups that both apply large EQ/volume — outputs stack.
- Naming channels after amp slots (
CH12) instead of room positions — harder later when you re-link.
6.2 - Devices and linking
Add amplifiers to the project and link project channels to physical outputs.
Goal / when to use
Connect real amplifiers and map each project channel (speaker) to the correct HW channel (amp output).
Prerequisites
Add a device
- Open DEVICES → ADD DEVICE.
- Choose:
- ADD FROM NETWORK — select discovered units (SCAN NETWORK as needed)
- ADD MANUALLY — model + hostname (and IP when known)
- Decide whether to CONNECT AFTER ADDING.
- Only enable CREATE CHANNELS if you want Maxx Remote to auto-create a project channel per amp output. For planned systems, leave this off.
- Confirm ADD / ADD SELECTED.

Expected result
The device row appears with STATUS updating as Maxx Remote connects. CONNECT can pause network activity.

Link project channels to HW channels
On the device row, open LINK CHs.
Select a project channel and a free HW channel.
Use IDENTIFY on the HW side to play a test tone and confirm the speaker.

LINK (or drag and drop).

Repeat for all speakers.
Reorder / swap by dragging HW channels between slots.
Expected result
CHANNELS LINKED TO shows the amp/output; identify matches the physical position.
Multi-way and speaker devices
Multi-way channels need several HW channels (or a speaker-style device) linked together. See Multi-way channels.
Replace a device
Typical sequence:
- Export the project (Projects).
- On the old device row, note hostname / links (or leave links and remove carefully).
- Add the replacement amplifier (same model when possible).
- Re-link project channels to the new HW channels (IDENTIFY again).
- Use SYNC if STATUS shows differences (Troubleshoot).
Optional delete dialog may offer to remove linked project channels — usually keep project channels and only remove the device.
Device row actions worth knowing
| Control | Purpose |
|---|
| STATUS | Connection / health |
| SYNC | Resolve project vs device differences |
| IDENTIFY | Visual / audible identify on the amp |
| CONNECT | Enable or pause control connection |
| LINK CHs | Open the linker |
| SETTINGS / REMOVE | Device config or remove from project |
| REBOOT DEVICE | Reboot from Maxx Remote when available |
Common mistakes
Common mistakes
- Linking without IDENTIFY — wrong speaker, wrong EQ forever.
- Auto-creating 32 project channels you never use.
- Relying on discovery across routers — enter IP for fixed installs.
- Removing a device and accidentally deleting the project channels you still need.
6.3 - Inputs and routing
Create Dante input sources, assign them to groups, and set channel roles.
Goal / when to use
Bring program audio into Maxx Remote so groups and channels receive the correct Dante (or related) streams.
Prerequisites
- Groups with Input ability enabled
- Channel ROLE planned (Left / Right / Mono / surround roles)
- Dante Controller available to read TX names
- See also Surround input sources for 5.1 / 7.1
- Open INPUTS → + INPUT SOURCE.
- Fill in:
- SOURCE LABEL — friendly name in Maxx Remote
- RECEIVE HOSTNAME — Dante device hostname
- RECEIVE LABEL — transmit channel name
- For stereo / surround sources, add each leg as required by the source type.
- Save with CREATE SOURCE.
Example TX naming in Dante Controller: 01@STEFFEN-PC.


Optional tools on INPUTS: DANTE DISCOVERY, volume offset / mute on the source, CSV import/export for large lists.
Expected result
The source appears in INPUTS and can be selected on groups.
Assign a source to a group
- Open GROUPS → select the group.
- Open INPUT and choose the source.
- Confirm the group output / channel setup (Stereo, 2.1, 5.1, …) matches the speakers in that room.

Expected result
Member channels receive streams according to their ROLE and the active crossmix strategy.
Set channel roles
- Open CHANNELS (or the channel edit dialog).
- Set ROLE to LEFT, RIGHT, MONO, or a surround role.
- NONE means this channel will not take INPUT SOURCE streams.

Note
MONO typically combines the available legs (downmix). That is correct for many subs; wrong for a dedicated Left speaker.
Expected result
Left hears left, Right hears right; Dante Controller shows dynamic subscriptions (often D:).

Review the signal path
Use SIG-PATH to see source → group → channel → device at a glance, and to run TEST / identify from that view. See GUI · SIG-PATH.
Common mistakes
Common mistakes
- Wrong hostname / TX label — silent channels.
- Group Input ability disabled — INPUT and setup controls hidden.
- Stereo music on a group with all roles still MONO.
- Expecting Maxx Remote to invent Dante TX names — copy them from Dante Controller.
6.4 - Tuning
Set volume, mute, EQ, delay, and phase on channels and groups.
Goal / when to use
Dial in levels and DSP after speakers are linked. Prefer group moves for room-wide changes and channel moves for speaker-specific trim.
Prerequisites
- Channels mapped to groups
- Devices linked if you want to hear results on hardware
- Understand summation (Concept)
Volume
Room (group)
- Open GROUPS.
- Click VOLUME for the room.
- Enter a value (for example
-20) → Enter / SET.

Speaker trim (channel)
- Open CHANNELS.
- Click VOLUME on the speaker.
- Enter an offset relative to the current summed output workflow you are using → SET.
Note
CHANNELS always shows the final output (channel + all groups). That is why a channel may already read −20 dB after a group change.
Mute and power
- Use group MUTE for room silence.
- Use channel MUTE for a single speaker.
- POWER controls (where available) can be driven from channel, group, or operator VIEW widgets.
EQ
- Open EQ from the channel or group row (EQ icon / edit dialog EQ tab).
- Drag filter types (PEQ, shelves, HP/LP, …) into the plot.
- Select a filter, set type (gear), frequency, gain, Q.
- On a channel, review the summed curve when groups also contribute EQ.


Delay and phase
- Open the channel or group edit dialog → DELAY / PHASE.
- Set delay for alignment; use phase invert when polarity must flip.
- Prefer group delay only when the whole room should shift together.
Advanced DSP (limiters, FIR, speaker detection, speaker presets) lives in the channel / group edit tabs (LIMIT, SPEAKER, …). For packaged speaker tunings see Speaker presets.
Bulk edits
On CHANNELS / GROUPS list pages, column headers such as VOLUME, MUTE, DELAY, PHASE open editors that can apply to the current selection — useful for many identical fills.
Undo / redo
Maxx Remote supports undo/redo for project edits — use it while tuning instead of guessing previous values.
Expected result
Rooms sit at safe levels; individual speakers are trimmed; EQ/delay match the design intent; CHANNELS output values match what you hear.
Common mistakes
Common mistakes
- Turning channel volume up to “fix” a group that is muted.
- Building the same EQ twice (channel + group) without noticing summation.
- Tuning in Maxx Control in parallel — creates Out of Sync.
- Forgetting IDENTIFY before applying aggressive EQ to the wrong linked output.
7 - Everyday control
Operate rooms and speakers day to day — groups vs channels, meters, status, and VIEW pages.
Goal / when to use
Run the finished system: change room levels, mute zones, watch meters/status, and hand simple control to operators via VIEW.
Prerequisites
Group vs channel — which control?
| You want to… | Prefer |
|---|
| Change whole room level / mute | GROUPS |
| Trim one speaker | CHANNELS |
| Change program source for a room | GROUPS → INPUT |
| Give a receptionist a simple panel | VIEW (operator link) |
Remember: group and channel values add. CHANNELS shows the output result.
Typical operator moves
Set room volume
- Open GROUPS.
- Set VOLUME (or use a VIEW volume widget).
- Confirm meters move on member channels.
Mute a room
- GROUPS → MUTE on, or VIEW mute control.
- Confirm CHANNELS / SIG-PATH reflect mute.
Check health
- HOME — project / device / linked-channel status cards.
- DEVICES — STATUS, CONNECT, SYNC.
- CHANNELS — LEVEL and STATUS columns.
- LOG — export or filter if something failed.
- Floating OUT OF SYNC — resolve before a show (Troubleshoot).
Operator VIEW pages
- Open VIEW (view manager).
- Create a page with + VIEW.
- Add objects: group volume/mute, channels, level meters, images, links to other views.
- SAVE VIEW.
- Copy the operator Link (fullscreen page without editor chrome).
- Open that URL on a tablet or control PC.
Details: GUI · VIEW and View API.
Expected result
Operators adjust the intended rooms without accessing CHANNELS / DEVICES commissioning screens.
Snapshots (groups)
Where available, group SNAPSHOTS store and recall sets of group-related settings for scene changes. Use them for rehearsed level/EQ scenes — not as a substitute for project export.
Expected result
Day-to-day control happens mostly from GROUPS and VIEW; CHANNELS is for trim and diagnosis; OUT OF SYNC stays clear.
Common mistakes
Common mistakes
- Letting operators work in CHANNELS and stack accidental trims.
- Sharing the full Maxx Remote UI instead of a VIEW link.
- Ignoring OUT OF SYNC until audio “sounds wrong.”
- Editing amps in Maxx Control during a show.
8 - Advanced
Maxx Remote advanced features: multi-way speaker channels, surround / crossmix layouts, and reusable speaker presets.
Goal / when to use
Use these Maxx Remote topics after the basic stereo / mono workflow is solid.
8.1 - Multi-way channels
Represent one loudspeaker cabinet as a single channel with 2 / 3 / 4 amp ways.
Goal / when to use
Use a multi-way channel when one physical speaker cabinet needs several amplifier outputs (for example low / mid / high). You still control the cabinet as one channel, while each way holds driver-specific DSP.
Prerequisites
Create multi-way channels
- Open CHANNELS → MAP | CREATE → + CHANNEL.
- Enable MULTI-WAY MODE.
- Set NR OF WAYS to 2, 3, or 4.
- Name the parent channels and click CREATE CHANNELS.
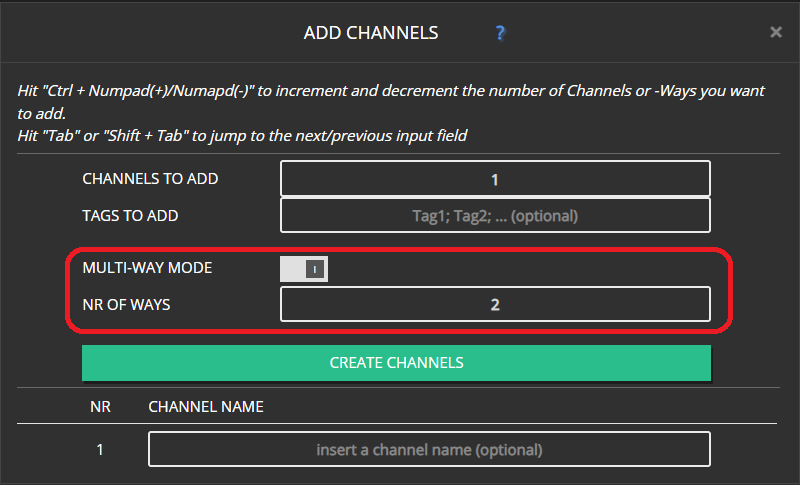
Expected result
Each new channel is a parent cabinet with fixed child ways (not separately deletable).
Convert an existing channel
- Open the channel edit dialog → MAIN.
- Enable multi-way (or change way count) and confirm the popup.
- You can pre-set the way count before enabling.
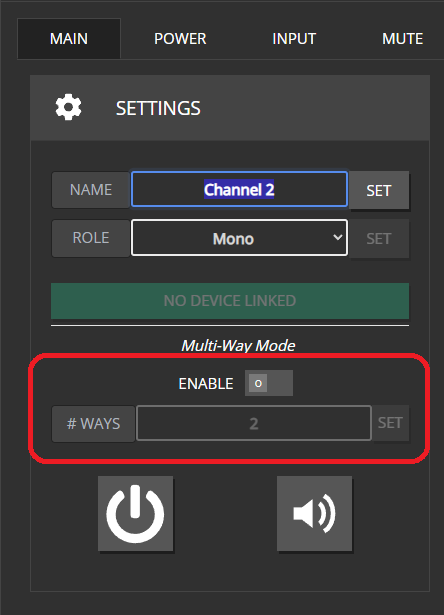
You cannot change multi-way configuration while the channel is linked to a device. Unlink first.
Note
Ways are always tied to their parent. They disappear only when you delete the parent, disable multi-way, or reduce the way count.
Naming
Ways are named from the parent plus a role:
| Ways | Roles |
|---|
| 2 | Low, High |
| 3 | Low, Mid, High |
| 4 | Sub, Low, Mid, High |
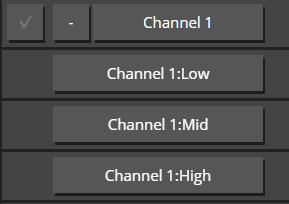
Link multi-way channels
Linking is like normal channels, with a few extras:
Open DEVICES → LINK CHs.
Multi-way parents show their way count.

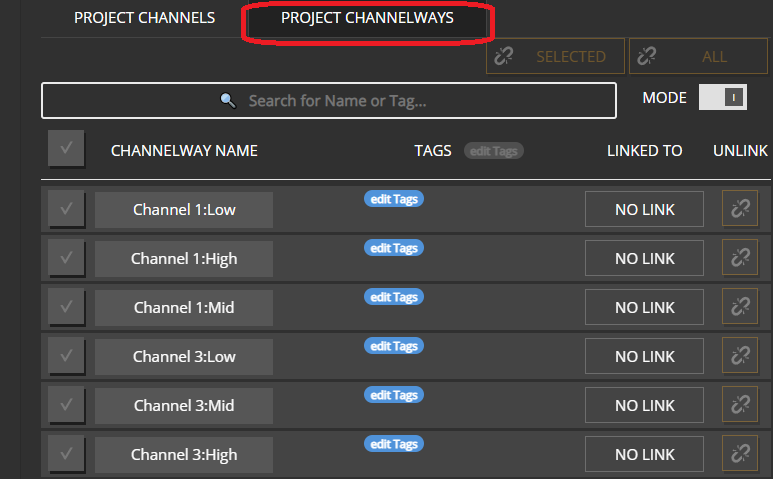
Use the PROJECT CHANNELWAYS tab to link individual ways (different amps or non-default order).
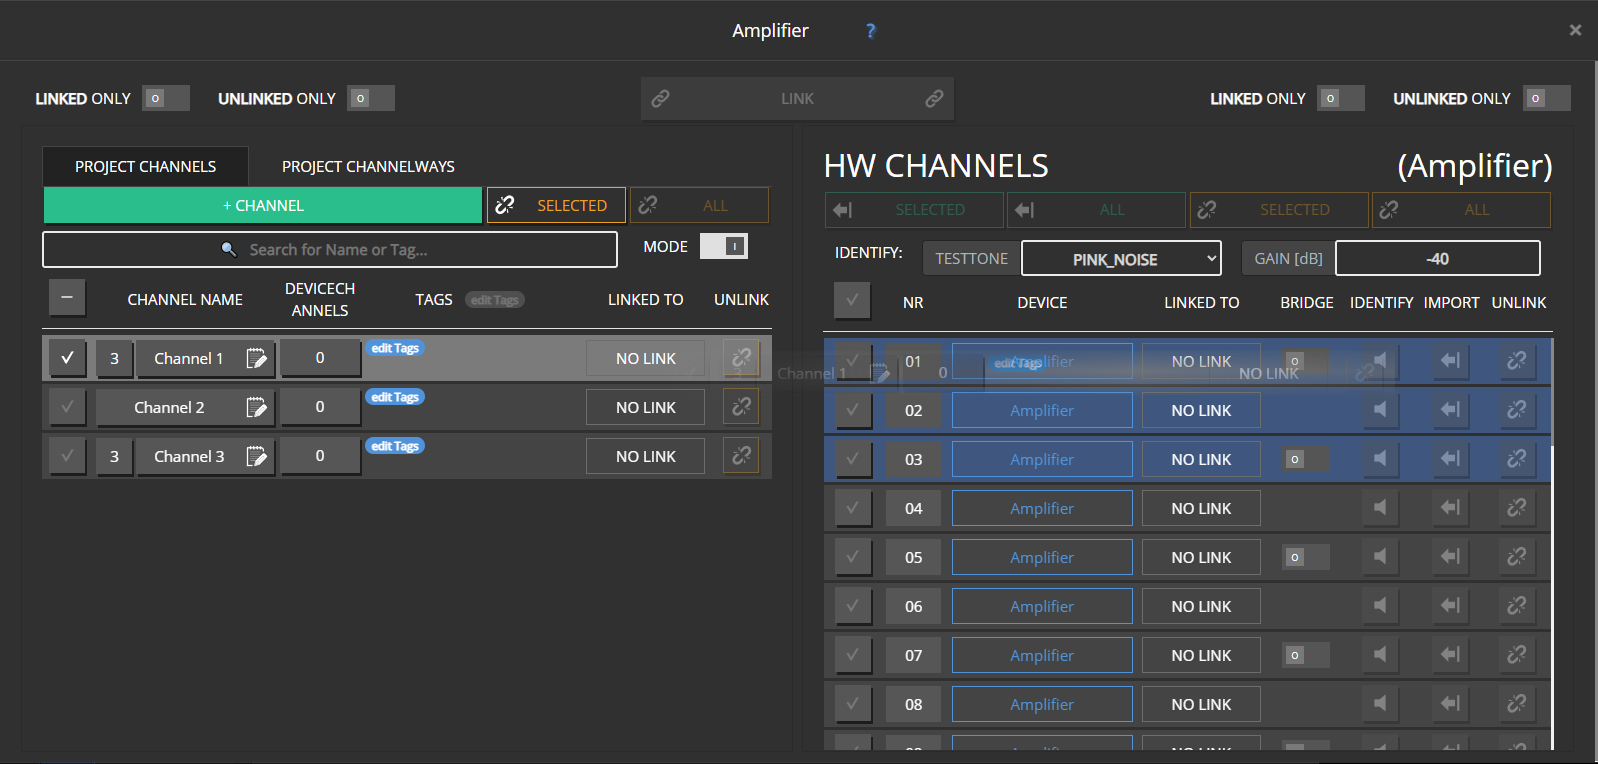
On the PROJECT CHANNELS tab, select the matching number of device channels before LINK unlocks (3-way → 3 HW channels).
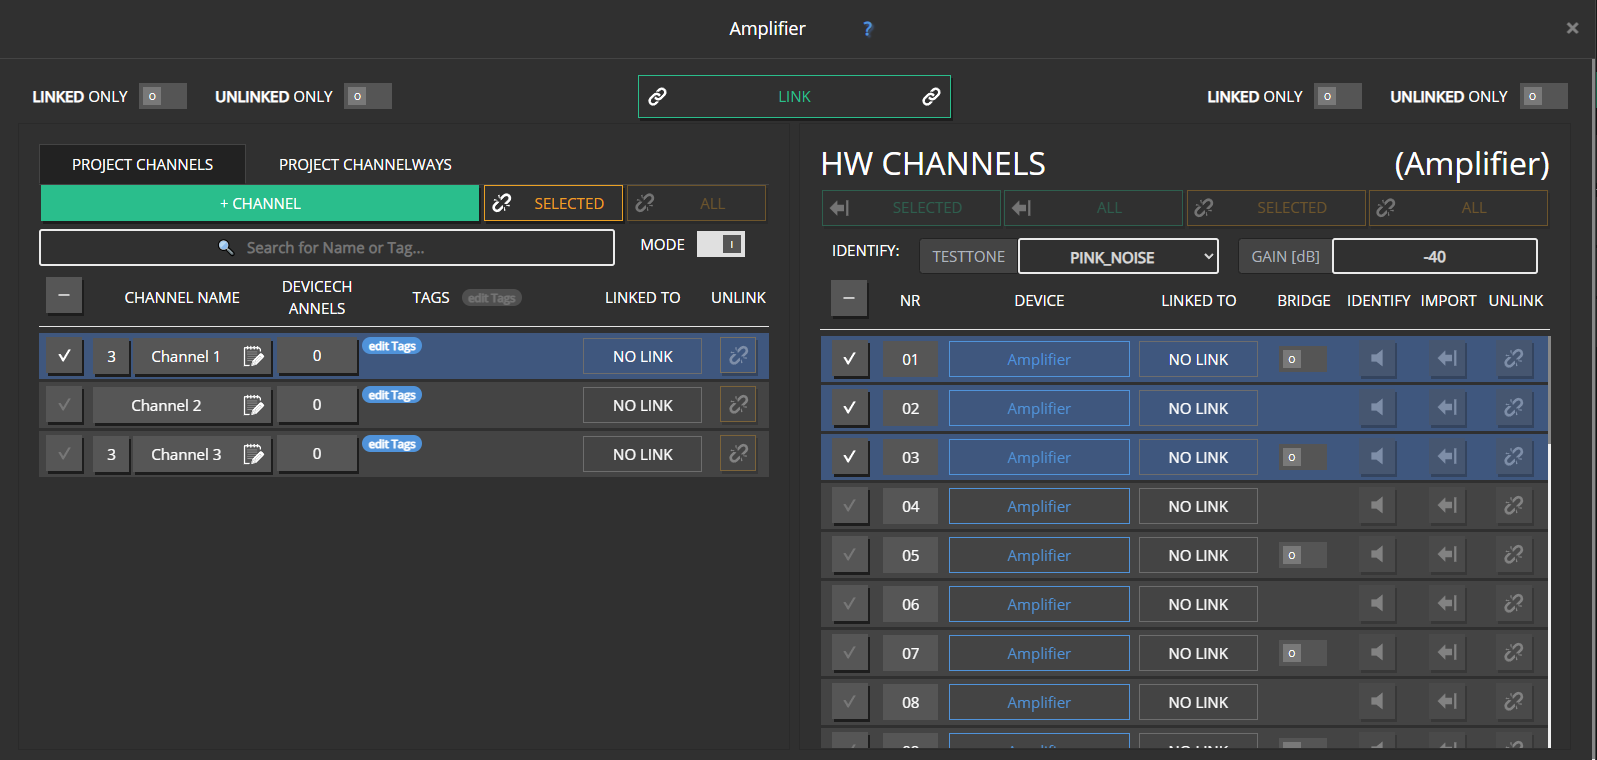
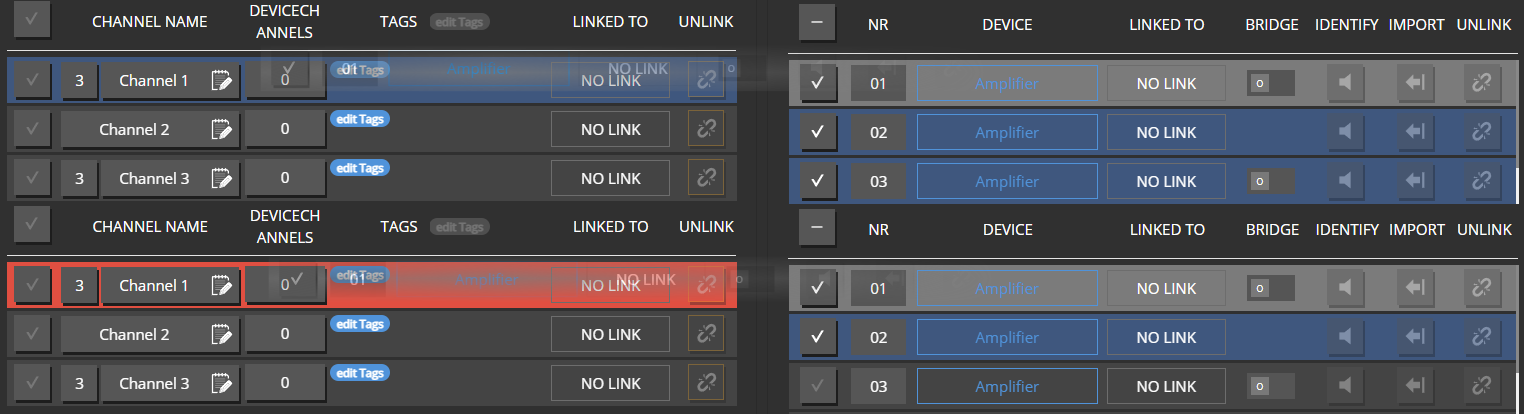
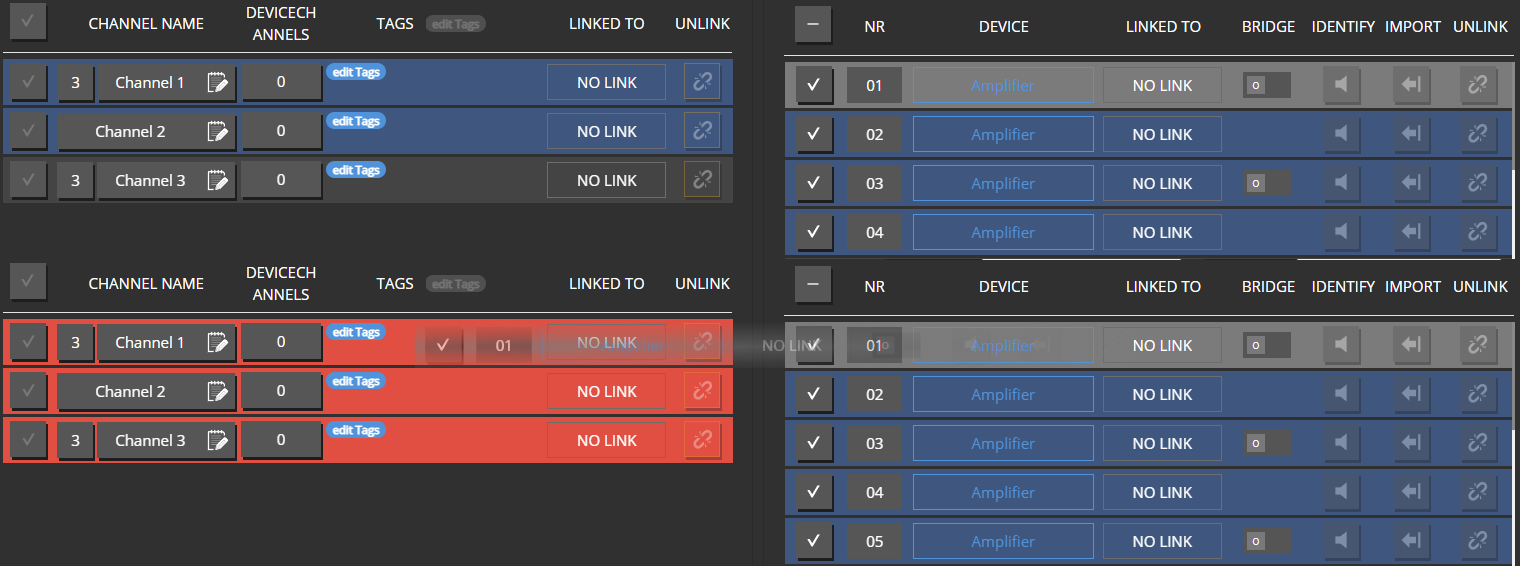
Drag and drop rules
Dragging a multi-way parent highlights the matching number of HW channels.
Dragging HW channels onto a parent requires the same count.
Extra HW channels continue to the next project channel in line.
Whole-cabinet links assign HW channels low → high in list order.

Changing way count on an already linked channel is blocked on purpose — it would leave orphan ways or outputs. Unlink, reconfigure, then link again. Use the CHANNELWAYS tab when ways must land on different devices.
Speaker-style devices
Some amplifiers present as a single “speaker” device with a fixed internal way layout. For those:
- Link a matching multi-way parent as a whole — not individual ways.
- The linker filters to parents with the correct way count (shown next to the device name).
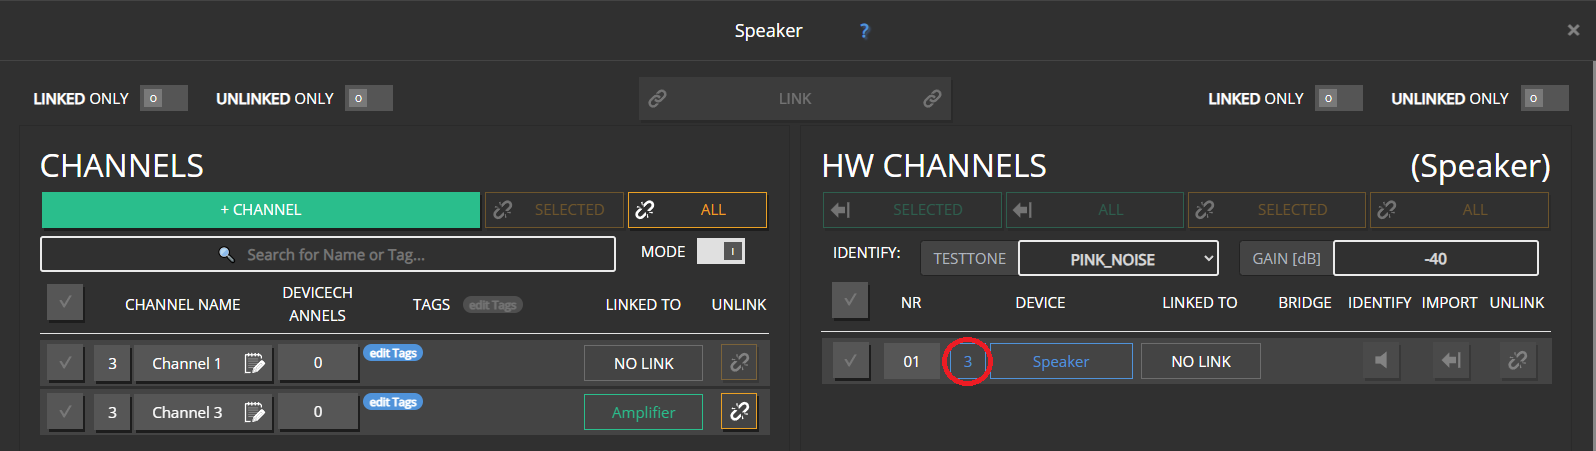
How settings combine
Parent settings and way settings combine much like group + channel. For limited DSP resources (EQ, FIR, limiters, speaker detection), a way’s own settings take precedence when the hardware cannot hold everything. Parent values may already include group contributions.
UI differences
CHANNELS overview
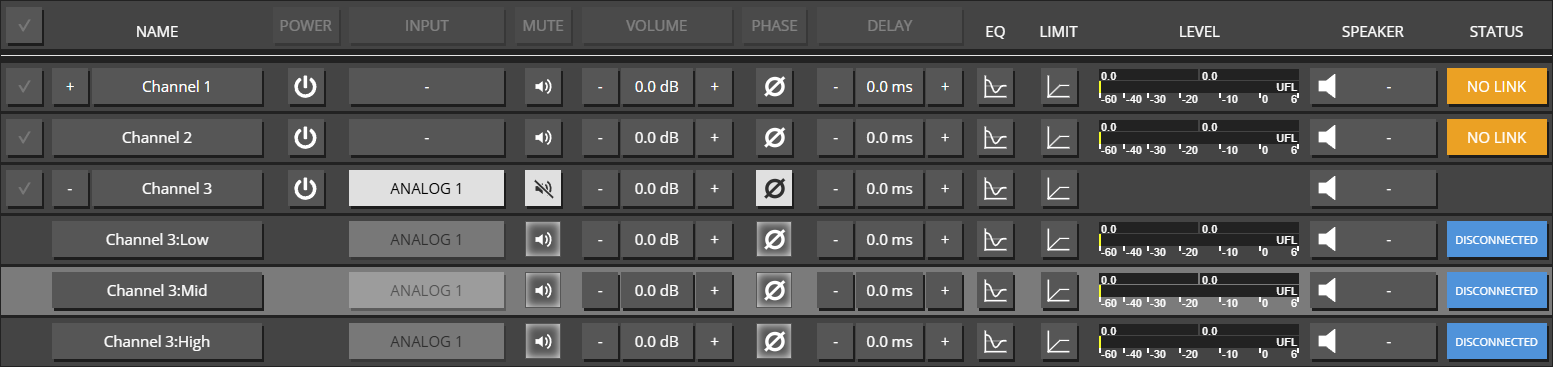
- Ways are not multi-selected for bulk edits — edit the parent for “whole cabinet” changes.
- Ways have no separate power control; INPUT on ways is read-only (inherited).
- Parent level meter shows the combined level of its ways; STATUS combines way status.
Edit dialogs
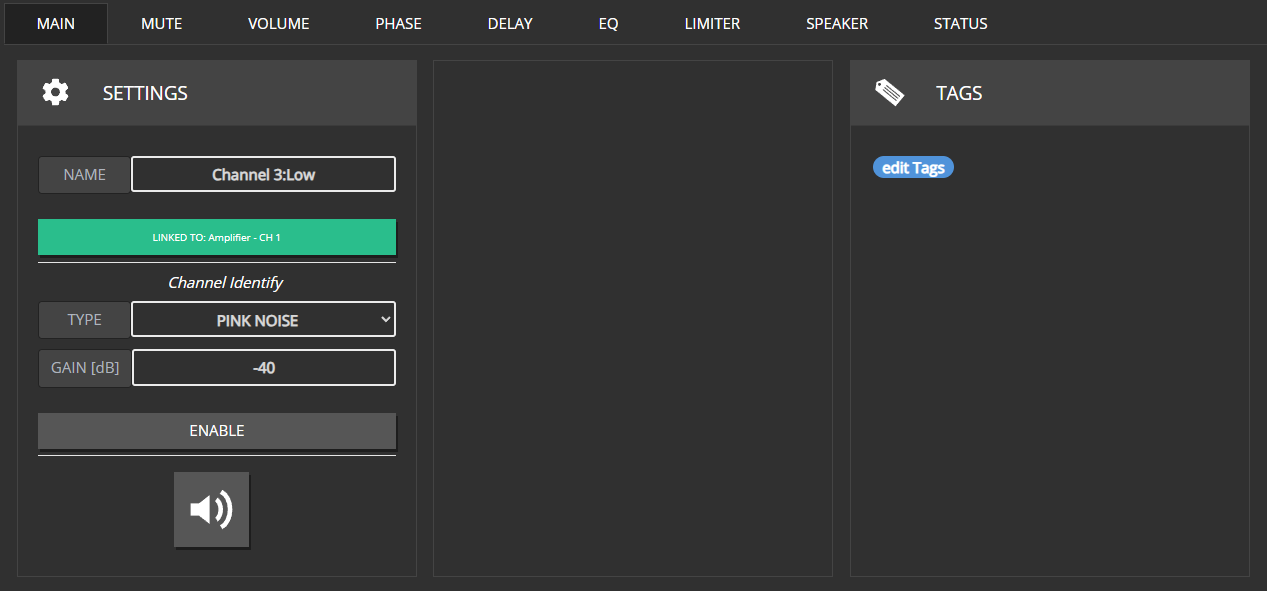
- Way editor: no Power / Input tabs; name read-only; no channel role / multi-way section.
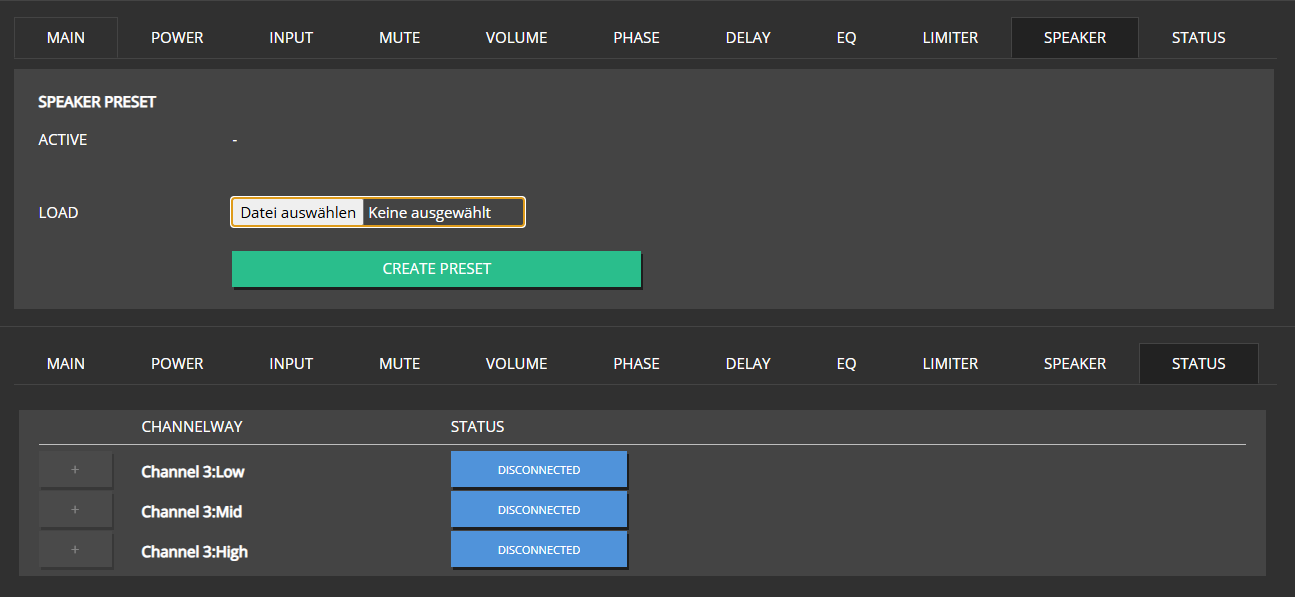
- Parent SPEAKER tab: no one-shot speaker detection (set per way).
- Parent STATUS lists way status (similar to groups listing members).
Common mistakes
Common mistakes
- Trying to rename or delete a single way — only the parent is editable that way.
- Linking three HW channels out of order without using the CHANNELWAYS tab.
- Applying a 2-way speaker preset to a 3-way parent (Speaker presets).
8.2 - Surround input sources
5.1 / 7.1 roles, group output setups, and crossmix strategies in Maxx Remote.
Goal / when to use
Route surround program (5.1 / 7.1 and related) into rooms when the speaker layout and the source layout are not always identical. For basic stereo INPUTS, start with Inputs and routing or Quick-Start.
Prerequisites
- Groups with Input ability enabled
- Channels created and given surround ROLEs
- Dante TX labels known for every surround leg
Surround channel names in Maxx Remote
Naming varies across the industry. Maxx Remote uses:
5.1

- Center (C)
- Left (L)
- Right (R)
- Left Surround (Ls)
- Right Surround (Rs)
- Low Frequency Effect (LFE)
7.1

- Center (C)
- Left (L)
- Right (R)
- Left Surround (Ls)
- Right Surround (Rs)
- Back Surround Left (Bsl)
- Back Surround Right (Bsr)
- Low Frequency Effect (LFE)
Note
LFE speaker position is not fixed in every room — place it as your design requires.
Same workflow as stereo INPUTS, with more RECEIVE LABEL entries — one per surround leg. See Quick-Start · inputs.
Channel roles
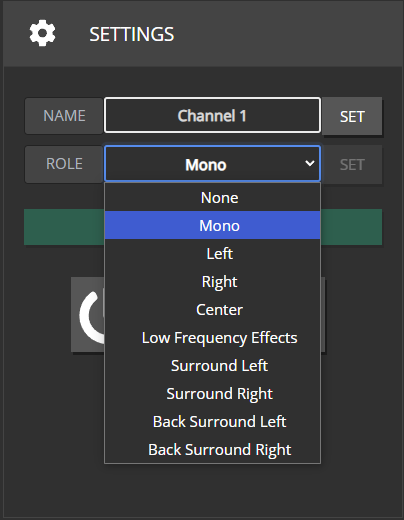
Assign each speaker channel a role. NONE receives no INPUT SOURCE streams. MONO usually receives a combination of legs (see crossmix).
Group output / channel setup
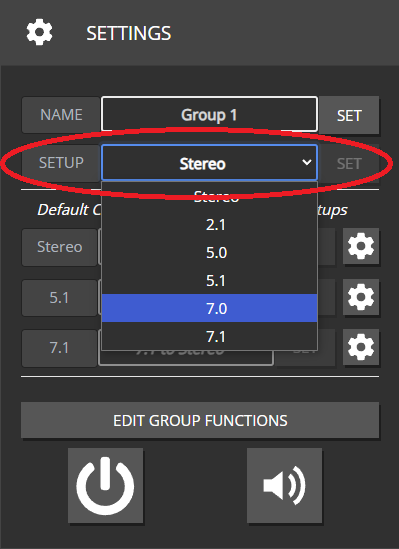
On GROUPS, set output / channel setup to match the room (Stereo, 2.1, 5.0, 5.1, 7.0, 7.1, …). Every role in that setup should exist on at least one mapped channel.
Missing or extra roles do not always hard-error — you may simply get silent speakers or unused streams.
Roles included in each output setup
Stereo: L, R
2.1: L, R, LFE
5.0: C, L, R, Ls, Rs
5.1: C, L, R, Ls, Rs, LFE
7.0: C, L, R, Ls, Rs, Bsl, Bsr
7.1: C, L, R, Ls, Rs, Bsl, Bsr, LFE
Disabling the group Input ability hides output-setup and crossmix controls.
Crossmix (upmix / downmix)
What it is
When the INPUT SOURCE layout and the group speaker layout differ, Maxx Remote needs a matrix that maps input legs to output roles. Downmix and upmix are both handled as CROSSMIX strategies.
Crossmix page
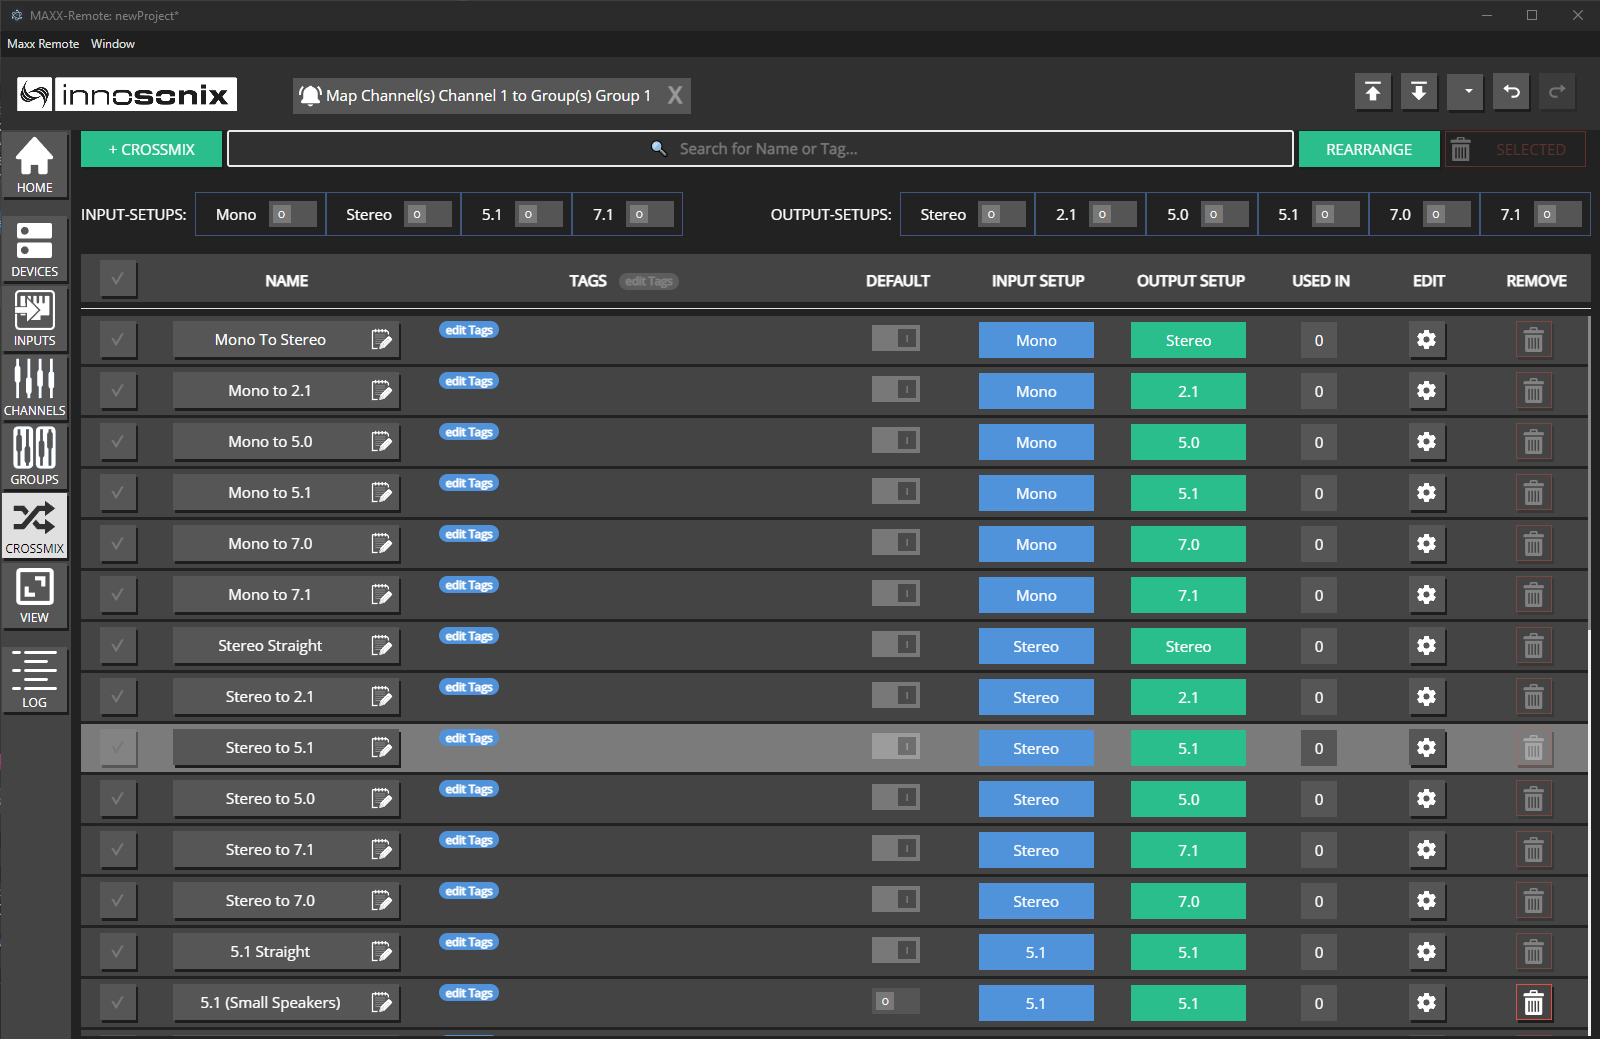
- Open CROSSMIX.
- Review built-in strategies for each in/out pair; edit or add your own (+ CROSSMIX).
- Filter by input / output setup when the list is long.

Note
Pre-defined strategies are editable (and deletable) — but a combination must always keep one global default.
Assignment priority (highest wins)
- INPUT SOURCE + GROUP specific strategy
- GROUP strategy for an input setup
- Global default for that in/out pair
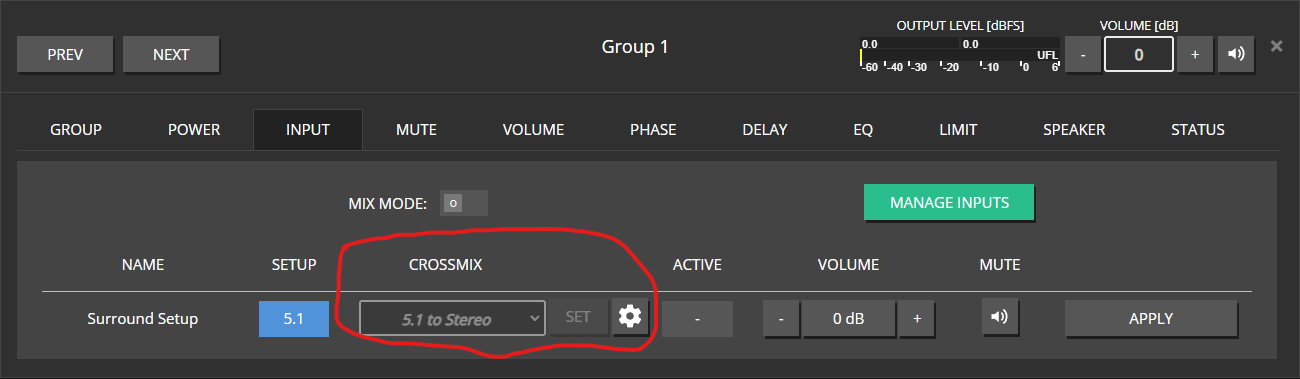
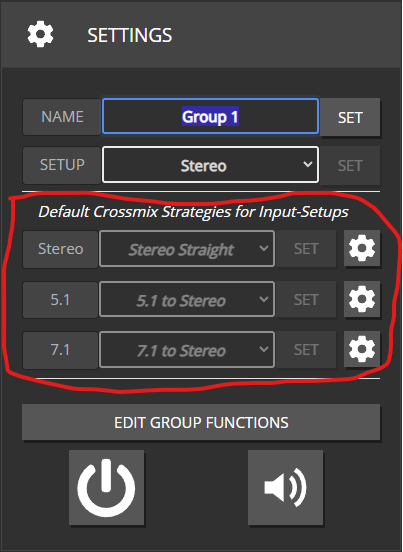

Maxx Remote always picks a strategy (even for exact matches) by checking from highest priority to lowest. Gear icons open the editor for the selected / effective strategy.
Add / edit a crossmix
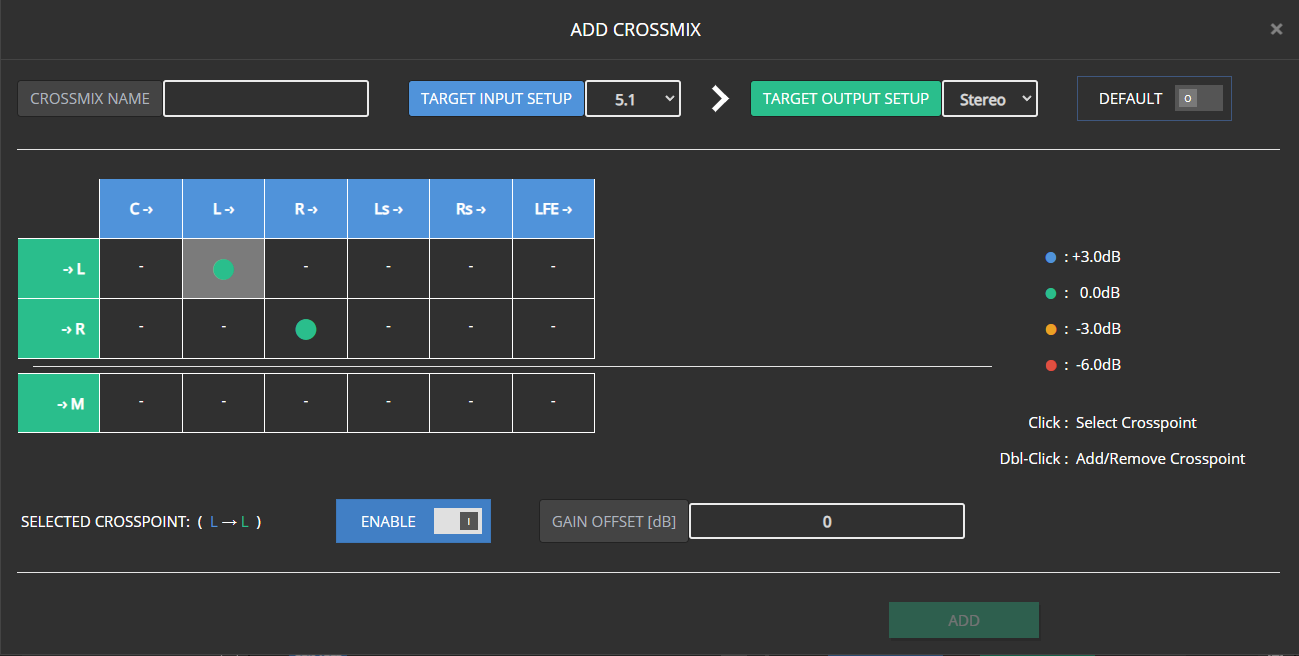
Rows = output roles, columns = input legs.
Enable crosspoints (double-click, or select + Enable).
Set Gain Offset on active points (common 0 / ±3 / −6 values are color-coded).
Name the strategy to unlock Add; use Save or Save As New when editing.

Mark Default only when this should become the global fallback for that in/out pair.
You cannot change in/out setup on the current global default (would remove the fallback). Non-defaults can change freely.


Changing setup on a strategy that was assigned to a group/input clears that assignment; Maxx Remote falls back to the next strategy in the chain.
Note
Crossmix is why each input-capable group needs an output setup. Without it, Maxx Remote cannot decide whether a Left channel should get only L or a surround-to-stereo downmix.
Expected result
Surround legs land on the intended speakers; intentional up/downmix uses the strategy you selected; Dante shows the resulting subscriptions.
Common mistakes
Common mistakes
- 5.1 source into a stereo group with no reviewed downmix.
- Forgetting LFE / Center roles in the room.
- Trying to delete the only global default crossmix for a pair.
- Disabling group Input ability and wondering where setup controls went.
8.3 - Speaker presets
Create, protect, and apply speaker presets for single- and multi-way channels.
Goal / when to use
Package a finished speaker tuning so you can reuse it on other channels or jobs. From Maxx Remote 1.13.0, presets are created and edited in Maxx Remote (not only on the amplifier).
For multi-way cabinets, read Multi-way channels first.
Prerequisites
- Channel (or multi-way parent) tuned the way you want
- Matching way count on any target channel that will load the preset
What a preset stores
Typical fields included:
- Volume
- Phase invert
- Delay
- EQ
- FIR
- Limiters
Create a preset
- Finish tuning on a regular or multi-way channel.
- Open the channel edit dialog → SPEAKER tab (use the parent for multi-way).
- Click CREATE PRESET.
- Enter metadata. Optionally set a password so only authorized users can edit later.
- Confirm creation / export as needed (
.spkr files).
Note
Presets are encrypted/encoded. Settings are not readable as plain text in exported files or project storage.
Expected result
You have a reusable speaker preset file / project preset you can apply elsewhere.
Edit a preset
- Apply the preset to a channel (or open a channel that already has it).
- SPEAKER tab → EDIT (enter password if prompted).
- The UI focuses on the preset editor channel(s).
- Change DSP, then SAVE or SAVE AS NEW / abort as offered.
Each edit increments an internal revision so two files with the same name/id can be compared for which is newer when exporting.
Apply a preset
- Open the target channel or group → SPEAKER.
- Use Select file (or the preset picker) and choose a
.spkr file. - Confirm the way configuration matches (2-way preset → 2-way channel only).
Groups
- Mapped channels inherit a group’s speaker preset unless the channel already has its own.
- If several groups provide presets, the channel uses the preset from the group that was mapped first — avoid stacking conflicting group presets.
- Way-count mismatches on some members are skipped for those members.
Expected result
Target channels show the preset on the SPEAKER tab; amp output follows after link/sync.
Legacy .speaker presets
Presets created on MAXX devices (.speaker) still load, but:
- They are not editable in Maxx Remote
- New
.spkr presets take precedence; applying a new preset removes the legacy one - A channel prefers a new preset (even from a group) over a legacy preset on the channel itself
Common mistakes
Common mistakes
- Loading a 3-way preset onto a single-way channel.
- Password-protecting a preset and losing the password — editing stays locked.
- Assigning different speaker presets on overlapping groups for the same channels.
9 - Troubleshoot
Fix Out of Sync, discovery, Dante routing, and device replacement issues.
Goal / when to use
Something does not connect, discover, sync, or route audio. Work through the matching section below.
Out of Sync
Symptoms
- Floating OUT OF SYNC alert in the UI
- Device SYNC indicator not clean
- Levels or EQ on the amp do not match Maxx Remote
Why it happens
Maxx Remote owns linked channels (Remote → device). Edits in Maxx Control, front-panel/other tools, or failed partial writes create differences. Maxx Remote detects them on periodic check-in.
Steps
- Click OUT OF SYNC (or device SYNC).
- Review which parameters differ.
- Choose direction carefully — normal recovery is APP → DEVICE (project wins).
- Use SYNC DEVICE / SYNC EVERYTHING as offered.
- Optional: enable HOME AUTO SYNC so future mismatches are pushed from the project automatically.
Expected result
Sync UI clears; amp matches the project.
Important
Do not “fix” sync by randomly editing both Maxx Control and Maxx Remote. Pick Maxx Remote as source of truth for linked systems.
Device not discovered
Symptoms
ADD FROM NETWORK is empty; UI may warn that discovery on UDP 9453 is unavailable.
Steps
- Confirm the amp appears in IDFM (discover) on the same PC/network.
- Check PC and amp are on a discovery-friendly segment (broadcast does not cross routers).
- Docker: use
--network host — publishing UDP 9453 with -p is not enough for broadcast discovery. See Installation. - Select the correct NETWORK INTERFACES / RECEIVE DISCOVERY options if shown.
- Fall back to ADD MANUALLY with hostname + IP.
Expected result
Device listed, or manually added and CONNECT goes online.
Dante TX sources missing in Maxx Remote
Symptoms
INPUTS / Dante discovery shows no (or stale) transmit channels, while Dante Controller on another PC may still see them.
Steps
- Confirm Maxx Remote can join the Dante control network (same L2 segment as the devices).
- Docker: use
--network host. Dante discovery needs mDNS (224.0.0.251:5353) plus multicast 224.0.0.231:8702 and 224.0.0.233:8708 — bridge -p mappings do not deliver that reliably. - Check host firewall allows those UDP multicast joins / inbound packets.
- As a workaround, read Transmit Channel@Hostname from Dante Controller and enter the INPUT SOURCE manually.
Expected result
TX channels appear for assignment, or you can enter them from Dante Controller.
Device connected but offline / errors
- DEVICES → STATUS column and CONNECT switch.
- Ping / browser-check the amp IP; re-run IDFM if IP changed.
- LOG → filter errors, Export Log if you need support.
- Try IDENTIFY / REBOOT DEVICE when safe.
- Re-link channels if the amp was replaced.
- Confirm TX hostname and label in Dante Controller match the INPUT SOURCE.
- Check channel ROLE (Left/Right vs Mono).
- Confirm the group has Input ability and a source assigned.
- For surround mismatches, review crossmix and group output setup.
- Verify Dante and control networks are as designed (many sites separate them).
- Look for
D: subscriptions in Dante Controller after assignment.
Wrong speaker / wrong EQ after linking
- Open LINK CHs.
- IDENTIFY each HW channel.
- Unlink and re-link to the correct project channel.
- Re-apply or verify speaker preset if used.
Replace an amplifier
- Export the project.
- Add the new device; keep project channels.
- Link speakers again with IDENTIFY.
- SYNC project → device.
- Remove the old device when safe (do not delete project channels unless intended).
Common mistakes
Common mistakes
- Blaming Maxx Remote for discovery when IDFM also cannot see the amp.
- Recreating Docker without a volume after a “fix.”
- Syncing device → app accidentally and wiping intentional project tuning.
- Leaving AUTO SYNC off and Maxx Control open on the same amps.
10 - GUI reference
Maxx Remote GUI reference — purpose and key actions for each screen (HOME, DEVICES, INPUTS, CHANNELS, GROUPS, CROSSMIX, SIG-PATH, VIEW, LOG).
Goal / when to use
Use this section as a Maxx Remote screen map: what each page is for, key actions, and links to task guides.
| Screen | Purpose |
|---|
| HOME | Project overview, status, API docs link |
| DEVICES | Amplifiers, connect, sync, link outputs |
| INPUTS | Dante / input sources |
| CHANNELS | Speakers / project channels |
| GROUPS | Rooms and zones |
| CROSSMIX | Surround / layout mix strategies |
| SIG-PATH | End-to-end signal routing view |
| VIEW | Operator pages |
| LOG | Application log / export |
Task-oriented docs start at Quick-Start and Build a system.
10.1 - HOME
Maxx Remote HOME screen — project overview, status cards, activity, and REST API docs link.
Purpose
Landing overview for the open project: health at a glance and entry points to docs / API.
Key actions
- Read PROJECT card — name, status, AUTO SYNC.
- Rename the project (NAME / SET) when needed.
- Check DEVICES counts and status.
- Check CHANNELS counts and linked-channel status.
- Review LAST ACTIVITIES (who changed what).
- Note APP-Version.
- Open REST-API Doc (same as
http://host:8000/api-docs/).
When to use
- Start of a session: is everything online?
- Enable AUTO SYNC after commissioning.
- Hand integrators the OpenAPI link.
10.2 - DEVICES
Add amplifiers, connect, identify, sync, and link hardware channels.
Purpose
Manage every amplifier in the project and map physical outputs to project channels.
Key actions
- ADD DEVICE — from network scan or manually (model, hostname, IP).
- Choose network interface / SCAN NETWORK when discovery is used.
- Toggle CONNECT per device.
- IDENTIFY the amplifier.
- Open LINK CHs to assign project channels ↔ HW channels.
- Run SYNC when project and device differ.
- Open device SETTINGS, COPY SETTINGS, or REBOOT DEVICE.
- REARRANGE list order; REMOVE devices (watch delete-linked-channels option).
10.3 - INPUTS
Create and manage input sources for groups (typically Dante TX labels).
Purpose
Define named INPUT SOURCES that groups can use for program audio.
Key actions
- + INPUT SOURCE — label, receive hostname, receive label(s).
- Edit source properties; set volume offset / mute when needed.
- Use DANTE DISCOVERY helpers if available.
- REARRANGE order; delete SELECTED / ALL.
- Import/export via CSV for large systems.
- Create/edit stream patches when the UI offers CREATE/EDIT STREAM.
10.4 - CHANNELS
Project channels — speakers, DSP, roles, and group membership.
Purpose
Work on individual speakers (project channels): levels, DSP, roles, linking status, and meters.
Key actions
- MAP | CREATE — add channels; open channel↔group mapping.
- Enable MULTI-WAY MODE when creating cabinets with multiple ways.
- Set ROLE for input routing (Left / Right / Mono / surround…).
- Edit DSP via row controls or dialog tabs: Volume, Mute, Phase, Delay, EQ, Limiter, Speaker, Input, Power, Status, …
- Read LEVEL / STATUS; remember values are final output (channel + groups).
- REARRANGE, CSV export/import, Copy Settings between channels.
- Jump to device linking from linked-channel indicators.
- Create / apply SPEAKER PRESET on the Speaker tab.
10.5 - GROUPS
Rooms and zones — grouped control of volume, mute, EQ, inputs, and more.
Purpose
Control many speakers as a room or zone. Group parameters sum with each member channel.
Key actions
- Create groups via MAP | CREATE → + GROUP.
- Map / unmap member channels.
- Configure GROUP ABILITIES (which controls the group exposes).
- Set VOLUME, MUTE, EQ, delay/phase as enabled.
- Assign INPUT sources and output/channel setup (stereo / surround).
- Select group-level CROSSMIX overrides when needed.
- Manage SNAPSHOTS for scene recalls.
- Apply group SPEAKER PRESET carefully (members inherit unless overridden).
10.6 - CROSSMIX
Strategies that map input layouts to speaker layouts (upmix / downmix).
Purpose
Define and assign matrices that route INPUT SOURCE legs to group output roles when layouts differ (or even when they match).
Key actions
- Browse strategies; filter by input / output setup.
- + CROSSMIX to create a custom matrix.
- Edit crosspoints and gain offsets in the matrix editor.
- Mark a strategy as global default for an in/out pair (always keep one).
- Assign overrides on groups or group+input combinations (higher priority).
- REARRANGE / delete unused non-default strategies.
10.7 - SIG-PATH
Visual signal path from sources through groups and channels to devices.
Purpose
See how audio is supposed to flow: source → group → channel → device. Useful for verifying routing after INPUT changes.
Key actions
- Open SIG-PATH.
- Filter by SOURCE, GROUP, LINKED, UNLINKED.
- Inspect columns/tabs for group, channel, input, and device relationships.
- Use TEST / identify controls to confirm the physical path.
- Jump back to CHANNELS / GROUPS / DEVICES to fix anything wrong.
Standalone per-group URLs exist for integrators — see Group signal path API.
10.8 - VIEW
Build operator pages with meters and simple controls; share fullscreen links.
Purpose
Create simplified operator canvases (rooms, mute, volume, meters, images) without exposing the full commissioning UI.
Key actions
- + VIEW to create a page.
- Add objects: channel, group, level meter, mute, power, volume, device, group input, image, view link.
- Arrange with align / distribute / layer tools; optional snap-to-grid.
- MANAGE IMAGES for background / diagram assets.
- SAVE VIEW.
- Copy the operator Link for fullscreen use (
/view/...). - DELETE VIEW when obsolete; BACK TO LIST to manage many pages.
10.9 - LOG
Application log — search, filter, load history, and export for support.
Purpose
Inspect what Maxx Remote and connected clients recently did when diagnosing failures.
Key actions
- Open LOG.
- Search / filter; Apply / Reset.
- Load older entries when the issue is further back.
- Export Log for support tickets.
- Correlate with the navbar warning icon and OUT OF SYNC alerts.
11 - API
Integrator entry points for Maxx Remote — REST, operator VIEW, and signal-path URLs.
Maxx Remote exposes a few user-facing integration surfaces. This section stays thin on purpose: the live OpenAPI document on a running system is the contract for REST calls.
| Entry point | Typical use |
|---|
| REST API | Third-party control (media controllers, show control) |
| View API | Fullscreen operator pages at /view/ |
| Group signal path | Scoped SIG-PATH page for one group |
OpenAPI UI on a running host: http://localhost:8000/api-docs/ (also linked from HOME → REST-API Doc).
11.1 - REST API
HTTP API for controlling Maxx Remote from third-party systems.
Goal / when to use
Drive day-to-day control (levels, mutes, selections) from a media controller or similar. Prefer this over scraping the GUI.
Where is the full reference?
Each Maxx Remote instance ships OpenAPI docs:
That document is authoritative for paths, payloads, and versions.
Scope
Compared with Maxx Control’s device REST API, this API targets the Maxx Remote project/server — operator-oriented control of the system Maxx Remote manages, not low-level single-device setup.
11.2 - Maxx Remote View API
Maxx Remote View API: open a saved VIEW as a standalone operator web page at http://:8000/view/ (tablet / kiosk).
The Maxx Remote View API exposes a saved VIEW as a standalone operator page — without the Maxx Remote editor chrome. Operator URLs use the /view/ path (also called the View API).
What is the Maxx Remote View API?
Use it when you want tablets or dedicated operator PCs to show only the mute / volume / meter widgets you placed in VIEW, not the full project editor.
How do I open a VIEW operator page at /view/?
- In VIEW, create and SAVE a page.
- Copy the operator Link from the editor toolbox.
- Open URLs of the form:
http://<server>:8000/view/<view-name>
(Exact name encoding matches what the UI copies.)
Expected result
Fullscreen operator canvas with the mute / volume / meter widgets you placed.
11.3 - Group signal path
Maxx Remote group signal-path API — open the SIG-PATH view scoped to one group via URL.
Goal / when to use
Embed or bookmark a SIG-PATH page for one room/group — useful on a monitoring wall.
URL pattern
Groups are addressed by their internal id (UUID), for example:
http://<server>:8000/group-signal-path/<group-uuid>
Example:
http://localhost:8000/group-signal-path/36875a19-8203-4647-9760-303ffd3c8f8f
Obtain the group id from your project/export or integrator tooling — it is not the display name.